Quantcast
Channel: Magento – Inchoo
Viewing all 263 articles
Browse latest View live

Custom API for Magento 2

$
0
0

We have already went through on how to configure integration and utilize Magento apis. But let’s see how to make our own module with custom API calls.

Module Essentials

For a simpler start you should read the following article: “How to create a basic module in Magento 2” by Hrvoje Ivancic and make basic Magento 2 module. You would need only two things, module.xml and register.php for this example module. I would create module under Inchoo name space and call it Hello.

Module Configuration – etc/module.xml

<?xml version="1.0"?>
<config xmlns:xsi="http://www.w3.org/2001/XMLSchema-instance" xsi:noNamespaceSchemaLocation="urn:magento:framework:Module/etc/module.xsd">
    <module name="Inchoo_Hello" setup_version="1.0.0" />
</config>

Registration – registration.php

<?php
\Magento\Framework\Component\ComponentRegistrar::register(
    \Magento\Framework\Component\ComponentRegistrar::MODULE,
    'Inchoo_Hello',
    __DIR__
);

API configuration

There are two more additional configurations we need to add API capability to module, webapi.xml and di.xml. In webapi.xml we are configuring access rights and API Interface that specified method will use.

Web API configuration – etc/webapi.xml

<?xml version="1.0"?>
<routes xmlns:xsi="http://www.w3.org/2001/XMLSchema-instance" xsi:noNamespaceSchemaLocation="urn:magento:module:Magento_Webapi:etc/webapi.xsd">
    <route url="/V1/hello/name/:name" method="GET">
        <service class="Inchoo\Hello\Api\HelloInterface" method="name"/>
        <resources>
            <resource ref="anonymous"/>
        </resources>
    </route>
</routes>

Resource tag defines what resources user needs to have to be able to access this api call. Possible options are self, anonymous or Magento resource like Magento_Catalog::products or Magento_Customer::group. We will for now use anonymous so we can access it as a guest.

Define Interface – etc/di.xml

<?xml version="1.0"?>
<config xmlns:xsi="http://www.w3.org/2001/XMLSchema-instance" xsi:noNamespaceSchemaLocation="urn:magento:framework:ObjectManager/etc/config.xsd">
    <preference for="Inchoo\Hello\Api\HelloInterface"
                type="Inchoo\Hello\Model\Hello" />
</config>

In di.xml we define what model will interface call to. We also need to add Interface and Model, please note that you need to take care about comments also.

Interface – Api/HelloInterface.php

<?php
namespace Inchoo\Hello\Api;
 
interface HelloInterface
{
    /**
     * Returns greeting message to user
     *
     * @api
     * @param string $name Users name.
     * @return string Greeting message with users name.
     */
    public function name($name);
}


Model – Model/Hello.php

<?php
namespace Inchoo\Hello\Model;
use Inchoo\Hello\Api\HelloInterface;
 
class Hello implements HelloInterface
{
    /**
     * Returns greeting message to user
     *
     * @api
     * @param string $name Users name.
     * @return string Greeting message with users name.
     */
    public function name($name) {
        return "Hello, " . $name;
    }
}

Within model we add our functionality that will be executed by call to API method. In this case it will append Hello to name provided by call and return as string.

With all this your module should look like this:

file_tree


Communicating with new API call

Testing as guest

To test REST you can go to http://{domain_name}/rest/V1/{method}/{attribute}/{value}.

Example: http://magento2.loc/rest/V1/hello/name/Jim

This is how response should look like for this example:

<response>Hello, Jim</response>

Here is small code that will test same API call but with SOAP:

<?php
$proxy = new SoapClient('http://magento2.vm/index.php/soap/default?wsdl&services=inchooHelloV1');
$result = $proxy->inchooHelloV1Name(array("name"=>"Jim"));
var_dump($result);

Response for SOAP

object(stdClass)#2 (1) {
  ["result"]=>
  string(10) "Hello, Jim"
}

Adding ACL

If we don’t set anonymous in resource of webapi.xml, we need to set existing Magento resource or create our own. We can do that by adding acl.xml to etc.

ACL – etc/acl.xml

<?xml version="1.0"?>
<config xmlns:xsi="http://www.w3.org/2001/XMLSchema-instance" xsi:noNamespaceSchemaLocation="urn:magento:framework:Acl/etc/acl.xsd">
    <acl>
        <resources>
            <resource id="Magento_Backend::admin">
                <resource id="Inchoo_Hello::hello" title="Hello" translate="title" sortOrder="110" />
            </resource>
        </resources>
    </acl>
</config>


In this case we need to add “Inchoo_Hello::hello” to webapi.xml resource instead anonymous.

In article Magento 2 API usage with examples by Tomas Novoselic is covered how we can connect to Magento with REST or SOAP API and we can use the same example to create new integration and test new implementation of API call.

Since Magneto 2 is still fresh this may change in time, but we will try to keep this up to date with latest version. This is tested with Magento v2.1.0.


The post Custom API for Magento 2 appeared first on Inchoo.


Magento 2: How to add new search engine like Solr or Elasticsearch

$
0
0

Magento 2 Community Edition comes with support for only MySQL search engine, but some projects require better or more adjustable search engine in order to increase sales or conversion rate.
In this situation we are implementing Solr or Elasticsearch search engine.

In this post we will create a skeleton code or rough example which will introduce main classes and methods by which we can implement additional search engine like Solr or Elasticsearch. If you take a look in Magento 2 admin you can find search engine configuration on next location: Stores -> Configuration -> Catalog -> Catalog Search and drop down “Search Engine”.

In drop-down list you will notice that you have only MySQL engine and our first step will be to add additonal option in this drop-down list with label “Solr”. So, let’s start.

As per usual, you need to create a Magento 2 module (I suppose that you already know this process but if you don’t, you can read the tutorial here). In your module in etc folder you need to create file di.xml with next xml code:

    <type name="Magento\Search\Model\Adminhtml\System\Config\Source\Engine">
        <arguments>
            <argument name="engines" xsi:type="array">
                <item name="solr" xsi:type="string">Solr</item>
            </argument>
        </arguments>
    </type>

With this xml code we added a new option to our drop-down list with the option name “Solr“. If you created it properly and cleaned Magento cache, you will be able to see it in the drop-down where there’ll be a new option “Solr”. If you see it then it means that you added it properly.

In the next step we will start with php classes which is in charge for indexing data to search server.

First of all, we should implement Engine class, put in di.xml next code:

    <type name="Magento\CatalogSearch\Model\ResourceModel\EngineProvider">
        <arguments>
            <argument name="engines" xsi:type="array">
                <item name="solr" xsi:type="string">Inchoo\Solr\Model\ResourceModel\Engine</item>
            </argument>
        </arguments>
    </type> 

You can see that we introduced our own Engine class for “Inchoo\Solr\Model\ResourceModel\Engine“. Engine class is in charge for preparing data before it goes to our indexerHandler class (last endpoint before solr server) and Engine class has to implement: \Magento\CatalogSearch\Model\ResourceModel\EngineInterface.

Interface class contains next four methods:
processAttributeValue prepare attribute value to store in solr index
getAllowedVisibility retrieve allowed visibility values for current engine
allowAdvancedIndex define if current search engine supports advanced index
prepareEntityIndex prepare index array as a string glued by separator

These methods are mandatory and have to be implemented in your Engine class. For better understanding you can check/compare logic in similar MySQL native class: Magento\CatalogSearch\Model\ResourceModel\Engine.

Our example of skeleton class is below:

<?php
namespace Inchoo\Solr\Model\ResourceModel;
 
use Magento\CatalogSearch\Model\ResourceModel\EngineInterface;
 
 
class Engine implements EngineInterface
{
 
    protected $catalogProductVisibility;
    private $indexScopeResolver;
 
    public function __construct(
        \Magento\Catalog\Model\Product\Visibility $catalogProductVisibility,
        \Magento\Framework\Indexer\ScopeResolver\IndexScopeResolver $indexScopeResolver
    ) {
        $this->catalogProductVisibility = $catalogProductVisibility;
        $this->indexScopeResolver = $indexScopeResolver;
    }
 
    public function getAllowedVisibility()
    {
        return $this->catalogProductVisibility->getVisibleInSiteIds();
    }
 
    public function allowAdvancedIndex()
    {
        return false;
    }
 
    public function processAttributeValue($attribute, $value)
    {
        return $value;
    }
 
    public function prepareEntityIndex($index, $separator = ' ')
    {
        return $index;
    }
 
    public function isAvailable()
    {
        return true;
    }
}

Next step is creating indexerHandler with name “Inchoo\Solr\Model\Indexer\IndexerHandler” which has to implement Magento\Framework\Indexer\SaveHandler\IndexerInterface.
For implemetation of IndexerHandler you should add next code in your di.xml file:

   <type name="Magento\CatalogSearch\Model\Indexer\IndexerHandlerFactory">
        <arguments>
            <argument name="handlers" xsi:type="array">
                <item name="solr" xsi:type="string">Inchoo\Solr\Model\Indexer\IndexerHandler</item>
            </argument>
        </arguments>
    </type>

If you open IndexerInterface you will see four methods which you have to implement:
saveIndex add entities data to index
deleteIndex remove entities data from index
cleanIndex remove all data from index
isAvailable define if engine is available (you can implement ping to solr server and check is it live).

Our example of IndexerHandler skeleton class is below:

<?php
namespace Inchoo\Solr\Model\Indexer;
 
use Magento\Eav\Model\Config;
use Magento\Framework\App\ResourceConnection;
use Magento\Framework\DB\Adapter\AdapterInterface;
use Magento\Framework\Indexer\SaveHandler\IndexerInterface;
use Magento\Framework\Indexer\IndexStructureInterface;
use Magento\Framework\Search\Request\Dimension;
use Magento\Framework\Search\Request\IndexScopeResolverInterface;
use Magento\Framework\Indexer\SaveHandler\Batch;
use Magento\Framework\Indexer\ScopeResolver\IndexScopeResolver;
 
class IndexerHandler implements IndexerInterface
{
    private $indexStructure;
 
    private $data;
 
    private $fields;
 
    private $resource;
 
    private $batch;
 
    private $eavConfig;
 
    private $batchSize;
 
    private $indexScopeResolver;
 
    public function __construct(
        Batch $batch,
        array $data,
        $batchSize = 50
    ) {
        $this->batch = $batch;
        $this->data = $data;
        $this->batchSize = $batchSize;
    }
 
    public function saveIndex($dimensions, \Traversable $documents)
    {
        foreach ($this->batch->getItems($documents, $this->batchSize) as $batchDocuments) {
 
        }
    }
 
    public function deleteIndex($dimensions, \Traversable $documents)
    {
        foreach ($this->batch->getItems($documents, $this->batchSize) as $batchDocuments) {
 
        }
    }
 
    public function cleanIndex($dimensions)
    {
 
    }
 
    public function isAvailable()
    {
        return true;
    }
}

In these methods you should implement Solr PHP client which will proceed listed operations to Solr server. Very often used is Solarium PHP client.

With this step we are ending with process of indexing data to search-server.

Now you can check are your indexer works with next command (before in set search engine to SOLR in magento admin):

php /bin/magento indexer:reindex catalogsearch_fulltext

In the next, last step we will explain how to implement a new search engine on the Magento 2 frontend. Also, we have to modify di.xml and add next code:

<type name="Magento\Search\Model\AdapterFactory">
        <arguments>
            <argument name="adapters" xsi:type="array">
                <item name="solr" xsi:type="string">Inchoo\Solr\SearchAdapter\Adapter</item>
            </argument>
        </arguments>
    </type>

Our new adapter is class Inchoo\Solr\SearchAdapter\Adapter. Adapter class should implement Magento\Framework\Search\AdapterInterface. In our adapter we have to implement method query – this method accepts query request and process it. Take a look of our example and everything will be more clear.

<?php
namespace Inchoo\Solr\SearchAdapter;
 
use Magento\Framework\Search\AdapterInterface;
use Magento\Framework\Search\RequestInterface;
use Magento\Framework\Search\Response\QueryResponse;
use Inchoo\Solr\SearchAdapter\Aggregation\Builder;
 
 
class Adapter implements AdapterInterface
{
    protected $responseFactory;
 
    protected $connectionManager;
 
    protected $aggregationBuilder;
 
    public function __construct(
        ResponseFactory $responseFactory,
        Builder $aggregationBuilder,
        ConnectionManager $connectionManager
    ) {
        $this->responseFactory = $responseFactory;
        $this->aggregationBuilder = $aggregationBuilder;
        $this->connectionManager = $connectionManager;
 
    }
 
    /**
     * @param RequestInterface $request
     * @return QueryResponse
     */
    public function query(RequestInterface $request)
    {
        $client = $this->getConnection();
        $documents = [];
 
        $documents[1007] = array('entity_id'=>'1007', 'score'=>46.055);
        $documents[1031] = array('entity_id'=>'1031', 'score'=>45.055);
        $documents[1120] = array('entity_id'=>'1120', 'score'=>44.055);
 
        $aggregations = $this->aggregationBuilder->build($request, $documents);
 
        $response = [
            'documents' => $documents,
            'aggregations' => $aggregations,
        ];
        return $this->responseFactory->create($response);
    }
 
    public function getConnection(){
        return $this->connectionManager->getConnection();
    }
}

In our demo adapter class we hard coded product entity_ids: 1007, 1031, 1120 from our database product-ids, only for testing purpose. If you want to dig deeper I suggest that you examine logic how MySQL native adapter works.

With this step we are ending our example. Even though things seem pretty complicated, when you start working, everything will be fine. I hope that you will enjoy the coding of your new search engine for Magneto 2.

The post Magento 2: How to add new search engine like Solr or Elasticsearch appeared first on Inchoo.

Mitigating Facebook’s “x-fb-http-engine: Liger” site hammering using Apache or nginx

$
0
0

Facebook is using a sort of web page prerendering mechanism in it’s in-app browser for mobile users [see disclosure here]. It is used by Facebook’s in-app browser to speed up page rendering for web link content shared on Facebook. But it can cause serious headaches, and this post should explain how to mitigate it with Apache or nginx.

Web page prerendering is not uncommon way of reducing frontend load times. Most today’s browsers support it, and some of them use it regularly (like Chrome – did you notice how first results on Google sometimes render instantly?!).  Some browsers prefer “preview” instead of “prerender” [like Safari], so other browsers [like Chrome] had to accept both instructions for the same action.

We all know that Magento CPU cycles come at a price. You should test on your own whether this FB in-app feature has implications on your web server performance and expenditure.

Facebook’s “Liger preview” requests can be recognized in your server logs by:

  • HTTP referer: “http://m.facebook.com
  • User-Agent has: FB_IAB/FB4A;FBAV (Facebook in-app browser for Android)
  • x-fb-http-engine: Liger – this is the identifier of the engine, BUT, FB in-app does not send it every time! It is being sent only when X-Purpose is sent:
  • X-Purpose: preview – page prerender/prefetcher HTTP header
  • regular images are not loaded – FB in-app requests only for HTML page

Every owner of Facebook page(s) that regularly shares links and with more than 10K fans should test their website for this particular page requests, as it might severely impact web site performance. Please, check this article on how to precisely log and test how severe your web site is affected.

I’m affected, what now?!

Since these requests are marked with two significant HTTP headers, we’ll use them to block this type of requests. We don’t want to block ALL prerender/preview requests, only those that come from Facebook’s in-app browser engine signed as “Liger“.

In Apache, you can use [tested, verified]:

RewriteCond %{HTTP:x-fb-http-engine} Liger
RewriteCond %{HTTP:X-Purpose} preview
RewriteRule .* - [F,L]


In nginx, you can use [not tested, but should work; please verify]:

This rule checks for presence of one HTTP header [faster]:

if ($http_x_fb_http_engine = "Liger") {
return 403 "Access denied due to Facebook's 'Liger preview' site hammering";
}

This one covers requests when both headers are present [since nginx does not support logical AND, we have to use a trick] :

if ($http_x_fb_http_engine = "Liger") {
set $lp L;
}
if ($http_x_purpose = "preview") {
set $lp "${lp}P";
}
if ($lp = "LP") {
return 403 "Access denied due to Facebook's 'Liger preview' site hammering";
}

And that’s it!

Don’t forget, prerendering can be quite cool and useful, so not all prerender/preview requests should be blocked – only those that originate from “Liger” engine. Prerendering advantages will be covered in the next article so – stay tuned!

The post Mitigating Facebook’s “x-fb-http-engine: Liger” site hammering using Apache or nginx appeared first on Inchoo.

How to keep your CMS blocks organized (and not go insane)

$
0
0

Head on over to Magento dashboard in your store and take a look at CMS blocks. How many CMS blocks have you got? Can you tell which of the blocks are being used on site and which are currently not active or can be safely removed? Can you pick a random CMS block and instantly know what it is and where to find it on site? In this article we’re going to cover a powerful way of organizing, searching and filtering CMS blocks by simply naming them in a specific way. And the best part is that it works out of the box in vanilla Magento without any extensions.

CMS blocks are very useful part of Magento. But there is a chance that, over time, you could have dozens (or even hundreds) of various CMS blocks on your Magento store. Those CMS blocks can be named by different people with different mindsets who use different naming conventions and terminology which, in different cases, can cause confusion and lot of time being lost on finding the block you’re looking for.

Currently, Magento admin dashboard doesn’t provide any effective way of organizing them besides some basic search and filter options. But we can make most of these options and come up with a simple, but powerful way of organizing and keeping track of the CMS blocks that works in vanilla Magento and doesn’t depend on extensions.

Simplest and most obvious solution can be found in naming the blocks in a structured way that makes sense to developers and merchants as well.

Rules, Goals and Basic Structure

Let us establish some rules and goals for our naming structure. Suggested naming convention for Magento CMS block titles must meet the following requirements (in no particular order):

  • It must be universal and applicable for all CMS blocks
  • Each block has to have a unique title
  • Users must be able to filter the blocks effectively and always find what they’re looking for without resorting to blind guessing or the other timewasting methods
  • It must work on vanilla Magento (CE or EE) and it must not dependent on any extension
  • Users should immediately get an idea what is the block’s position and purpose

Taking inspiration from various popular naming conventions and following the requirements, I have come up with the following naming structure for CMS block titles.

[TAG] Website Name – Store View – Template Reference – Layout Position – Component Name – Component Variation

Underlined components represent required parameters when naming a CMS block, rest of the parameters are optional.

Please note that you may use any format that you like and feel like it better fits your project. The presented structure is just a proposed naming structure that made most sense to me at the time.

Before we move onto examining each part of naming structure separately, here is an example of CMS block title following the naming rule and using only the required (underlined) parts:

Global – Footer – Social Media Links

Taking a Closer Look at Each Component

[TAG] (optional)

It can be used to tag specific blocks for a specific reason. Tags should be used as a temporary part of a name until requested action has taken place or the tag becomes outdated after new code deployment.

Examples:

Value Description
[no-value] CMS block isn’t tagged
DELETE Marked for deletion and waiting for the final approval.
EDIT Requested an edit (content, code or design).
BUG-ticket number This CMS block contains an issue or a bug detailed in a ticket or a task defined in the ticket number which is optional.
OUTDATED-id Paired with the id of a block with a tag [NEW], it marks new CMS block which has been replaced with the newer version of the CMS block (with major changes) in recent deployment, but has not been deleted in case of code revert. It can be deleted after the deployment has been verified.
NEW-id Paired with the id of a block with a [OUTDATED] tag, it marks the new version of the CMS blocks that will replace the outdated one when the new code has been deployed to the site.


Website Name (optional)

Refers to the website name in Magento structure where the CMS block can be found.

Examples:

Value Description
[no-value] Only one Website
multi Block can be found in multiple websites
[Store Name] Block can be found only in a specific website


Store View Name (optional)

Refers to the store view in Magento structure where the CMS block can be found. It can also refer to the i18n internalization to mark identical blocks in different languages.

Examples:

Value Description
[no-value] Website doesn’t have multiple store views
multi Block can be found in multiple store views (Multilanguage)
en English language
de German language


Template Reference (required)

Refers to the page name.

Examples:

Value Description
Global Global scope, component appears on all pages
Multi Component appears or 2 or more pages, but not all pages
Category Page Magento Category Page
Product Page Magento Product Page
Homepage CMS Homepage CMS Page
About Us CMS About Us CMS Page


Layout Position (required)

Position in the Magento page layout.

Examples:

Value Description
Multi Component appears on multiple containers on a page
Content Main contents, main container
Sidebar Left Left sidebar container
Sidebar Right Right sidebar container
Header Website header
Footer Website footer


Component name (required)

Custom name for the CMS block that describes CMS block’s role.

Examples:

Component Name Value
Sale Banner
Size Guide
Category Description


Component variation (required only under certain condition)

Variation for the existing CMS block. Required if the CMS block is a different version or an iteration of an existing block.

Examples:

Component Name Value Component Variation Values Description
Component Name [no-value] or Regular No variation, base component
Sale Banner Summer, Holiday, Black Friday Various sale banners
Size Guide Shoes, Shirts, Pants Size Guide for various clothing
Category Description Accessories, Bags, Belts Category page CMS blocks

For the block identifiers, we have to take a different, but simpler approach in naming them. We don’t want to use the same naming format for block identifiers as for the block title, since the idea of the identifier that it doesn’t change to avoid completely refactor the code. I would suggest using the following format for the identifiers to keep up with the structured name format:

component_name-component_variation

Proof of Concept and Examples

Using the presented naming format, let’s convert some block titles for some default Magento 1 CMS Blocks!

Default Magento 1 block title New block title
Footer Links Company Global – Footer – Company Links
Footer Links SM Global – Footer – Social Media Links
Category Landing Page Home Category Page – Content – Home
Category Landing Page Main Block Category Page – Content – Main Block
Cookie Restriction Notice Global – Header – Cookie Restriction Notice


New block title New Block Identifier
Global – Footer – Company Links company_links-regular
Global – Footer – Social Media Links social_media_links-regular
Category Page – Content – Home home-regular
Category Page – Content – Main Block main_block-regular
Global – Header – Cookie Restriction Notice cookie_restriction_notice-regular

That looks way better, doesn’t it? Look at all that info that you could get just looking at the CMS block title! We immediately know which store the block’s location on a website, it’s position on a page, content and role just by simply looking at the block title. Now, isn’t that awesome? But true power and purpose of this naming structure is in filtering the blocks.

Filtering CMS blocks by Block Title

Now that we created new naming format for our CMS blocks and gave them more meaningful titles, let’s see how this naming convention fares when searching for a specific block or a specific group of blocks.

It’s important to note the differences in Searching by Block Title in Magento 1 and Magento 2. Whereas Magento 1 is really strict in regards to search words where you have to type exact part of block title, in Magento 2 we have a more lenient search where every word separated by the empty space or every set of words in quote marks separated by the empty space would be searched.

For testing purposes, I have created 20 empty CMS blocks in Magento 1 and Magento 2 (shown in the images) and I gave them random block titles I could think of following the suggested naming format and I gave them their respective block identifiers following the suggested naming format.

cms-01

Example – Scenario 1

Routine inspection for tagged CMS blocks (listing all tagged CMS blocks – bugs, delete requests, edit requests, etc.)

Even though there isn’t a keyword that applies for all CMS blocks which are, we cannot filter all the tagged blocks by searching (even though we can search for an individual tag like “[DELETE]”, for example). Instead of searching for each individual tag, we can make the tagged blocks appear on top of the list by sorting the CMS block title in an ascending order to make the tagged blocks appear first in the CMS block listing.

cms-02

Example – Scenario 2

Listing all CMS blocks that may appear on a specific page (Product page, for example)

Let’s assume that we’re looking for a block that we saw on the Product Page. Sounds simple enough. We just type in “Product Page”, right?

cms-03

But what if the block is “Global” or “Multi”? We should search for the block using page-specific parameters and widen the search to “Multi” or “Global” blocks if we don’t find it using page-specific parameters. We can also combine this search with info about layout position “Content” or “Sidebar Left” for example, to get better results while filtering. All this could be done using vanilla Magento filtering feature available in CMS Block Admin page. We can also use improved filtering in Magento 2 to get all results in one search.

cms-04

And finally we end up with results we’re looking for. This way we get a list of all possible blocks that appear on a Product Page (excluding blocks marked with “Multi” which may or may not appear on the Product Page).

Same approach applies when searching the CMS blocks for the CMS block in the specific store, in the specific store view (language) and in the specific section in a page layout.

Example – Scenario 3

Listing all CMS blocks with specific variation (listing all holiday CMS blocks, for example).

It is important to also have rule when naming CMS block variations to allow easier filtering. In this case, if we have included a variation name “Holiday” in all of the CMS block holiday variations, we would simply have to search the CMS blocks by the keyword “Holiday” to display only the holiday CMS blocks.

Example – Scenario 4

Deploying a revamped page element (footer, for example) with updated CMS block (social media links, for example).

Before any code deployment, we need to move our updated CMS block for footer social media links and give it a tag [NEW-id] with the id of the original social media links block. After the code deployment and after verifying the deployment success, we need to update the original social media links block title with tag [OUTDATED-id] with the id of the new block. After a few days and if code revert isn’t needed and the block isn’t going to be used anymore, it is safe to either give it a [DELETE] tag or delete it.

Answers to Some Questions That You Might Have

Come on, is it even possible to have that many CMS blocks in your project?

Yes! From personal experience, I worked on projects who had the number of CMS blocks ranging from few dozen CMS blocks on a smaller project, to about a hundred blocks on a regular project and finally, to more than a thousand CMS blocks on a long-term large-scale project.

Why have “Global” and “Multi” values for Template Reference? What is the point?

“Global” refers to the elements that are defined as default in the Magento layout and they aren’t removed for any page/s on the site. “Multi” refers to the elements that are defined as default in the Magento layout, but which are removed from at least one page in the Magento layout.

Practical example would be removing excessive (and distracting) header elements only on checkout page to make sure customer is completely focused on the checkout form. In that case, you would need to use “Multi” in the removed CMS block’s name.

Why not just get an extension that fixes this issue?

Why not, indeed. Go for it. This is conceived as a free alternative that works out of the box and uses vanilla Magento features. All it takes is coordination and established rule between people who create and manage CMS blocks.

Editing that many block titles can become tedious when refactoring!

Magento 2 allows making quick changes to the CMS blocks (like changing a block title) right from the CMS block listing. Even though this method requires opening the CMS block in Magento 1 which is an extra step in comparison to Magento 2, the benefits greatly outweigh those occasional inconveniences.

cms-05

I have an idea for a better naming structure!

Let me know in the comments. I am curious what other developers will come up with and how they organize and prioritize CMS block info.

Conclusion

Working with CMS blocks can be a messy job and organizing them can be even messier. It is astounding how much better we can manage CMS blocks simply by establishing naming rules. I hope that you found this method of naming CMS blocks useful and that it will help you in your projects. I am also hoping that this is just a temporary solution and that folks over at Magento will come up with a better way of organizing and keeping track of CMS blocks and CMS pages.

What do you think about this idea? Can you see yourself using an established naming rules for CMS blocks in your current or future projects? Or you have a better suggestion for the naming rules? I am curious to know your thoughts, opinions and ideas, so feel free to leave me a comment below.

The post How to keep your CMS blocks organized (and not go insane) appeared first on Inchoo.

Enter HTTPS

$
0
0

In their effort to improve security on the web, Google has been, for some time now, steadily pushing their “HTTPS everywhere” initiative. Besides providing better security for end user by encrypting all traffic between server and browser, HTTPS will most likely be used as a ranking signal. Another interesting fact is that starting from January 2017, Chrome will use icon in the address bar to mark HTTP pages that collect passwords or credit cards as non-secure, as a part of the long-term plan to mark all HTTP sites as non-secure. We can assume that other browsers will adapt this behaviour in the future.

In this blog post, we will cover basic configuration required to run your Magento shop over HTTPS and we will look at some common pitfalls and gotchas.

HTTPS everywhere

Configuring site-wide HTTPS in Magento is easy enough. Assuming that your server is configured properly and that you have a valid SSL certificate, all you have to do is change a few configuration parameters. In System > Configuration > Web update your Unsecure Base URL to start with https, e.g. https://www.example.com/. Additionally, under Secure tab, set both Use Secure URLs in Frontend and Use Secure URLs in Admin to Yes.

This covers the basic configuration required to enable site-wide HTTPS but, as usual, things are never so simple. Let’s take a look at some common issues that can happen once site-wide HTTPS is enabled and how to resolve them.

Redirects

Depending on your configuration, you might face an issue where all your old HTTP links are being redirected to HTTPS homepage.

Example:

http://www.example.com/some-product.html redirects to https://www.example.com/ which is not correct. Expected result is redirect to https://www.example.com/some-product.html

To prevent redirecting to home page, set Auto-redirect to Base URL to No. This option is also located in System > Configuration > Web section. Disabling Auto-redirect, however, introduces another problem. Now both www and non-www variations of your site will be available. This can be fixed with redirect rule on your web server.

RewriteCond %{HTTPS} off [OR]
RewriteCond %{HTTP_HOST} !^www\.
RewriteRule ^ https://www.example.com%{REQUEST_URI} [NE,L,R=301]

The example give is for apache web server. What it does is force both HTTPS and www for all incoming requests.

Mixed content

Another common issue is when static content, most commonly images, css and javascript, are hardcoded to load over http protocol. This will cause your browser to issue mixed content / unsecure page warning. To fix this, you will have to review your templates, layouts, static block, cms pages, etc. and update any static content to load over HTTPS. Alternatively you can also use protocol-relative URLs.

For example: //www.example.com/skin/frontend/rwd/default/images/media/logo.png

Magento EE

If you are planning to run site-wide HTTPS and are using Magento EE, make sure you are at least on version 1.14.1 or later, since in prior versions, full page cache was disabled when on HTTPS.

HTTPS on CDN

Serving static content via CDN over HTTPS may result in additional expense, in case you have to purchase additional SSL certificate(s) for your CDN subdomains. Your CDN provider may also charge you for installing SSL certificate. There are also some free options available which vary depending on the CDN provider, but none of them are ideal. Something to keep in mind when adopting site-wide HTTPS.

And with this we will conclude todays blog post. If you already adopted site-wide HTTPS and faced issues similar to this ones or some not mentioned  in this blog post, let us know in the comments section.

Happy browsing and may the SSL be with you.

The post Enter HTTPS appeared first on Inchoo.

We’ve developed a Croatian Language Pack for Magento 2

$
0
0

eCommerce is rapidly increasing in the world, but Croatian market was a little behind that trend. Why? Maybe it’s our distrustful nature to buy something online. Who knows. But the good thing is – we at Croatia are slowly but surely discovering the benefits of online shopping. Both as consumers and as shop owners.

Wether you are big or small, on Magento or on some other platform, goal is the same. Increasing sales and keeping customers happy and loyal. One of the ways to achieve that is by shop localization.

Customers are more comfortable using their native language when visiting web shops. And to prepare a store for the Croatian market, we provided a Language Pack for Magento 2 in Croatian language. With this extension, more than 12 000 phrases of Magento 2 administration and frontend are translated into Croatian and are ready for use and further customization.

Language Pack is now available for free through official channel – Magento Marketplace. It can be installed in less than 30 minutes. Once it’s set up, administration and frontend are translated to Croatian – no code has to be touched. By specifying Croatian as a default language, it becomes easier for the administrator to customise the store to follow brand’s tone of voice and attract more of the target market.

croatian_language_pack

Language pack icon at Magento Marketplace

Magento 2 localization is making life easier for Croatian merchants

Customer satisfaction is connected with simplicity of experience while shopping and understanding of store functionalities. To achieve this for Croatian merchant, we’re localizing Magento 2.

Although Croatian market is a small one when compared to some other markets, we still believe translation will pay off in the long run. With Magento localization we’re helping merchants to customize their store not only from technical, but from legal side too. Therefore, we are developing supporting modules for Magento 2, as fiscalisation, shipping modules and most used Croatian payment gateways – HT PayWay system and WSpay system.

inchoo-cro-language-pack

inchoo-cro-language-pack-7

Zelimir Gusak, Sales Representative at Inchoo, says the following about the benefits of Magento 2 localization for the Croatian market:

Language pack is very important for every merchant that is on a market where English is not a primary language. Not everyone is accustomed to English, at least not to the level which would allow simple system managing. In some cases, lack of translation was the reason for avoiding Magento as a platform by Croatian merchants.

With localization, stores on Magento 2 will be technically and legally prepared for the Croatian market and offer better user shopping experience.

If you experience any difficulties with the installation, or have questions about localization, feel free to contact us! We’ll be happy to help.

If you’re interested how the demo store looks, feel free to click away here.

The post We’ve developed a Croatian Language Pack for Magento 2 appeared first on Inchoo.

Optimize Elasticsearch autocomplete URL for Google Analytics

$
0
0

In this article, we’re talking about Extension for Elasticsearch® by BubbleShop and optimizing URL for tracking autocomplete search through Google Analytics.

The Elasticsearch extension for Magento allows you to enhance drastically the default Magento search results which are not very relevant, and much more.

Where is the problem with Elasticsearch?
Magento default search has parameter in URL “?q=keyword“, but if you click on Elasticsearch suggested autocomplete item, you will get clear url without parameters.

This feature for Elasticsearch is adding query string to all URLs in quick search dropdown. That string allows you tracking “quick search autocomplete” through Google Analytics.

Autocomplete Elasticsearch

Default URL (before editing):
https://www.EXAMPLE.com/product.html

New URL (optimized):
https://www.EXAMPLE.com/product.html?q=keyword

Example from image:
https://www.EXAMPLE.com/product.html?q=Madison


Step 1 – Copy files in your theme:

/app/design/frontend/base/default/template/bubble/elasticsearch/autocomplete/category.phtml
/app/design/frontend/base/default/template/bubble/elasticsearch/autocomplete/cms.phtml
/app/design/frontend/base/default/template/bubble/elasticsearch/autocomplete/product.phtml

Step 2 – Implement query string in URL:

› category.phtml – Line 15.

<a href="<?php echo $this->escapeUrl($this->getCategoryUrl($_category)) ?>"

change to:

<a href="<?php echo $this->escapeUrl($this->getCategoryUrl($_category)) ?>?q=<?php echo Mage::helper('catalogsearch')->getQueryText(); ?>"

› cms.phtml – Line 15.

<a href="<?php echo $this->escapeUrl($this->getBaseUrl() . $_page->getIdentifier()) ?>"

change to:

<a href="<?php echo $this->escapeUrl($this->getBaseUrl() . $_page->getIdentifier()) ?>?q=<?php echo Mage::helper('catalogsearch')->getQueryText(); ?>"

› product.phtml – Line 16.

<a href="<?php echo $this->escapeUrl($this->getProductUrl($_product)) ?>"

change to:

<a href="<?php echo $this->escapeUrl($this->getProductUrl($_product)) ?>?q=<?php echo Mage::helper('catalogsearch')->getQueryText(); ?>"

Step 3 – Initialization Magento

/autocomplete.php – add this code on top files:

require_once "app/Mage.php";
Mage::app();

Step 4 – Don’t forgot to clear the cache!


Hope this will help you improve your tracking through Google Analytics.

The post Optimize Elasticsearch autocomplete URL for Google Analytics appeared first on Inchoo.

Your Magento shop deserves a custom tailored theme!

$
0
0

Getting your store up is a process. One which starts with a revelation that, if you want to make things work in the long run, you’ll need a webshop. An online place for reaching new and informing existing customers. For them, it’s a brand new channel where they can buy your products. For you, it’s a strategic decision. Why? Because the idea behind that action is growing your business.

But, apart from choosing the platform or the hosting, you should also think about the visual appeal of your store. In this interview, Marko Briševac, one of Inchoo designers, answers the most frequent questions we get from prospective clients. Read more to find out what’s it all about!

Most of our clients contemplate getting an existing theme template rather than deciding on investing in getting one which is custom made. Why do you think it is extremely important to invest in a theme tailored according to their needs?

Marko: I must admit we get this question a lot. After talking with a lot of clients and fellow designers throughout the years, here’s the best possible answer based on my experience. 

Design process is a series of steps through which designers come up with a solution to a problem. Even though clients think it would be nice to skip all (or some of) those steps and buy a nice looking theme, every step must be completed to ensure a successful project. Design should promote improving the quality of the user’s interaction with a store and perception of a brand. None of these can be achieved with a pre-built theme.

Pre-built themes rarely care for usability, performance or user experience. Authors of these themes are aware of the fact that people are naturally more attracted to the things which are aesthetically pleasing, especially if they come with a whole list of features. However, that doesn’t necessarily mean they are solving a problem for the brand, communicating with customers in the right way or ensuring amazing user experience.

Pre-built theme could work if you are a small business owner with limited funds looking for a simple website as a space to provide general information about your company, but it should not be an option for a thriving eCommerce business.

design-sketching

How does “I want a site that looks exactly like example.com” fit into the picture? Or, better yet, why it doesn’t fit into it?

Marko: There are two different types of clients when it comes to this.

Some clients refer only to visual direction when they mention they like a certain site. For example, 70% of all clients will say they like Apple web site. Solution, in this case, isn’t to copy everything from Apple, but to recognise that the client likes effective use of white space, minimalistic colour scheme, large high quality images, etc. It is necessary to perceive are there some obvious elements on example sites which client likes but doesn’t know how to describe.

Other clients want to copy literally everything – style, features, behaviour, functionalities… I have to say it’s completely understandable why they want to copy from more successful competitors. They simply believe they will achieve the same results. For them, successful competitors’ website is a pattern of how things should be done in their field.

If that’s the case, it is crucial to explain that their business and brand is unique in every way, and what works for one doesn’t for the other even though they may be in the same industry.

We’d like to point out that our job is to carefully consider both the needs of the client and the needs of the user so we can maximize the results. We can achieve that only by planning, research and testing, definitely not by copying from others.

design-theme

Design process is what people usually connect with something being “pretty” when, in fact, it requires a lot of hard work. Can you describe, briefly, what goes into making a custom theme and benefits it yields?

Marko: At Inchoo, our design process consists of several phases through which we emphasise, define, ideate, prototype and test.

Here I’ll just mention that during that process we research, report detected problems and suggest improvements. Our design process focuses on users and their needs and business goals of the client in order to create cohesion, optimize conversion rates and find sustainable growth.

If you’re interested in all of our “behind the scenes” work, you can check out this article which covers every step we go through while working on your custom theme.

Main conclusion is definitely that design today should be (and at Inchoo is) way more than creating a visually pleasing site.

As Marko already pointed out, design is way more than something being pretty. If you’re thinking on whether you should invest in a custom tailored theme for your Magento shop, keep in mind that your customers judge you based on it. The more you understand them and display that through your shop, the more they’re likely to understand – and buy – from you.

The post Your Magento shop deserves a custom tailored theme! appeared first on Inchoo.


Meet Magento World brings Magento experts to your home and office

$
0
0

Meet Magento World is a new addition to Magento ecosystem – for the first time ever you’ll be able to attend a Magento conference without leaving your home or your office.

On December 6th – 8th 2016 you can take part in this global online event and get direct access to all the top speakers and hottest Magento and eCommerce topics at once.

Read on to learn more about this event and hear from one of the top speakers – our own Ivona Namjesnik – what you can expect.

When you’re a part of Magento ecosystem, looking back at a year behind you measure it, among other things, by Meet Magento events you’ve attended – as a delegate, sponsor or a speaker. Perhaps even by the ones you organized.

2016 was packed with these, and it’s only November. So, to wrap up this amazing year for Meet Magento Association, something completely different is taking place, for the first time ever there’s going to be a Meet Magento World, taking place in, well – anywhere and everywhere actually!

Over the course of three days (December 6th – 8th) more than 30 speakers will give sessions in the different conference rooms on various Magento and eCommerce topics. The sessions will be held by a long list of international speakers.

Who are the speakers and why them?

You can check out the full agenda for this 3-day event here – the speaker list has been carefully crafted out of Meet Magento veterans and those speakers who have been the best of the best – those people who got highest scores for their speeches at various local Meet Magento events around the world.

And since it’s often very rare to gather the cream of the crop in one place, Meet Magento World is a great opportunity to infuse yourself with the hottest topics presented by great speakers in a packed 3 days of events.

One speaker’s perspective – an interview with Ivona

Now, we are very proud to have one of our own make the cut – Ivona Namjesnik was invited to participate, so here’s her two cents (and some change) about this event.

Ivona, hi. Congratulations for being the voice of Inchoo at Meet Magento World! How does it feel to prepare for the global stage?

Aron, hi. I must admit it’s extremely flattering. Even though I believe I’m quite a “chatterbox”, I never imagined it will be part of my job description. Especially on the global level! I guess learning to channel your natural abilities sure comes in handy and makes your life a whole lot interesting.

So, let’s back up a bit. You got invited to speak at Meet Magento World mostly because of your speech at Meet Magento Czech Republic earlier this year when you got almost the perfect score – what did you talk about in Prague?

Prague was quite an adventure! I absolutely loved it there and I believe overall impression after my topic “No content marketing? No future for your eCommerce business” was really good.

I tried to explained (and if score is to be trusted, I succeeded) the role of content marketing and how it interferes with eCommerce in general. Basically, they are a match made in heaven and talk explained why.

And what about now? How will your presentation look like this time around?

I believe every brand needs a voice. And every brand has one! What brands tend to forget is a fact that being silent sends a message too.

In this talk, I’ll try to reveal the mystery of finding brand voice and following it – both on social media and when approaching customers.

ivona-mmcz-2016

In your interview before MMCZ in Prague you shared some thoughts about number of women (i.e. the lack of) speaking at Magento events, and tech events in general. We can all feel there is a slight shift taking place, but how do you feel this process can be sped up? And should it?

That’s a tough question. As a founder of a Lean In Osijek circle, I believe we as a society should do everything that’s in our power to make sure men and women are treated equally. If speeding up the process means encouraging men and women ever the same and cheering them on, yes, I’m all up for it.

For me, that’s the only normal and natural thing to do and it’s silly to think there are people who would support someone more based on their gender.

What do you think about the concept of Meet Magento World? What are the pros and cons if you compare it to a “regular” Meet Magento event?

I guess it depends on how one thinks of it. I love, and I believe delegates will love too, the fact that you can incorporate it into your working schedule easily. Meet Magento World doesn’t require travelling and you can be in something as comfy as PJ’s.

On the other hand, you miss out on mingling with the community – greatest pro of “3D” Magento events is meeting wonderful people, sharing a cup of joe and exchanging stories and experiences throughout the conference. We’ll have to think of a way to compensate for that. 🙂

Since this event is something really new in the Magento ecosystem, can you put on a fortune teller hat (as opposed to the storyteller one you wear on any given weekday) and tell us how do you see this event play out? Epic or fail?

Hahah, I never really like those hats. But, I see a lot of effort being put into this and amazing colleagues from the Magento community participating – you can only imagine my predictions. 😉

So epic it is. Thanks for your time, Ivona. Any final thoughts to people thinking about becoming a part of Meet Magento World?

I would usually say “See you at the conference” but given the fact it’s all about digital world and connections now – see you on social media.

So there you have it. The thoughts of one of the Meet Magento World speakers. But, that’s not all. Here’s something just for you:

Special discount for Inchoo blog readers

If you’ve read through the entire interview (or just scrolled down very fast – it counts too), you’re in luck. We have a special discount for you guys if you decide to register to take part in this new Magento experience.

banners-mm16world

Our discount code will give you a 16% discount on the list price and you can use it when completing the registration process.

Code: 

MMWORLDWB748F

Discount is valid until November 30th 2016 so better hurry up and register!

Join the conversation using #MM16WORLD hashtag on Twitter and see you all at Meet Magento World!

The post Meet Magento World brings Magento experts to your home and office appeared first on Inchoo.

Meet Magento Croatia 2017 – save the dates!

$
0
0

Ready for the newest addition to the global family of Meet Magento events? We sure are! Save the dates, 17 – 18 March 2017, ’cause that’s when we’ll be seeing you in Osijek for the first ever Meet Magento Croatia.

2016 was a huge year for Inchooers.

After checking off two major things from our to do list (putting together Developers Paradise and moving to a new office), we decided 2017 will be no different. To set the tone right, we already started planning some rather exciting new things.

Meet Magento Croatia 2017 is one of those things and we can’t wait to see you there!

Yes, it’s true that Meet Magento events have a tendency to be more oriented towards the local community. We admit that’s the case in our scenario too. But, when local forces are joined by the strong international community, that’s when the magic happens.

So, we are excited to welcome you – members of the extraordinary Magento community to our hometown!

For those of you who’ve been to Developers Paradise and miss it, and for those of you who heard rumours and want to be part of the next conference organized by Inchoo – we suggest you to get your tickets now. 

Number of tickets is limited and we wouldn’t want you to miss the event ’cause you waited too long.

lobby-bar-broj-1

Why join?

Simply put – we’ll do everything that’s in our power to make it amazing. Last time it certainly paid off, we hope it will pay off this time too.

We will have separate Biz and Dev tracks with Dev track entirely in English so if you hope to tackle Magento 2 right on the spot or to share war stories with your old and some new friends – this is the place to be.

Care to share?

Interested in sharing the story of how you tackled a certain Magento 2 challenge with everyone? You can (and should!) apply as a speaker – check out the form here and let us know what you would like to speak about.

All other info (such as the location and Early Bird ticket price) can be found on this link. If there are some uncertainties left, we even got you covered with a nice FAQ.

Hopefully, this sparked your interest and we’ll see you in Osijek soon.

pogled-drava-s-hotela

Interested? Great!

The next thing you’d like to do is to book your ticket. Based on our DevParadise experience, Early Bird has a tendency of flying off really fast once it catches the worm. Now, you’d like to get your ticket before that happens, right? 😉

The post Meet Magento Croatia 2017 – save the dates! appeared first on Inchoo.

Minify your CSS and JavaScript code!

$
0
0

If you are reading this article, you are probably somehow involved with web development. It is also most likely that you already know how search engines use page speed as one of the parameters for evaluating your site. We have couple of options on our disposal when it comes to increasing site speed. Today we will cover one of them.

Probably the simplest method of increasing site speed is minifying CSS and JavaScript. Even though this is pretty simple and straight forward method, for some reason, a lot of Magento stores and generally websites, don’t use this benefit. We have seen different cases where developers completely ignored code minification. Also, we have seen partially minified code. Partially means that, for example, theme code is minified but there is a lot of inline code which isn’t and it is possible to relocate and minify it. We’ve also seen cases where main theme code is minified but code from some other source (extension etc.) isn’t.

Before we go any further let us just ensure that we are on the same page about what “minified code” means. So, minified code is code without:

  • Whitespace characters
  • New line characters
  • Comments
  • Block delimiters.

Let us to suggest few possible options how to minify your code for production.

Minifying CSS and JavaScript code

In order to minify code we first need to decide are we going to do it manually or automatically. We’ll suggest to do automatically in order to speed up the development process, but if for some reason you want to do it manually, we don’t mind.

Do It Manually

CSS Minifying

If you are a developer who doesn’t use any kind of frontend “wizard” on your project (SASS, LESS, Gulp, Grunt etc.), the best option for you will be to use some kind of online or offline minifying tool. For example, one of the online minifying tools you can use is cssminifier.
If you are working on a complex project, you’re probably using some kind of IDE software. In that case you can speed things up by using some kind of IDE plugin that you can install or enable. That will minify the code every time when you save the working stylesheet file.

JavaScript Minifying

Very similar to minifying CSS code. There is bunch of online tools and different kind of IDE extensions for minifying JavaScript code. For example, good online tools are jscompress or javascript-minifier.

Do it automatically

This approach highly depends on the project and what we can or can’t change on it. Sometimes, it’s not possible to change the whole development environment just like that, especially if we’re collaborating with other developers on the same project. It’s not easy to suggest the best possible solution for everyone, but we’ll share what are we using on our Magento projects. We will assume that our audience is familiar with SASS, Compass, Gulp etc. If you need more information, please check out this article from my colleague. You can learn a lot of new things there.

SASS

If you already using SASS on your project, this will be easy for you. Just add additional parameter on sass –watch command:

sass --watch file.scss:file.css --style compressed

But, if you are not familiar with SASS then keep reading, maybe you will find even something better for you.

Compass

If project has Compass included, we already have Compass config file in the project. Just search for config.rb file, open the file and you should see something that looks something like the following:

# Require any additional compass plugins here.
 
# Set this to the root of your project when deployed:
http_path = "/"
css_dir = "stylesheets"
sass_dir = "sass"
images_dir = "images"
javascripts_dir = "javascripts"
 
# You can select your preferred output style here (can be overridden via the command line):
output_style = :compressed # :expanded or :nested or :compact or :compressed
 
# To enable relative paths to assets via compass helper functions. Uncomment:
# relative_assets = true
 
# To disable debugging comments that display the original location of your selectors. Uncomment:
line_comments = false

The config.rb file, Line 11 will likely be commented with the # sign. Uncomment the output_style (remove #). Then restart Compass to start watching for changes in SCSS files. To trigger it enter the command:

$ compass watch

Gulp

Gulp is a truly useful tool for better and faster frontend development. Here on Inchoo blog we have already mentioned few Gulp benefits. We often suggest using Gulp as one of the best tools for complex projects such as Magento frontend development itself.
With Gulp we have wide range of tools at our disposal which can be used to solve different kinds of development problems. But, currently we are only interested in code magnification tasks.

There is couple of ways to handle code magnification in Gulp, but we prefer these two Gulp tasks for that:

Minify CSS and JS code in Magento 1.x

If we take Magento 1.x for example, we need to handle with a lot of inline CSS and Javascript code inside template files. And in order to achieve the best possible results with code magnification, we need to take a look at your Magento template files and find all CSS and JavaScript code that we can transfer to our theme files. Keep in mind that in some cases we will not be in position to transfer all of them to appropriate theme files. Mostly in cases where JavaScript is depending on some php input/output.

Also, we suggest that while we’re transferring JavaScript code to theme file, we double check what code we need on which page. It is possible that we don’t need everything loaded on all Magneto pages. For example, some chunk of code is required just on the product page or just on the home page. That gives us possibility of splitting code in two different files which we can call on different occasions by using Magneto XML engine.

Let us create new gulp tasks which we will using for fast minifying code:

var gulp = require('gulp');
var sass = require('gulp-sass');
var concat = require('gulp-concat');
var rename = require('gulp-rename');
var uglify = require('gulp-uglify');
 
// Css paths
var cssInput = '../sass/**/*.scss';
var cssOutput = '../css';
 
// script paths
var jsSkinInput = '../js/**/*.js';
var jsSkinOutput = '../js/';
 
// Js min task
gulp.task('skin-scripts', function() {
    return gulp.src(jsSkinInput)
        .pipe(uglify())
        .pipe(rename({
            suffix: '.min'
        }))
        .pipe(gulp.dest(jsSkinOutput));
});
 
// Sass task
gulp.task('sass', function () {
    return gulp.src(cssInput)
        .pipe(sass({
            errLogToConsole: true,
            outputStyle: 'compressed'
        }))
        .pipe(gulp.dest(cssOutput))
});
 
// Sass file watcher
gulp.task('sass-watch', function() {
    return gulp
        .watch([cssInput, cssOutput], ['sass','browser-reload'])
        .on('change', function(event) {
            console.log('Css File ' + event.path + ' was ' + event.type + ', running tasks...');
        })
});
 
// Js file watcher
gulp.task('skin-scripts-watch', function() {
    return gulp
        .watch([jsSkinInput,jsSkinOutput], ['skin-scripts','browser-reload'])
        .on('change', function(event) {
            console.log('Js File ' + event.path + ' was ' + event.type + ', running tasks...');
        });
});
 
gulp.task('default', ['skin-scripts', 'skin-scripts-watch', 'sass', 'sass-watch']);

As we can see, we are watching for changes on all JavaScript and SASS files in our theme structure. Gulp recognized it and after few seconds Gulp generated minified code at the end. The first two task (skin-scripts and sass) are responsible for CSS and JavaScript minifying, and they work very similar, only difference being that JS files are renamed after minifying process by adding suffix .min at the end of file name. We wish to keep original file for further work and adjustments.

When you are ready, enter this command in your terminal in order to start Gulp tasks:

gulp default

Sounds simple right. But with Magento there’s always something additional 🙂

The thing is that Magento uses JavaScript not just in themes scope, but on the whole system. Major part of JavaScript which is responsible for keeping the system running is located in Magento root (js folder).

As we mentioned before, our goal is to have full minified JavaScript code. And we wish to do things properly. So we have two options:

First one is to adjust our Gulp task so that our task minifies root JavaScript code also, but that isn’t the best possible option. Why? Because with that action we will additionally complicate further maintenance and Magento upgrades. So, in order to avoid that, we want to minify root JavaScript code through Magento backend adjustments. Just before Magento JavaScript code merge.

The second option will be presented by my colleague Tomislav. Instructions for that will come soon.

Keep reading our blog and let us know what you think in the comments below 🙂

The post Minify your CSS and JavaScript code! appeared first on Inchoo.

Road to the Code with Less Bugs?

$
0
0

I think that writing any non-trivial software without introducing bugs is close to impossible. World is complex, data used in programs is complex, handling all possible interactions of our code with said data is hard. There are probably bugs even in the short script that is accompanying this article. Sounds dark? Maybe it shouldn’t.

Everybody who writes software is creating bugs, it is inevitable.

There is huge amount of research about what causes bugs and there are various results and conclusions.

My interpretation of the surface reading is that number of “bugs per line” is scaling in some way with total number of lines in program. For example, program with 1000 lines will have one bug, program with 2000 lines will have 3 bugs, and program with 50 000 lines will have 100 bugs. Personally, I feel like that is true as it kind of matches my experience. Programmers mostly agree about this.

Another finding is that programs with more restriction about who (who = which code) and when (under which conditions) can modify some state also have less bugs. (Scientists say!) I agree, because it also matches my experience. In long functions with many variables or classes with lots of properties which are used later for logic there are more bugs. Especially if we are writing code under assumption that objects will always be in some finite amount of states that we accounted for or that variables will be configured in a certain way. (error calling Method() on null, index not found, Varien_Object returning null on getPropertty() instead of giving error)

There is also something called cyclomatic complexity (amount of logical branches code can take).
I hope there are least some of us who did not experience that feeling of dread upon reading logs and seeing an exception occurred in the middle of 500+ line method of class on a line which starts somewhere after character number 52…

So, if we could somehow:

  • Make objects/variables which are always in valid state. Maybe by using static declarations, there will be another article about how PHP7 is improvement over PHP5 here.
  • Make sections of code smaller and easier to understand. Perhaps by reducing number of branches and loops.
  • Reduce overall amount of code. Perhaps by using higher level constructs, so we write less code.

Honestly, I am not really sure if such ideas will really work. So far, my feeling is that it helps a lot. Maybe it will help more when I get more experience, maybe it is actually worse and I lack knowledge/skill to see it.

But I can see there is lot of space for improvement. And I am very confident that we should at least examine some of the options and see how they work in practice.

So, in this teaser post, let’s do something everybody enjoys!

Parsing CSV files, and doing some analysis on that data!!!

Input: CSV with UN employment data. Rows with years, work sectors and number of people working in each sector per given year (in 2002, there were 100 000 people working for the Government).

Output: Statistic with percentages that show how many people worked in some sector for given year, and how those percentages changed over years.

For the first post, we are going simple, only showing data for one country and for both genders.
That gives us excuse to introduce generators. 🙂 Our goal is to show the table in HTML (ugly looking table but we won’t be concerned with styling, only with filling table with proper data).
Performance is secondary goal, and it will not be tackled until we are satisfied with the code quality. Corectness and crash-resistance are primary goals!

I will quickly show uses of some of the concepts and we will try to improve code as series go on.
Not sure where we will end and if functional style is good fit for the problem overall but let’s see where it will take us. Along the way, we’ll also see if functional in PHP will be easier to understand than the same thing implemented in OOP way or old-school imperative approach.

Code is on github

https://github.com/grizwako/broadening_horizons

We will start with closures.

Closures are good for encapsulating data, without going full on object-oriented.
http://php.net/manual/en/functions.anonymous.php
http://culttt.com/2013/03/25/what-are-php-lambdas-and-closures/
http://fabien.potencier.org/on-php-5-3-lambda-functions-and-closures.html

Goes like this – you create some function which will have some data saved, and you can later call that function (with new parameters too).

Example function is accessing values of CSV data rows by column names defined in CSV header line.

function mappedRow(data-row, column-map)
 
$entry = mappedRow(
    [4, 'bla@blo.com'],
    ['id' => 0, 'email' => '1]
);
 
echo $entry('email'); //bla@blo.com

Implementation:

/**
 * Creates dictionary-like closure which accesses array values by string keys.
 * So instead of $row[$map['key'] you can use $row('key')
 * @param $row
 * @param $columnMap
 * @return Closure
 */
function mappedRow($row, $columnMap)
{
    if(empty($columnMap)) {
        throw new LogicException('Column map must not be empty! Hint: reverse header row to use as column map');
    }
 
    //returns function which accepts one parameter and has saved values for $row and $columnMap
    return function($key = null) use ($row, $columnMap) {
        return $row[$columnMap[$key]];
    };
}


Second useful thing: generators!

http://php.net/manual/en/language.generators.overview.php
Generators are like iterators/array, but differ in the fact that they will give you data only when they are told to do so. We can use generator to read huge CSV file line by line, and we only take lines that we need.

For now, you can think of keyword yield as “feed (return) value into caller, but save state of generator function for when it is called next”.

Generator is somewhat like closure, it can also have some local variables saved for later usages.

/**
 * Lazily read CSV file
 *
 * @param $filename
 * @param string $split
 * @param int $maxLineLength
 * @param array $columnMap
 * @return Generator
 * @throws Exception
 */
function mappedCsvGenerator($filename, $split = ',', $maxLineLength = 0, $columnMap = [])
{
    $fileHandle = fopen($filename,'r');
    if(FALSE === $fileHandle) {
        throw new Exception('Could not open file: '.$filename);
    }
    while (($data = fgetcsv($fileHandle, $maxLineLength, $split)) !== FALSE) {
        if(empty($columnMap)) {
            //Moves array pointer to next row
            $columnMap = array_flip($data);
            continue;
        }
 
        yield mappedRow($data, $columnMap);
    }
}

Let’s create instance of a generator; we are still not asking it to read data from CSV.

$rows = mappedCsvGenerator('un_employment_1980-2008.csv');

Next, we will not need all rows from CSV, only a few. Let’s pretend that we do not have the database system in which we can import data. Filter rows as we are only interested in data for one country and for both genders.

It would be wonderful if we could somehow delay reading of the CSV rows to the point when we actually need them.

Luckily, Nikita Popov created a really nice library that helps with using lazy collections. (Also, he is one behind a lot of cool stuff that PHP got recently. Generators included.)
About Nikita: https://nikic.github.io/aboutMe.html
Lazy collections: https://github.com/nikic/iter

$stats = iter\filter(
    function($row) {
        return $row('Country or Area') === 'Croatia'
		&& $row('Sex') === 'Total men and women';
    },
    $rows
);

CSV file is still unread!! We did not actually use the values, we only specified that the values we will use will have to satisfy some condition. Instead of creating an array and then inserting rows from some foreach, we only said that $stats will give us rows that satisfy some condition when we ask for them.

Grouping values with common higher order functions

Next step, I think that we will need to group values by work sector and year if we want to display them in a table.

Higher order just means function that accepts other function in a parameter, nothing actually fancy.
Word group sounds like it should be a function, but there is not one such in Nikic’s library.
Some searching will bring us to: https://github.com/lstrojny/functional-php

It has group, it seems it can only do one level of grouping with one call. There is some advanced stuff in the library Lars made so maybe we can do some mumbo-jumbo when we revisit the code and refactor it to compose function that will group by two levels.

First we group by work sector (subclassification). And then we do something that is actually elegant, but looks weird if you are not used to it. Map is kind of like foreach, but it is not supposed to modify collection it is iterating over. Think of it like: map = foreach item: call function “a” and return items function “a” returned.

Function “a” will accept one item from the collection, do something and return one item. Map will return array of all items function “a” returned.

$statsBySubclassification = group($stats, function($row){
    return $row('Subclassification');
});
 
$statsBySubclassificationAndYear = map($statsBySubclassification, function($subclass) {
    $indexed = reindex($subclass, function($row) {
        return (int)$row('Year');
    });
    return map($indexed, function($row) {
        return (float)$row('Value');
    });
});

So, with our grouped entries we will call function (which accepts all entries that fall under one Subclassifiction). That function will first create a new array which will have “Year” of entry as a key and after that go over all elements and get ‘Value’ only for each row.

Something like:

$statsBySubclassificationAndYear = [];
foreach($statsBySubclassification as $subclassifiction => $items) {
    foreach($items as $item) {
    	//PHP has autovivification, so we dont have to worry about creating proper array keys
        $statsBySubclassificationAndYear[$subclassifiction][(int)$item('Year')] = (float)$item('Value');
    }
}

Honestly, in PHP foreach seems easier at first, even to me.
In some made up functional language, we would have this sort of thing:

statsBySubclassificationAndYear = map(statsBySubclassification, (subclass) =>
    indexed = reindex(subclass, (row) => (int)row('Year'))
    map(indexed, (row) => (float)row('Value'))
)


Displaying grouped data as a table:

<?php
$totalByYear = $statsBySubclassificationAndYear['Total.'];
$years = array_keys($totalByYear);
sort($years); // Why is this bad style?
 
//now, lets build table that will show us suclassifications percentages over years
// I feel that foreach is cleaner here, because we are mutating some object
$table = new SimpleXMLElement('<table/>');
$head = $table->addChild('tr');
$head->addChild('th', 'Subclassification');
foreach($years as $year) {
    $head->addChild('th', $year);
}
 
foreach($statsBySubclassificationAndYear as $subclass => $byYear) {
    $tableRow = $table->addChild('tr');
    $tableRow->addChild('td', $subclass);
    $percentage = 0;
    //we are relying on $years that was defined too far from where we are using it
    foreach($years as $year) {
        if(array_key_exists($year, $byYear)) {
            // can this part of code be improved by using functional style?
            // we are relying on $percentage from last iteration, stuff like that causes bugs
            $tempPerc = 100 *($byYear[$year] / $totalByYear[$year]);
            $delta = $tempPerc - $percentage;
            $percentage = $tempPerc;
            $procFormat = number_format($percentage, 2);
            $deltaFormat = number_format($delta, 2);
            $tableRow->addChild('td', $procFormat)->addChild('p', $deltaFormat);
        } else {
            $tableRow->addChild('td', ' - ');
        }
    }
}
 
?>
 
<style>
    table, th, td {
        border: 1px solid black;
    }
    p {
        color: blueviolet;
    }
</style>
 
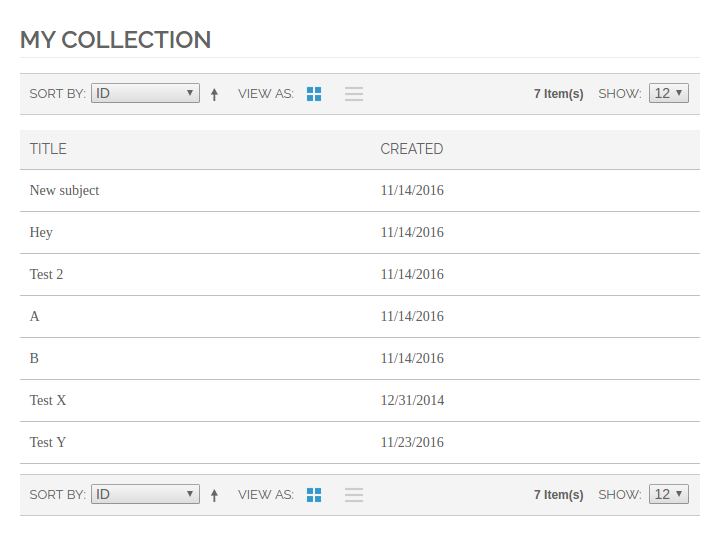
Percentages by sector, blue is delta from previous year
<?php echo $table->asXML(); ?>

Conclusion of the first part:

Article turned somewhat different than I expected. Having nicer lambda syntax would improve readability so much. Closures are great in limiting local scope, generators are really nice to use, in some other languages they require more syntax. Nikic does wonders for PHP.

We have nicely formatted data, look at this design masterpiece!
data screenshot

 Credits:

UN data

http://data.un.org/
Total employment, by economic activity (Thousands)  [1980-2008]
http://data.un.org/Data.aspx?q=employment&d=LABORSTA&f=tableCode%3a2B

https://github.com/nikic/iter
https://github.com/lstrojny/functional-php

The post Road to the Code with Less Bugs? appeared first on Inchoo.

Add Pagination to Custom Collection in Magento

$
0
0

If you are starting with Magento, just like I am, you might run into the issue of adding pagination to your table, list of products or anything else you want to list on frontend. Magento allows you to create your own pagination with adjustable built-in options. This tutorial will show you how to create pagination for a custom collection in Magento.

This is how final custom pagination looks like:
magento pagination

I created Education module inside Inchoo package with Ticket model.

magento pagination

STEP 1

First of all create custom action to access your content. Add a custom action inside your controller:

public function paginationAction()
{
    $this->loadLayout();
    $this->renderLayout();
}

STEP 2

In your xml (app > design > frontend > rwd > default > layout > your_layout.xml) inside “layout” node add the node referencing your custom action. If you are using different or custom theme your path might be different than “rwd > default”.

“education/pagination” – where “education” is the name of your module, “pagination” is name of your block inside pp/code/local/Inchoo/Education/Block folder, my block is named Pagination.php.

<education_index_pagination>
  <reference name="content">
    <block name="collection_ticket" type="education/pagination" template="education/pagination.phtml"/>
  </reference>
</education_index_pagination>

Magento pagination

STEP 3

Create class that will extend Magento’s default product list toolbar so you can alter default behavior. Inside app/code/local/Inchoo/Education/Block create Toolbar.php

class Inchoo_Education_Block_Toolbar extends Mage_Catalog_Block_Product_List_Toolbar
{
    public function getPagerHtml()
    {
        $pagerBlock = $this->getLayout()->createBlock('page/html_pager');
        if ($pagerBlock instanceof Varien_Object)
        {
            /* here you can customize your toolbar like h*/
            $pagerBlock->setAvailableLimit($this->getAvailableLimit());
            $pagerBlock->setUseContainer(false)
                ->setShowPerPage(false)
                ->setShowAmounts(false)
                ->setLimitVarName($this->getLimitVarName())
                ->setPageVarName($this->getPageVarName())
                ->setLimit($this->getLimit())
                ->setCollection($this->getCollection());
            return $pagerBlock->toHtml();
        }
        return '';
    }
}

STEP 4

Create your block inside your module’s block, in this case app/code/local/Inchoo/Education/Block. I named this block Pagination, you can call it however you want to, but then you have to be careful about calling it in your xml.

class Inchoo_Education_Block_Pagination extends Mage_Core_Block_Template
{
    public function __construct()
    {
        parent::__construct();
        //set your own collection (get data from database so you can list it)
        $collection = Mage::getModel('education/ticket')->getCollection();
        $this->setCollection($collection);
    }
    protected function _prepareLayout()
    {
        parent::_prepareLayout();
        //this is toolbar we created in the previous step
        $toolbar = $this->getLayout()->createBlock('education/toolbar');
        //get collection of your model
        $collection = Mage::getModel('education/ticket')->getCollection();
        //this is where you set what options would you like to  have for sorting your grid. Key is your column in your database, value is just value that will be shown in template
        $toolbar->setAvailableOrders(array('created_at'=> 'Created Time','id'=>'ID'));
        $toolbar->setDefaultOrder('id');
        $toolbar->setDefaultDirection("asc");
        $toolbar->setCollection($collection);
        $this->setChild('toolbar', $toolbar);
        $this->getCollection()->load();
        return $this;
    }
 
    //this is what you call in your .phtml file to render toolbar
    public function getToolbarHtml()
    {
        return $this->getChildHtml('toolbar');
    }
}

STEP 5

Inside app > design > frontend > rwd > default > template (or change rwd > default to your theme path) create pagination.phtml (as you stated in step 2):

<?php $collection = $this->getCollection();  ?>
    <div class="page-title">
        <h1><?php echo $this->__('My Collection') ?></h1>
    </div>
<?php echo $this->getToolbarHtml(); ?>
    <table class="data-table" id="my-custom-table">
        <thead>
        <tr>
            <th><?php echo $this->__('Title') ?></th>
            <th><span class="nobr"><?php echo $this->__('Created at') ?></span></th>
        </tr>
        </thead>
        <tbody>
        <?php $_odd = ''; ?>
        <?php foreach ($collection as $item): ?>
            <tr>
                <td><span class="nobr"><?php echo $item->getSubject(); ?></span></td>
                <td><?php echo $this->formatDate($item->getCreatedAt()) ?></td>
            </tr>
        <?php endforeach; ?>
        </tbody>
    </table>
<?php echo $this->getToolbarHtml(); ?>

*Custom pagination

If you want to create your own custom pagination without using Magento’s Toolbar, after you finished step 1 and step 2 inside app/code/local/Inchoo/Education/Block create Pagination.php.

class Inchoo_Education_Block_Pagination extends Mage_Core_Block_Template
{
    public function __construct()
    {
        parent::__construct();
        $collection = Mage::getModel('education/ticket')->getCollection();
        $this->setCollection($collection);
    }
    protected function _prepareLayout()
    {
        parent::_prepareLayout();
        $pager = $this->getLayout()->createBlock('page/html_pager', 'custom.pager');
        $pager->setAvailableLimit(array(5=>5,10=>10,20=>20,'all'=>'all'));
        $pager->setCollection($this->getCollection());
        $this->setChild('pager', $pager);
        $this->getCollection()->load();
        return $this;
    }
    public function getToolbarHtml()
    {
        return $this->getChildHtml('pager');
    }
}

After you did this, skip step 3 and 4 and go straight to step 5 to create .phtml. When you’re done with that you’ll get something like this:

magento pagination

The post Add Pagination to Custom Collection in Magento appeared first on Inchoo.

We want you on stage at Meet Magento Croatia!

$
0
0

Thinking about whether you should join us for Meet Magento Croatia? If you haven’t thought about it by now, you should definitely start! Here’s why…

Meet Magento Croatia is part of the global family of Meet Magento events which gathers eCommerce experts from all over the world. One, two or three-day events serve as the best possible connection platforms for getting all the latest info from the Magento world.

And not only that – they are the perfect place where eCommerce trends are discussed and hot Magento topics tackled. Developers Paradise we organized in April proved, once again, that events channel the power of community. In fact, that’s what makes them special!

How can you join?

By signing up, of course. We’d like to see you as a speaker or, alternatively, as a delegate. We know many of you have a lot of miles in your Magento shoes and we’d like to hear all about the roads you’ve been on. It’s no secret you’ve breathed life into numerous web shops – now it’s the time to shine and share with community how you did it.

mm17hr-tekst

We are interested in hearing your story (inside out)!

Along the way, you overcame different obstacles and bridged various challenges – by sharing your story, you are empowering the community to grow. We all want to improve, we would highly appreciate you telling us how exactly you are doing it – day in, day out.

The only thing is…

There’s not much time left to apply so you better hurry!

Final deadline for getting your applications in is December 31st. We’ll make sure to review all of your applications and get back to you as soon as possible. At this point, we can promise you, if you make it to the #MM17HR stage, you’ll be around some pretty amazing Magento and eCommerce experts. 😉 We’ll be dropping names soon, so make sure to stay tuned to see who we’ll host.

So, come on – tell us what you did, and more importantly, how did you do it and we’ll get you on the MM17HR stage. 

See you in Osijek, Croatia, home of Inchooers!

The post We want you on stage at Meet Magento Croatia! appeared first on Inchoo.

How to set up a CDN (Amazon CloudFront) in Magento

$
0
0

If you are using Amazon AWS CloudFront and you want to set up CDN in your Magento, this tutorial is going to take you step by step on how to set up your CloudFront and Magento to get it both working.

STEP 1 – DISTRIBUTIONS

The first thing you have to do is to set up Distribution on CloudFront. Below you can see an example of my custom Distribution.

CloudFront Distributions

This is how general options should look like, of course you can edit them to suit your needs.

CloudFront general tab

As you may see here:CloudFront certificate

Amazon’s CloudFront uses its own certificate so if your site uses SSL you can just use CloudFronts’s domain name such as “https://xyz13zxy.cloudfront.net”. You can also use custom CDN url with SSL such as “https://cdn.yoursite.com” but then you’ll have to import your own certificate.

Two very important options you need to be careful about are:

Alternate Domain Names (CNAMEs): this is used if you want nicer URLs for your content. So for example, if your CNAME is “cdn.yoursite.com” you will have to do some configuration in your cPanel of your own server to make it work and instead of, for example “http://www.yoursite.com/images/image.jpg” it’s going to be “http://cdn.yoursite.com/images/image.jpg”

Domain Name: This is a domain name Amazon generates for you, for example: “xyz13zxy.cloudfront.net”. If you don’t care about URL for your CDN this is faster and easier way to set up CDN. So instead of, for example “http://www.yoursite.com/images/image.jpg” it’s going to be “http://xyz13zxy.cloudfront.net/images/image.jpg”.

So how Amazon knows which images to use if you are trying to access it via “xyz13zxy.cloudfront.net”. This is where the Origins come in.

STEP 2 – ORIGINS

Now you have to set Origins. Amazon’s official documentation says: “When you create or update a distribution, you provide information about one or more locations—known as origins—where you store the original versions of your web content. CloudFront gets your web content from your origins and serves it to viewers. Each origin is either an Amazon S3 bucket or an HTTP server, for example, a web server”.

Origin Domain Name: this is your source domain name, for example “www.yoursite.com

Origin ID: this is some ID you specify by yourself just to easily identify this Origin. It can be something similar to your CDN domain name.

Origin Path: it’s empty. Amazon’s official documentation says: “Optional. If you want CloudFront to request your content from a directory in your Amazon S3 bucket or your custom origin, enter the directory name here, beginning with a /. CloudFront appends the directory name to the value of Origin Domain Name when forwarding the request to your origin, for example, myawsbucket/production.”

CloudFront Origins

CloudFront Origins

STEP 3 – BEHAVIOURS

The next thing you have to do is to set Behaviours. Amazon’s official documentation says: “A cache behaviour lets you configure a variety of CloudFront functionality for a given URL path pattern for files on your website. For example, one cache behaviour might apply to all .jpg files in the images directory on a web server that you’re using as an origin server for CloudFront.

When using CDN sometimes you might get an error on your website similar to this one: “Cross-Origin Request Blocked: The Same Origin Policy disallows reading the remote resource at http://xyz123zxy.cloudfront.net/images/images.jpg This can be fixed by moving the resource to the same domain or enabling CORS.”

To fix this problem you have to set Behaviours.

Origin: It’s very important to choose the right Origin from the dropdown box. This is your Origin you set up in the previous step.

Whitelist Headers: choose “Origin” from the left box and click on Add >>. When you choose your other options click on Create/Edit.

Path Pattern: This is path to a file you want to allow CORS for. I’m using “*” so it matches all files and allows Cross-origin resource sharing.

CloudFront Behavior

STEP 4 – INVALIDATIONS

You might be wondering how and when the cache is going to be invalidated or cached again. By default, each object automatically expires after 24 hours.

From Amazon’s official documentation: To change the cache duration for all objects that match the same path pattern, you can change the CloudFront settings for Minimum TTL, Maximum TTL, and Default TTL for a cache behaviour. For information about the individual settings, see Minimum TTL, Maximum TTL, and Default TTL. To use these settings, you must choose the Customize option for the Object Caching setting.

If you want to invalidate cache for all files (which is not recommended) or just for one specific file, you have to set “Invalidations”.

Enter path to your own files and click on Invalidate.

CloudFront Cache Invalidation

STEP 5 – MAGENTO SETTINGS

This was CloudFront’s side, now it’s time to configure Magento’s settings. It’s really easy to configure Magento. The only thing you have to do is to configure Magento’s URLs. Screenshots below are using SSL (HTTPS) so I used “https://…” everywhere. If you don’t use SSL, but regular HTTP, then you should use ”http://…”.

As you may see, nothing has changed in Default settings.

Magento Website Settings

Choose your Website from the dropdown and change only fields where you want to set CDN URL. I chose to set CDN only for images and CSS files.

Magento Website Settings

Save your settings, clear your cache and test your website. How do you know if your site uses CDN now? Open your website (if you are using Chrome) and press CTRL and U on your keyboard to open the source code. If you can find something like “.cloudfront.net” or “cdn.yoursite.com” and all your content is loading properly that means CDN is set up properly.

Magento CDN code

The post How to set up a CDN (Amazon CloudFront) in Magento appeared first on Inchoo.


How many Magento certified people do you know?

$
0
0

How many Magento certified people are out there? 5,288 to date, according to the official data at everyone’s disposal. What about their distribution – where do they come from, what countries have the most certified individuals?

In this post you’ll find an overview of one interesting metric – Magento certified individuals per capita. Who tops the charts and where does your country stand? Read on to find out.

We’ve seen many different rankings in the Magento world, and thanks to Ben Marks and one of his recent tweets, I took it upon myself to dig just a bit deeper around the number of Magento certified people (totals include developers and solution specialists) per capita.

The initial conversation was about whether Netherlands or Croatia are leading these rankings globally, but as it turns out after I took a closer look at the official numbers, there are actually countries doing way better than us.

Why per capita?

Ok, but why use this metric in the first place? Well, it’s rather difficult to compare countries using absolute numbers and if we combine absolutes with something like this (number of Magento certified people per 1M of general population in each country) and then analyze the data, we can see some interesting trends and put things in a different perspective.

For example, we can see how in some countries the efforts of several individuals and companies can really make a difference and impact their local communities – and this is exactly what the metrics in this case are showing or hinting at.

The methodology behind this one was rather simple and straightforward:

    1. Go to official Magento certification directory
    2. Select country after country and simply collect these figures
    3. Then use some type of comparable statistics on population per country (rather difficult to find as each country has their own methods but I chose this one – the data set used was of December 29th, 2016)

Limitations of this method

It’s impossible to see people who have opted not to be visible in the directory, so the numbers are not 100% representative of the real situation with certifications.

Another one is – there are people (app. 140 out of 5288 listed) who don’t have any country associated with them, so these have not made the numbers.

And finally – smaller countries can improve their position more easily. But then again, there are only two countries with less than 1M people in Top 50 so that’s not that big of an issue.

You can check out some of the hard data below, but for the sake of this post, I’ll focus more of the analysis on the thing I found most interesting – finding out just how many certified Magento people per 1M of the total population in each of the countries globally.

The “hard data”

  • there are 5288 certified individuals in Magento directory
  • they come from 73 countries
  • 7 countries have only one certified individual
  • 11 countries have more than 100 certified people
  • USA has the highest number of certified individuals – 849

Baltic countries top the charts

magento-certified-per-1m

While it may come as a surprise that Latvia is the one leading the pack, Scandiweb team have been doing an amazing job over there in the last years, getting a lot of their employees certified in the process, and building on the community in this Baltic country. We’ve also gotten quite fond of them as they sent the largest delegation to Developers Paradise 2016 in Opatija so we’re happy to see our Latvian friends in the significant lead with 41,4 Magento certified individuals per one million people.

In not that close second, we’ll find Malta. Now, this one is the only really debatable country to make it into Top 5 as it doesn’t make sense to say they have 30,3 people per 1M if they have the total of 13 people certified (and the total population of less than 500k). They are also the only country besides Montenegro to have at least one person certified and the population of less than 1M, so they do deserve to get some credit in any case.

We can either take them out of the chart or change the metric to certified per 100k people (which we can do, or not), but after them there’s another Baltic country, a Latvian neighbour – Estonia – with 20,5 Magento certified people per 1M.

Yes, it helps that these three countries topping the charts have 1-2 million people (or much less in case of Malta), but still – the smaller the country, the smaller the pool of people you can find those willing to dedicate their everyday work to a specific eCommerce software, so these numbers do hold value.

The Netherlands is hot and getting hotter

And then we have Netherlands – and hats off to them and everyone around an amazing community they’ve created as they are only one of two countries with >10M people who made it into Top 10. Can you guess the second one? Well, it wasn’t that difficult to spot Ukraine, right?

If you add to that one of the latest similar investigation by Willem de Groot (who many of you will know as the man behind MageReport) which shows that the Dutch are way ahead of everyone in number of Magento stores per 1M, it clearly demonstrates the strength and impact Magento and its community has had on the businesses in this country, and vice versa.

Not sure whether Magento’s official orange color had something to do with the ease of its penetration to this market, but let’s leave that aside for someone else to analyze 🙂

What about Croatia?

The reason why I started this was, of course, a chance to do some humblebragging as well, since we invested a lot of efforts of our own into Magento and local community of developers, and Croatia is in fact right there, in Top 5, with just over 12 Magento certified people per 1M, chasing after our friends from Netherlands – let’s see how the tables will turn in 2017. It would be really nice to see how our city of Osijek would rank on a similar chart if we compared cities globally, but that one is much more difficult to get right (proper data, cities vs metropolitan areas etc.).

More charts

For you who like to play around with numbers, here are some more charts to check out. Click on the thumbnails for full images.

A) USA (849) holds a slim lead over India (804) in the total number of certified individuals, and these two together take over 30% share of the global total of all Magento certified people.
magento-certified-per-country

B) European countries hold almost half of all certificates globally, while having just 10% of the global population.

C) Magento certified per 1M – a list of Top 25 countries
magento-certified-per-1m-top25

So, what now?

If you’re Magento certified yourself, jump on to the directory to check if you have a city/country listed next to your name to see if you made these numbers and helped your country out 🙂 If there’s something missing, there’s always the FAQ to help you sort it out.

And let’s all keep an eye out on these numbers and use them to further improve on the co-opetition within Magento ecosystem.

With these metrics, chances are we won’t have that much influence on the total population numbers, but we can all pull our weight when it comes to the certifications – we’re already preparing some of the Inchooers for new exams to get closer to and, hopefully, surpass our Dutch friends soon 🙂

Keep them coming!

The post How many Magento certified people do you know? appeared first on Inchoo.

Custom data components in Pimcore

$
0
0

Today I will show you how to create custom data component in Pimcore 4.4.. If you are using Pimcore, sooner or later you will end up with requirement for new form element (complex type). Data components in Pimcore are object types used for complex data modeling on object. Data component consists from data, tag Extjs scripts and one Model which is responsible for saving/loading configuration. Currently Pimcore has 19 complex data components (you can read more on https://www.pimcore.org/docs/latest/Objects/Object_Classes/Data_Types/index.html), and they will cover most requirements you will ever need. However, if (when) you’ll need a custom data component, here’s how you can create it.

Custom component

For demonstration we’ll create custom data component which will use source from custom controller and show data as select field (dropdown). Also we’ll cover how to add custom options in data script and use it on tag script. First, we’ll create plugin skeleton with basic plugin data in plugins folder and our folder will be called “Customdatacomponent”. If you want to know how to create plugin please read article “Extending Pimcore with plugins” on our blog. After we have created plugin skeleton it’s time to work on the component configuration script.

Data script

Data script is required for component configuration, and without this script our custom component will not be displayed in Pimcore. Let’s create script on location [Pimcore root]/plugins/Customdatacomponent/static/js/data-components/data/customcomponent.js, and include script in plugin configuration (plugin.xml):

<pluginJsPaths>
	<path>/plugins/Customdatacomponent/static/js/data-components/data/customcomponent.js</path>
</pluginJsPaths>

and we can write some code after that. First, we need to register pimcore.object.classes.data.customdatacomponent namespace and add new component class in pimcore.object.classes.data which will create class from pimcore.object.classes.data.data. To make it all work we also need to set type, allowed in, initialize logic, type name, icon class and group. We also need to work on getLayout method where we’ll add one custom option. But first, let’s write complete data script:

/**
 * Custom data component - configuration
 */
 
pimcore.registerNS("pimcore.object.classes.data.customdatacomponent");
pimcore.object.classes.data.customdatacomponent = Class.create(pimcore.object.classes.data.data, {
 
    type: "customdatacomponent",
 
    /**
     * define where this datatype is allowed
     */
    allowIn: {
        object: true,
        objectbrick: false,
        fieldcollection: false,
        localizedfield: false,
        classificationstore : false,
        block: true
    },
 
    initialize: function (treeNode, initData) {
        this.type = "customdatacomponent";
 
        this.initData(initData);
 
        this.treeNode = treeNode;
    },
 
    getTypeName: function () {
        return 'Custom data component';
    },
 
    getIconClass: function () {
        return "pimcore_icon_select";
    },
 
    getGroup: function () {
        return "select";
    },
 
    getLayout: function ($super) {
        $super();
 
        this.specificPanel.removeAll();
        this.specificPanel.add([
            {
                xtype: "textfield",
                fieldLabel: 'Custom option',
                name: "customoption",
                value: this.datax.customoption
            }
        ]);
 
        return this.layout;
    },
 
    applyData: function ($super) {
        $super();
        delete this.datax.options;
    },
 
    applySpecialData: function(source) {
        if (source.datax) {
            if (!this.datax) {
                this.datax =  {};
            }
        }
    }
 
});

You can see we have added Custom option (text field) in get layout method. We’ll call that value in tag script for label value. For demonstration we have set data component to be available only on objects (allowIn array). This is how it should look on data components menu:

customdatacomponent-1

and this is how it should look on configuration form:

customdatacomponent-2

Model

To save and load data into component configuration we’ll need to create corresponding model. When you click on save button in class form, our custom data component Pimcore will lookup for model in Pimcore\Model\Object\ClassDefinition\Data namespace, file with Customdatacomponent name and class Customdatacomponent which extends Model\Object\ClassDefinition\Data\Select. Now we need to create model on path [Pimcore root]/plugins/Customdatacomponent/lib/Pimcore/Model/Object/ClassDefinition/Data/Customdatacomponent.php. As you can see, starting point for autoloader in our plugin is in lib folder. Here is the model logic:

<?php
namespace Pimcore\Model\Object\ClassDefinition\Data;
 
use Pimcore\Model;
 
class Customdatacomponent extends Model\Object\ClassDefinition\Data\Select
{
 
    /**
     * Static type of this element
     *
     * @var string
     */
    public $fieldtype = "customdatacomponent";
 
    public $customoption;
 
    /** Restrict selection to comma-separated list of countries.
     * @var null
     */
    public $restrictTo = null;
 
    public function __construct()
    {
    }
 
    public function setcustomoption($customoption)
    {
        $this->customoption = $customoption;
    }
 
    public function getcustomoption()
    {
        return $this->customoption;
    }
}

We have extended Model\Object\ClassDefinition\Data\Select class because our custom data component is also select type and we already have all the logic. For custom option we’ll create class variable “customoption”, and the name matches as option added in data component. We also need setter and getter methods (setcustomoption and getcustomoption). Now we can test save and load configuration for our component on class form.

Tag script

We’ll create tag script which will be used to render data component. First, we’ll create the whole script logic and then I will explain every part. For this example we’ll cover getLayoutEdit method which is used by edit form. Create data script on location [Pimcore]/plugins/Customdatacomponent/static/js/data-components/tags/customcomponent.js

/**
 *
 */
pimcore.registerNS("pimcore.object.tags.customdatacomponent");
pimcore.object.tags.customdatacomponent = Class.create(pimcore.object.tags.select, {
 
    type: "customdatacomponent",
 
    initialize: function (data, fieldConfig) {
        this.data = data;
        this.fieldConfig = fieldConfig;
    },
 
    getLayoutEdit: function ($super) {
        $super();
 
        this.storeoptions = {
            autoDestroy: true,
            proxy: {
                type: 'ajax',
                url: "/plugin/Customdatacomponent/index/values",
                reader: {
                    type: 'json',
                    rootProperty: 'id'
                }
            },
            fields: ["id", "value", "text"],
            listeners: {
                load: function() {
                }.bind(this)
            }
        };
 
        this.store = new Ext.data.Store(this.storeoptions);
 
        var options = {
            name: this.fieldConfig.title,
            triggerAction: "all",
            editable: true,
            typeAhead: true,
            forceSelection: true,
            selectOnFocus: true,
            fieldLabel: this.fieldConfig.customoption,
            store: this.store,
            componentCls: "object_field",
            width: 250,
            style: "margin: 10px",
            labelWidth: 100,
            valueField: "value"
        };
 
        if (this.fieldConfig.width) {
            options.width = this.fieldConfig.width;
        } else {
            options.width = 300;
        }
 
        options.width += options.labelWidth;
 
        if (this.fieldConfig.height) {
            options.height = this.fieldConfig.height;
        }
 
        if (typeof this.data == "string" || typeof this.data == "number") {
            options.value = this.data;
        }
 
        this.component = new Ext.form.ComboBox(options);
 
        this.store.load();
 
        return this.component;
    }
});

After we set type and initialize class, we have created getLayoutEdit logic. First, we need to create storeoptions which are used to create store that will store pulled data from the custom controller. Data will be formatted to populate options for dropdown. For options we need to set proxy to point on url “/plugin/Customdatacomponent/index/values” and enable auto destroy and fields which will be returned by controller per item. After we create store options we’ll instantiate Ext.data.Store class. Next thing is to create options for component. Most of them are generic, but it’s important to set name (from configuration object), field label and store (instantiated store). Notice that we have set fieldLabel to value of our customoption from configuration to demonstrate how to use custom option field from data script on tag script. After options we need to create Ext.form.ComboBox, load store and return instantiated component. This is how our component looks like in object form:

customdatacomponent-3

Controller

Only thing we are missing to have data for tag script is custom controller. We’ll create custom controller on location [Pimcore root]/plugins/Customdatacomponent/controllers/IndexController.php

<?php
 
class Customdatacomponent_IndexController extends \Pimcore\Controller\Action\Admin
{
    public function indexAction()
    {
 
        // reachable via http://your.domain/plugin/Customdatacomponent/index/index
    }
 
    public function valuesAction()
    {
 
        $response = array(
            array(
                'id' => 0,
                'value' => 0,
                'text' => 'Value 0'
            ),
            array(
                'id' => 1,
                'value' => 1,
                'text' => 'Value 1'
            ),
            array(
                'id' => 2,
                'value' => 2,
                'text' => 'Value 2'
            )
        );
 
        return $this->_helper->json($response);
    }
}

Our logic is in valuesAction method. As you can see, we have prepared sample array with fields defined in store configuration in tag script. Important thing is to return array as json, for that we’ll use json method from our helper. Note that we are extending \Pimcore\Controller\Action\Admin class because it may contain sensitive data, so only admin should be able to access it.

Conclusion and Github

Now you have a basic knowledge on how to extend data components in Pimcore and you can additionaly improve our plugin to cover, for example, grid logic for select field. Hope this will help you to understand data components and Pimcore itself. Thanks for reading, soon we’ll cover more topics for extending Pimcore.

You can find our example plugin on https://github.com/zoransalamun/pimcore-custom-data-component

However, if you’re having trouble with Magento or Pimcore or need our technical assistance, feel free to drop us a note – we’ll be glad to check out your code and help you with development or review your site and help you get rid of any bugs there.

The post Custom data components in Pimcore appeared first on Inchoo.

Implementing javascript minifier

$
0
0

Implementing javascript minimization in Magento can help your page load time by compressing your javascript files and making them smaller for users to download.

In this article I will primary cover where minimization should be implemented, since writing a full code for dependable minifier is not a small task.

Although any custom php minimization code for javascript can be used, I will use slightly adjusted version of open source php minifier I tested and found really good written. Changes are done mainly to adapt it to Magento best practices, functionality remains the same. Open source PHP Javascript Minifier link.

First step in implementing this should be simple config switch in order to be able to turn it off for debugging purposes (place this is system.xml):

<?xml version="1.0"?>
<config>
    <sections>
        <dev>
            <groups>
                <js>
                    <fields>
                        <minimize_js translate="label">
                            <label>Minimize JavaScript Files</label>
                            <frontend_type>select</frontend_type>
                            <source_model>adminhtml/system_config_source_yesno</source_model>
                            <sort_order>20</sort_order>
                            <show_in_default>1</show_in_default>
                            <show_in_website>1</show_in_website>
                            <show_in_store>1</show_in_store>
                        </minimize_js>
                    </fields>
                </js>
            </groups>
        </dev>
    </sections>
</config>

Set the default value in config.xml by adding:

<default>
        <dev>
            <js>
                <minimize_js>0</minimize_js>
            </js>
        </dev>
</default>

Add declaration of core data helper rewrite also in your config.xml :

<helpers>
        <core>
             <rewrite>
                     <data>Inchoo_Minifier_Helper_Core_Data</data>
             </rewrite>
        </core>
</helpers>

Adjust the rewritten core helper code where Magento merges javascript, so we also minify it after merging (changes are marked between “INCHOO EDIT” in comments, and function minimizeJs is added, which serves as main handler of minifier code we’re about to add):

class Inchoo_Minifier_Helper_Core_Data extends Mage_Core_Helper_Data
{
    /**
     * INCHOO EDIT - added call for JS minimizing
     * @param array $srcFiles
     * @param bool $targetFile
     * @param bool $mustMerge
     * @param null $beforeMergeCallback
     * @param array $extensionsFilter
     * @return bool|string
     */
    public function mergeFiles(array $srcFiles, $targetFile = false, $mustMerge = false,
                               $beforeMergeCallback = null, $extensionsFilter = array())
    {
        try {
            // check whether merger is required
            $shouldMerge = $mustMerge || !$targetFile;
            if (!$shouldMerge) {
                if (!file_exists($targetFile)) {
                    $shouldMerge = true;
                } else {
                    $targetMtime = filemtime($targetFile);
                    foreach ($srcFiles as $file) {
                        if (!file_exists($file) || @filemtime($file) > $targetMtime) {
                            $shouldMerge = true;
                            break;
                        }
                    }
                }
            }
 
            // merge contents into the file
            if ($shouldMerge) {
                if ($targetFile && !is_writeable(dirname($targetFile))) {
                    // no translation intentionally
                    throw new Exception(sprintf('Path %s is not writeable.', dirname($targetFile)));
                }
 
                // filter by extensions
                if ($extensionsFilter) {
                    if (!is_array($extensionsFilter)) {
                        $extensionsFilter = array($extensionsFilter);
                    }
                    if (!empty($srcFiles)){
                        foreach ($srcFiles as $key => $file) {
                            $fileExt = strtolower(pathinfo($file, PATHINFO_EXTENSION));
                            if (!in_array($fileExt, $extensionsFilter)) {
                                unset($srcFiles[$key]);
                            }
                        }
                    }
                }
                if (empty($srcFiles)) {
                    // no translation intentionally
                    throw new Exception('No files to compile.');
                }
 
                $data = '';
                foreach ($srcFiles as $file) {
                    if (!file_exists($file)) {
                        continue;
                    }
                    $contents = file_get_contents($file) . "\n";
                    if ($beforeMergeCallback && is_callable($beforeMergeCallback)) {
                        $contents = call_user_func($beforeMergeCallback, $file, $contents);
                    }
                    $data .= $contents;
                }
                if (!$data) {
                    // no translation intentionally
                    throw new Exception(sprintf("No content found in files:\n%s", implode("\n", $srcFiles)));
                }
                if ($targetFile) {
                    /** INCHOO EDIT START **/
                    if(isset($file)){
                        // Minimize only .js files
                        $fileExt = strtolower(pathinfo($file, PATHINFO_EXTENSION));
                        if(Mage::getStoreConfigFlag('dev/js/minimize_js') && $fileExt === 'js'){
                            $data = $this->minimizeJs($data);
                        }
                    }
                    /** INCHOO EDIT END **/
                    file_put_contents($targetFile, $data, LOCK_EX);
                } else {
                    return $data; // no need to write to file, just return data
                }
            }
 
            return true; // no need in merger or merged into file successfully
        } catch (Exception $e) {
            Mage::logException($e);
        }
        return false;
    }
 
    /**
     * INCHOO - main JS minimizer function
     * @param $data
     * @return bool|string
     */
    public function minimizeJs($data)
    {
        $minifer = Mage::helper('inchoo_minifier/minifier');
        $result = $minifer->minify($data);
 
        if($result !== false) {
            return $result;
        }
        return $data;
    }
}

Lastly, minifier code we will use to compress our merged javascript files:

<?php
/**
 * Copyright (c) 2009, Robert Hafner
 * All rights reserved.
 *
 * Redistribution and use in source and binary forms, with or without
 * modification, are permitted provided that the following conditions are met:
 *     * Redistributions of source code must retain the above copyright
 *       notice, this list of conditions and the following disclaimer.
 *     * Redistributions in binary form must reproduce the above copyright
 *       notice, this list of conditions and the following disclaimer in the
 *       documentation and/or other materials provided with the distribution.
 *     * Neither the name of the Stash Project nor the
 *       names of its contributors may be used to endorse or promote products
 *       derived from this software without specific prior written permission.
 *
 * THIS SOFTWARE IS PROVIDED BY THE COPYRIGHT HOLDERS AND CONTRIBUTORS "AS IS" AND
 * ANY EXPRESS OR IMPLIED WARRANTIES, INCLUDING, BUT NOT LIMITED TO, THE IMPLIED
 * WARRANTIES OF MERCHANTABILITY AND FITNESS FOR A PARTICULAR PURPOSE ARE
 * DISCLAIMED. IN NO EVENT SHALL Robert Hafner BE LIABLE FOR ANY
 * DIRECT, INDIRECT, INCIDENTAL, SPECIAL, EXEMPLARY, OR CONSEQUENTIAL DAMAGES
 * (INCLUDING, BUT NOT LIMITED TO, PROCUREMENT OF SUBSTITUTE GOODS OR SERVICES;
 * LOSS OF USE, DATA, OR PROFITS; OR BUSINESS INTERRUPTION) HOWEVER CAUSED AND
 * ON ANY THEORY OF LIABILITY, WHETHER IN CONTRACT, STRICT LIABILITY, OR TORT
 * (INCLUDING NEGLIGENCE OR OTHERWISE) ARISING IN ANY WAY OUT OF THE USE OF THIS
 * SOFTWARE, EVEN IF ADVISED OF THE POSSIBILITY OF SUCH DAMAGE.
 *
 * Magento port adjustment by Tomislav Nikčevski, 2016
 * JS Minifier
 * Usage - $this->minify($js);
 */
 
class Inchoo_Minifier_Helper_Minifier
{
    /**
     * The input javascript to be minified.
     *
     * @var string
     */
    protected $_input;
 
    /**
     * Output javascript buffer - this will be returned
     * @var
     */
    protected $_text;
 
    /**
     * The location of the character (in the input string) that is next to be
     * processed.
     *
     * @var int
     */
    protected $_currentPosition = 0;
 
    /**
     * The first of the characters currently being looked at.
     *
     * @var string
     */
    protected $_firstChar = '';
 
    /**
     * The next character being looked at (after firstChar);
     *
     * @var string
     */
    protected $_secondChar = '';
 
    /**
     * This character is only active when certain look ahead actions take place.
     *
     *  @var string
     */
    protected $_endChar;
 
    /**
     * Contains lock ids which are used to replace certain code patterns and
     * prevent them from being minified
     *
     * @var array
     */
    protected $locks = array();
 
    /**
     * Takes a string containing javascript and removes unneeded characters in
     * order to shrink the code without altering it's functionality.
     *
     * @param  string      $js      The raw javascript to be minified
     * @return bool|string
     */
    public function minify($js)
    {
        try {
            $js = $this->lock($js);
 
            $this->initialize($js);
            $this->loop();
            $js = $this->unlock(ltrim($this->_text));
            $this->clean();
 
            return $js;
 
        } catch (Exception $e) {
            $this->clean();
            Mage::log('Minifier failed. Error: ' . $e->getMessage());
            return false;
        }
    }
 
    /**
     *  Initializes internal variables, normalizes new lines,
     *
     * @param string $js      The raw javascript to be minified
     */
    protected function initialize($js)
    {
        $js = str_replace("\r\n", "\n", $js);
        $js = str_replace('/**/', '', $js);
        $this->_input = str_replace("\r", "\n", $js);
 
        // We add a newline to the end of the script to make it easier to deal
        // with comments at the bottom of the script- this prevents the unclosed
        // comment error that can otherwise occur.
        $this->_input .= PHP_EOL;
 
        // Populate "firstChar" with a new line, "secondChar" with the first character, before
        // entering the loop
        $this->_firstChar = "\n";
        $this->_secondChar = $this->getReal();
    }
 
    /**
     * The primary action occurs here. This function loops through the input string,
     * outputting anything that's relevant and discarding anything that is not.
     */
    protected function loop()
    {
        while ($this->_firstChar !== false && !is_null($this->_firstChar) && $this->_firstChar !== '') {
 
            switch ($this->_firstChar) {
                // new lines
                case "\n":
                    // if the next line is something that can't stand alone preserve the newline
                    if (strpos('(-+{[@', $this->_secondChar) !== false) {
                        $this->_text .= $this->_firstChar;
                        $this->saveString();
                        break;
                    }
 
                    // if secondChar is a space we skip the rest of the switch block and go down to the
                    // string/regex check below, resetting secondChar with getReal
                    if($this->_secondChar === ' ')
                        break;
 
                // otherwise we treat the newline like a space
 
                case ' ':
                    if(static::isAlphaNumeric($this->_secondChar))
                        $this->_text .= $this->_firstChar;
 
                    $this->saveString();
                    break;
 
                default:
                    switch ($this->_secondChar) {
                        case "\n":
                            if (strpos('}])+-"\'', $this->_firstChar) !== false) {
                                $this->_text .= $this->_firstChar;
                                $this->saveString();
                                break;
                            } else {
                                if (static::isAlphaNumeric($this->_firstChar)) {
                                    $this->_text .= $this->_firstChar;
                                    $this->saveString();
                                }
                            }
                            break;
 
                        case ' ':
                            if(!static::isAlphaNumeric($this->_firstChar))
                                break;
 
                        default:
                            // check for some regex that breaks stuff
                            if ($this->_firstChar === '/' && ($this->_secondChar === '\'' || $this->_secondChar === '"')) {
                                $this->saveRegex();
                                continue;
                            }
 
                            $this->_text .= $this->_firstChar;
                            $this->saveString();
                            break;
                    }
            }
 
            // do reg check of doom
            $this->_secondChar = $this->getReal();
 
            if(($this->_secondChar == '/' && strpos('(,=:[!&|?', $this->_firstChar) !== false))
                $this->saveRegex();
        }
    }
 
    /**
     * Resets attributes that do not need to be stored between requests so that
     * the next request is ready to go. Another reason for this is to make sure
     * the variables are cleared and are not taking up memory.
     */
    protected function clean()
    {
        unset($this->_input);
        $this->_currentPosition = 0;
        $this->_firstChar = $this->_secondChar = $this->_text = '';
        unset($this->_endChar);
    }
 
    /**
     * Returns the next string for processing based off of the current index.
     *
     * @return string
     */
    protected function getChar()
    {
        // Check to see if we had anything in the look ahead buffer and use that.
        if (isset($this->_endChar)) {
            $char = $this->_endChar;
            unset($this->_endChar);
 
            // Otherwise we start pulling from the input.
        } else {
            $char = substr($this->_input, $this->_currentPosition, 1);
 
            // If the next character doesn't exist return false.
            if (isset($char) && $char === false) {
                return false;
            }
 
            // Otherwise increment the pointer and use this char.
            $this->_currentPosition++;
        }
 
        // Normalize all whitespace except for the newline character into a
        // standard space.
        if($char !== "\n" && ord($char) < 32)
 
            return ' ';
 
        return $char;
    }
 
    /**
     * This function gets the next "real" character. It is essentially a wrapper
     * around the getChar function that skips comments. This has significant
     * performance benefits as the skipping is done using native functions (ie,
     * c code) rather than in script php.
     *
     *
     * @return string            Next 'real' character to be processed.
     */
    protected function getReal()
    {
        $startIndex = $this->_currentPosition;
        $char = $this->getChar();
 
        // Check to see if we're potentially in a comment
        if ($char !== '/') {
            return $char;
        }
 
        $this->_endChar = $this->getChar();
 
        if ($this->_endChar === '/') {
            return $this->processOneLineComments($startIndex);
 
        } elseif ($this->_endChar === '*') {
            return $this->processMultiLineComments($startIndex);
        }
 
        return $char;
    }
 
    /**
     * Removed one line comments, with the exception of some very specific types of
     * conditional comments.
     *
     * @param  int    $startIndex The index point where "getReal" function started
     * @return string
     */
    protected function processOneLineComments($startIndex)
    {
        $thirdCommentString = substr($this->_input, $this->_currentPosition, 1);
 
        // kill rest of line
        $this->getNext("\n");
 
        if ($thirdCommentString == '@') {
            $endPoint = $this->_currentPosition - $startIndex;
            unset($this->_endChar);
            $char = "\n" . substr($this->_input, $startIndex, $endPoint);
        } else {
            // first one is contents of $this->_endChar
            $this->getChar();
            $char = $this->getChar();
        }
 
        return $char;
    }
 
    /**
     * Skips multiline comments where appropriate, and includes them where needed.
     * Conditional comments and "license" style blocks are preserved.
     *
     * @param  int               $startIndex The index point where "getReal" function started
     * @return bool|string       False if there's no character
     * @throws \RuntimeException Unclosed comments will throw an error
     */
    protected function processMultiLineComments($startIndex)
    {
        $this->getChar(); // current endChar
        $thirdCommentString = $this->getChar();
 
        // kill everything up to the next */ if it's there
        if ($this->getNext('*/')) {
 
            $this->getChar(); // get *
            $this->getChar(); // get /
            $char = $this->getChar(); // get next real character
 
            // Now we reinsert conditional comments and YUI-style licensing comments
            if ($thirdCommentString === '!' || $thirdCommentString === '@') {
 
                // If conditional comments or flagged comments are not the first thing in the script
                // we need to append firstChar to text and fill it with a space before moving on.
                if ($startIndex > 0) {
                    $this->_text .= $this->_firstChar;
                    $this->_firstChar = " ";
 
                    // If the comment started on a new line we let it stay on the new line
                    if ($this->_input[($startIndex - 1)] === "\n") {
                        $this->_text .= "\n";
                    }
                }
 
                $endPoint = ($this->_currentPosition - 1) - $startIndex;
                $this->_text .= substr($this->_input, $startIndex, $endPoint);
 
                return $char;
            }
 
        } else {
            $char = false;
        }
 
        if($char === false)
            throw new \RuntimeException('Unclosed multiline comment at position: ' . ($this->_currentPosition - 2));
 
        // if we're here endChar is part of the comment and therefore tossed
        if(isset($this->_endChar))
            unset($this->_endChar);
 
        return $char;
    }
 
    /**
     * Pushes the index ahead to the next instance of the supplied string. If it
     * is found the first character of the string is returned and the index is set
     * to it's position.
     *
     * @param  string       $string
     * @return string|false Returns the first character of the string or false.
     */
    protected function getNext($string)
    {
        // Find the next occurrence of "string" after the current position.
        $pos = strpos($this->_input, $string, $this->_currentPosition);
 
        // If it's not there return false.
        if($pos === false)
 
            return false;
 
        // Adjust position of index to jump ahead to the asked for string
        $this->_currentPosition = $pos;
 
        // Return the first character of that string.
        return substr($this->_input, $this->_currentPosition, 1);
    }
 
    /**
     * When a javascript string is detected this function crawls for the end of
     * it and saves the whole string.
     *
     * @throws \RuntimeException Unclosed strings will throw an error
     */
    protected function saveString()
    {
        $startpos = $this->_currentPosition;
 
        // saveString is always called after a gets cleared, so we push secondChar into
        // that spot.
        $this->_firstChar = $this->_secondChar;
 
        // If this isn't a string we don't need to do anything.
        if ($this->_firstChar !== "'" && $this->_firstChar !== '"') {
            return;
        }
 
        // String type is the quote used, " or '
        $stringType = $this->_firstChar;
 
        // append out that starting quote
        $this->_text .= $this->_firstChar;
 
        // Loop until the string is done
        while (true) {
 
            // Grab the very next character and load it into firstChar
            $this->_firstChar = $this->getChar();
 
            switch ($this->_firstChar) {
 
                // If the string opener (single or double quote) is used
                // output it and break out of the while loop-
                // The string is finished!
                case $stringType:
                    break 2;
 
                // New lines in strings without line delimiters are bad- actual
                // new lines will be represented by the string \n and not the actual
                // character, so those will be treated just fine using the switch
                // block below.
                case "\n":
                    throw new \RuntimeException('Unclosed string at position: ' . $startpos );
                    break;
 
                // Escaped characters get picked up here. If it's an escaped new line it's not really needed
                case '\\':
 
                    // firstChar is a slash. We want to keep it, and the next character,
                    // unless it's a new line. New lines as actual strings will be
                    // preserved, but escaped new lines should be reduced.
                    $this->_secondChar = $this->getChar();
 
                    // If secondChar is a new line we discard firstChar and secondChar and restart the loop.
                    if ($this->_secondChar === "\n") {
                        break;
                    }
 
                    // append the escaped character and restart the loop.
                    $this->_text .= $this->_firstChar . $this->_secondChar;
                    break;
 
                // Since we're not dealing with any special cases we simply
                // output the character and continue our loop.
                default:
                    $this->_text .= $this->_firstChar;
            }
        }
    }
 
    /**
     * When a regular expression is detected this function crawls for the end of
     * it and saves the whole regex.
     *
     * @throws \RuntimeException Unclosed regex will throw an error
     */
    protected function saveRegex()
    {
        $this->_text .= $this->_firstChar . $this->_secondChar;
 
        while (($this->_firstChar = $this->getChar()) !== false) {
            if($this->_firstChar === '/')
                break;
 
            if ($this->_firstChar === '\\') {
                $this->_text .= $this->_firstChar;
                $this->_firstChar = $this->getChar();
            }
 
            if($this->_firstChar === "\n")
                throw new \RuntimeException('Unclosed regex pattern at position: ' . $this->_currentPosition);
 
            $this->_text .= $this->_firstChar;
        }
        $this->_secondChar = $this->getReal();
    }
 
    /**
     * Checks to see if a character is alphanumeric.
     *
     * @param  string $char Just one character
     * @return bool
     */
    protected static function isAlphaNumeric($char)
    {
        return preg_match('/^[\w\$\pL]$/', $char) === 1 || $char == '/';
    }
 
    /**
     * Replace patterns in the given string and store the replacement
     *
     * @param  string $js The string to lock
     * @return bool
     */
    protected function lock($js)
    {
        /* lock things like <code>"asd" + ++x;</code> */
        $lock = '"LOCK---' . crc32(time()) . '"';
 
        $matches = array();
        preg_match('/([+-])(\s+)([+-])/S', $js, $matches);
        if (empty($matches)) {
            return $js;
        }
 
        $this->locks[$lock] = $matches[2];
 
        $js = preg_replace('/([+-])\s+([+-])/S', "$1{$lock}$2", $js);
        /* -- */
 
        return $js;
    }
 
    /**
     * Replace "locks" with the original characters
     *
     * @param  string $js The string to unlock
     * @return bool
     */
    protected function unlock($js)
    {
        if (empty($this->locks)) {
            return $js;
        }
 
        foreach ($this->locks as $lock => $replacement) {
            $js = str_replace($lock, $replacement, $js);
        }
 
        return $js;
    }
 
}

That’s it, enable your minifier in admin under System->Configuration->Developer->JavaScript Settings->Minimize Javascript Files -> Yes.

Good luck, and don’t forget to clear cache.

In case you feel you need some extra help, we can offer you a detailed custom report based on our technical audit – feel free to get in touch and see what we can do for you!

The post Implementing javascript minifier appeared first on Inchoo.

Session storage and influence on performance in large PHP applications

$
0
0

Session is something that PHP developers use in their everyday work. But how many of you did took some time to actually consider where are they stored and how does that impact your application? Should you even care? Does number of sessions influence performance of your application?

Setting up the test for file-based sessions

To test this, lets create some code. Keep in mind that same apply to larger applications such us Magento as well, but for the purposes of this article, we will keep it simple:

<?php
 
// Start profiling
$start = microtime(true);
 
// Set header
header('Content-type: text/plain');
 
// Adjust session config
ini_set('session.save_path', __DIR__ . '/sessions/');
ini_set('session.gc_probability', 1);
ini_set('session.gc_divisor', 10);
ini_set('session.gc_maxlifetime', 3000);
 
// Init session
session_start();
 
// End profiling
$duration = (microtime(true) - $start);
 
// Output the data
echo number_format($duration, 12) . PHP_EOL;

As you can see from the code above, the script doesn’t actually do anything. It allows you to set session configuration (to allow easier testing) while the only operational code here is – starting a session.

Before we go any further, let’s revise what those session configuration settings actually mean (though, you should already know this):

  • save_path – This is self-explanatory. It is used to set location of session files. In this case this is on file system, but as you will se later, this is not always the case.
  • gc_probability – Together with gc_divisor setting, this config is used to determine probability of garbage collector being executed.
  • gc_divisor – Again, used to determine probability of garbage collector being executed. This is actually calculated as gc_probability/gc_divisor.
  • gc_maxlifetime – Determines how long should session be preserved. It doesn’t mean that it will be deleted after that time, just that it will be there for at least that long. Actuall lifetime depends on when the garbage collector will be triggered.

Results of file-based session storage

To complete the test, I have executed 1000 curl requests to my server and stored the result returned by our ‘profiler’. With that data, I have created histogram of the response time:

As you can see, nothing really happens, application is working well in all cases. On the other hand, these are only 1000 sessions on extremely simple script, so let’s generate better environment. For the purpose of the test, I have used 14 days. For the number of sessions per day, I have opened random Google Analytics account of one of my Magento project, and determined that we will use 40’000 session per day. Roughly saying, we need 550’000 sessions to begin testing, which were generated by executing same amount of CURL requests to the server.

So we are ready to check what happens. I have executed another 1000 curl requests, again logging the response and generating the histogram of results:

session stored in file with GB turned on

As you can see, the results are very different. We know have two kind of results – ones that are executed properly, and ones that have severe performance penalty (700% longer execution time than usual). So what happened here? Well, simply said – garbage collector was triggered.

Explaining the results

If you recall from the beginning of the post (or take a look at the source), we defined some probability of GC being triggered. This means that given the calculate probability, some requests (to say at random) will trigger GC. This doesn’t mean that actual sessions will be deleted, but all of them will be checked, and delete if required. And that exactly is the problem.

Looking back at the script, we have defined the probability of GC being triggered as 1/10, and that is exactly what is observed on image above – 900 out of 1000 executed properly, while the rest 100 which executed GC took significantly longer to process. To confirm our findings, we will adjust gc_probability to 0 and thus disable GC. Repeating the same test, we observe following:

session stored in file with GB turned off

Now, we have only one data set, and that is the first group from the graph before. Difference in execution time is minimal, and application runs evenly across all requests. One may say that this s the solution to the problem, but keep in mind that currently nothing is deleting those session from our storage.

And last thing to note here, that in the example above with th GC turned on, due to my settings, none of the session files were actually deleted. When I did trigger deletion of the files, it took about 27 seconds to clear 90% of the files. If this is going to occur on the production server, you would have nasty problems during those 27 seconds.

Setting up the test for redis-based sessions

Next, I have tried what happens if you put those sessions into Redis server, instead of keeping them in files. For that, we need, among other things, altered version of our script:

<?php
 
// Start profiling
$start = microtime(true);
 
// Set header
header('Content-type: text/plain');
 
// Adjust session config
ini_set('session.save_handler', 'redis');
ini_set('session.save_path',    'tcp://127.0.0.1:6379');
ini_set('session.gc_probability', 0);
ini_set('session.gc_divisor', 10);
ini_set('session.gc_maxlifetime', 30000);
 
// Init session
session_start();
 
// End profiling
$duration = (microtime(true) - $start);
 
// Output the data
echo number_format($duration, 12) . PHP_EOL;

There is a very small difference in code, we only told PHP to used redis-php module to store sessions into Redis server specified by IP. Since I know nothing will happen with lower number of sessions in storage, I went and regenerated those 550’000 session before executing any tests.

Results of redis-based session storage

With everything read, we can execute the tests, the same way we previously did:

Once completed, I have adjusted gb_probabilty gain, and repeated the test:

Explaining the results

Unlike the previous test with file-based sessions, there is not really a difference in performance here. And this is basically because Redis internally can deal with session lifetime, which means that PHP does not have to. In other words, GC settings related to session no longer have influence on application performance.

Conclusion

Looking back at two examples, you can clearly see the difference between two storage types. Even though file storage is somewhat faster for majority of requests, it becomes an issue with large number of files. Even though only smaller portion of session files is actually deleted, when GC is triggered, all files will be checked. You can overcome this by disabling GC, but keep in mind that in such case, you must setup your own GC to serve the same purpose (cron process that relays on file system time-stamps). Of course, you can better time it, and it is enough to execute it once per day to lower stress, but it needs to exists.

On the other hand, you can use Redis, which is somewhat slower. How much slower, it depends on your setup. In my case, Redis was running on the same machine and we can observe performance penalty of 1ms in average. If the setup is different and Redis is running on remote server, you can expect heavy impact on the performance (for an example, in case of poor connection between servers).

My recommendation would be to use files with custom GC when application is running on single web server. If you have Multi-node setup, than Redis will be better option for you, but keep an extra eye on speed of the linke between your servers.

The post Session storage and influence on performance in large PHP applications appeared first on Inchoo.

How to improve your Magento store performance by using Fastly

$
0
0

If you’re looking for a way to improve your user’s experience in terms of speed – try Fastly.

What is Fastly?

Fastly is a modern CDN service – it uses SSD disks in their cache servers to ensure fast content access & great cache hit ratio, it offers over 30 POP (point of presence) locations placed on strategic places all over the world (Asia, Europe, North & South America, Australia, New Zeland), it uses reverse proxying which means that the content is being fetched from your origin server as it’s requested and on top of that – they have greatly supported extensions for Magento 1 & Magento 2.

Benefits

  • Faster load times for web and mobile users
  • Better site stability in the event of traffic surges
  • Easy to configure with your Magento store

Installation

In this article, I will show you how to install and configure Fastly CDN extension for Magento 2.
To install the extension, just follow instructions from their Github repository.

You may choose between three installation methods – composer installation, installation through the Magento Marketplace and manual installation by downloading the zip file.

I will use composer as installation method.

1. Open terminal \ console, go to your Magento installation directory and type these two commands in the following order:

composer config repositories.fastly-magento2 git "https://github.com/fastly/fastly-magento2.git"

Then:

composer require fastly/magento2

Once the installation is completed, enable the Fastly CDN module:

bin/magento module:enable Fastly_Cdn

Immediately after that, run the setup:upgrade command:

bin/magento setup:upgrade

And finally, clear the cache:

bin/magento cache:clean

You can read more detailed step by step instructions here.

That’s it, you have successfully installed the Fastly CDN extension. Let’s move to configuration.

Configuration

In order to use the Fastly Cdn extension, you will have to register a free Fastly account.

Once you register and verify your account, login to Fastly:

Fastly wizard

You will see a welcome wizard with two input fields which you should fill with:

  • Your website domain for Fastly to use when routing requests
  • The hostname (or IP address) and port number for your origin server

On the next screen, Fastly is offering you to enable gzip, logging and health check of your origin – you can enable this later. Click continue.

On the final screen, you will have to point your CNAME to Fastly. Doing this, you will direct traffic from the Internet through Fastly instead of immediately through your store. You can read more here on how to achieve this.


Once you’ve finished with pointing your CNAME to Fastly, let’s configure Magento.

Login to you Magento admin and go to:
Stores > Configuration > Advanced > System

Under the Full page cache tab, untick the Use system value checkbox next to the Caching Application and choose Fastly CDN.

Click on Fastly Configuration tab and enter your Fastly Service ID* and Fastly API key**.

*To find out you Service ID, login to the Fastly dashboard, locate your Service name and click on the Show Service ID link.

**To find out your API key, while in the Fastly dashboard, select Account from the user menu and scroll way down to the bottom of the page. In the Account API Key area, click the Show button.

You can press the Test credentials button just to make sure that you have entered valid credentials.

If you have received a success message, press the Save Config button and clear cache by going to System > Cache Management.

Once you have cleared the cache, go back to Stores > Configuration > Advanced > System and click on the Fastly Configuration. The final step is to upload the VCL to Fastly. You can do this by pressing the Upload VCL to Fastly button.

The modal window will pop up, make sure that the Activate VCL after upload is ticked and press the Upload button in the top right corner:

Once the upload process is done, the modal window will automatically close and the success message will show:

That’s it, you have successfully configured your Magento store with the Fastly CDN.

Advanced configuration

You can configure Advanced options by clicking the Advanced Configuration tab under the Fastly configuration. You have a detailed description under every option – read it and configure it according to your needs.

You can read more about advanced configuration here.

Purging

You can purge Fastly CDN content through the Magento admin by going to System > Cache Management. You can purge content by the following options:

  • Purge by content type
  • Purge by store
  • Purge a URL
  • Purge all

You can read more about purging here.

The post How to improve your Magento store performance by using Fastly appeared first on Inchoo.

Viewing all 263 articles
Browse latest View live