Quantcast
Channel: Magento – Inchoo
Viewing all 263 articles
Browse latest View live

When can you deliver? (FedEx)

$
0
0

As a customer, there are two things prioritizing choices of shipping methods. First one, of course, is shipping price and other is delivery date. Since Magento is already showing us shipping prices on the checkout we don’t need to worry about that.

Magento offers us a lot of different shipping possibilities and each one has its own way of communicating and returning shipping details so there is not one single solution for all of them, but for now, we can show you how to do this for FedEx.

2016-04-14 11_18_53-Settings

Changing FedEx API

Biggest problem we encounter with getting delivery date is that shipping provider as FedEx is not returning that date back to us. To resolve this, we need to request this data from Fedex and to do so, we need to change our API request.

That is why we want to overwrite _formRateRequest method in Mage_Usa_Model_Shipping_Carrier_Fedex class and add “ReturnTransitAndCommit” in API call.

protected function _formRateRequest($purpose)
{
   $ratesRequest = parent::_formRateRequest($purpose);
   $ratesRequest['ReturnTransitAndCommit'] = true;
   return $ratesRequest;
}

Adding this attribute in call will request that Transit Time information is included in the reply from Fedex.

Fedex will return to us delivery timestamp for each method, but to make this more readable and accessible to shipping rate we will overwrite _prepareRateResponse method in same class and split it into date and time.

protected function _prepareRateResponse($response)
{
   $costArr = array();
   $priceArr = array();
   $errorTitle = 'Unable to retrieve tracking';
 
   if (is_object($response)) {
       if ($response->HighestSeverity == 'FAILURE' || $response->HighestSeverity == 'ERROR') {
           if (is_array($response->Notifications)) {
               $notification = array_pop($response->Notifications);
               $errorTitle = (string)$notification->Message;
           } else {
               $errorTitle = (string)$response->Notifications->Message;
           }
       } elseif (isset($response->RateReplyDetails)) {
           $allowedMethods = explode(",", $this->getConfigData('allowed_methods'));
 
           if (is_array($response->RateReplyDetails)) {
               foreach ($response->RateReplyDetails as $rate) {
                   $serviceName = (string)$rate->ServiceType;
                   if (in_array($serviceName, $allowedMethods)) {
                       $amount = $this->_getRateAmountOriginBased($rate);
                       $costArr[$serviceName]  = $amount;
                       $priceArr[$serviceName] = $this->getMethodPrice($amount, $serviceName);
                       $deliveryTimestamp[$serviceName] = $rate->DeliveryTimestamp;
                   }
               }
               asort($priceArr);
           } else {
               $rate = $response->RateReplyDetails;
               $serviceName = (string)$rate->ServiceType;
               if (in_array($serviceName, $allowedMethods)) {
                   $amount = $this->_getRateAmountOriginBased($rate);
                   $costArr[$serviceName]  = $amount;
                   $priceArr[$serviceName] = $this->getMethodPrice($amount, $serviceName);
               }
           }
       }
   }
 
   $result = Mage::getModel('shipping/rate_result');
   if (empty($priceArr)) {
       $error = Mage::getModel('shipping/rate_result_error');
       $error->setCarrier($this->_code);
       $error->setCarrierTitle($this->getConfigData('title'));
       $error->setErrorMessage($errorTitle);
       $error->setErrorMessage($this->getConfigData('specificerrmsg'));
       $result->append($error);
   } else {
       foreach ($priceArr as $method=>$price) {
           $rate = Mage::getModel('shipping/rate_result_method');
           $rate->setCarrier($this->_code);
           $rate->setCarrierTitle($this->getConfigData('title'));
           $rate->setMethod($method);
           $rate->setMethodTitle($this->getCode('method', $method));
           $rate->setDeliveryDate(date("l, F d",strtotime($deliveryTimestamp[$method])));
           $rate->setDeliveryTime(date("h:i A", strtotime($deliveryTimestamp[$method])));
           $rate->setCost($costArr[$method]);
           $rate->setPrice($price);
           $result->append($rate);
       }
   }
   return $result;
}

Now we made sure that Fedex is returning transit data.

Displaying delivery data

Before we can use this on a template we need to add it to shipping rate. To do this we will overwrite importShippingRate method in Mage_Sales_Model_Quote_Address_Rate class and append our new data to shipping.

public function importShippingRate(Mage_Shipping_Model_Rate_Result_Abstract $rate)
{
   $shippingRate = parent::importShippingRate($rate);
   if($rate->getDeliveryDate()){
       $shippingRate->setDeliveryDate($rate->getDeliveryDate());
       $shippingRate->setDeliveryTime($rate->getDeliveryTime());
   }
   return $shippingRate;
}

Now we can simply access this in checkout\onepage\shipping_method\available.phtml template as $_rate attribute and create our delivery message.

<label for="s_method_<?php echo $_rate->getCode() ?>"><?php echo $this->escapeHtml($_rate->getMethodTitle()) ?>
<?php $_excl = $this->getShippingPrice($_rate->getPrice(), $this->helper('tax')->displayShippingPriceIncludingTax()); ?>
<?php $_incl = $this->getShippingPrice($_rate->getPrice(), true); ?>
<?php echo $_excl; ?>
<?php if ($this->helper('tax')->displayShippingBothPrices() && $_incl != $_excl): ?>
   (<?php echo $this->__('Incl. Tax'); ?> <?php echo $_incl; ?>)
<?php endif; ?>
   <?php if($_rate->getDeliveryDate()): ?>
   <?php echo "Delivery on " . $_rate->getDeliveryDate(). " in " . $_rate->getDeliveryTime(); ?>
   <?php endif ?>
</label>

This was a simple modification on an existing call and it gave us one useful feature that makes it easier for a customer to decide what shipping method to use. But there are many cool things that Fedex Api offers that are not used in Magento. I invite you to play with it and give a little more flexibility to your shipping methods.

If you find this useful and would like this functionality on some other shipping method please comment below.


The post When can you deliver? (FedEx) appeared first on Inchoo.


Pimcore Portlets

$
0
0

After long time, we are back on Pimcore development. This time, we are working on Pimcore 4, which is in development (RC version), and we will share some guides with you. There are many changes in new Pimcore version, but most important are; improved UI, new ext-js (version 6) and under the hood code (like new Zend version, classification store, etc).

Portlets in Pimcore are dynamic widgets that can be placed on dashboard panels. As you can add multiple dashboards, you also can add multiple portlets. By default Pimcore 4 comes with Modified Documents, Modified Objects, Modified Assets, Changes made in last 31 days, Feed, Google Analytics and Custom report portlets. They can be great because you can add them to dashboard panel in any way you want, and you can have dynamic information for users as well.

For example, good portlet is “Modified Objects”, where you can see every change made in Objects like log feed, which can be very useful in big teams for easy user work tracking. Portlets can be added as many times as you want in any dashboard panel. They are stored in psf file in dashboard configuration – configurations are located in website/var/config/portal/ folder, and they are named like dashboards_DASHBOARD_ID.psf. They are fully rendered and loaded by extjs. They can be created custom for any purpose you want. All you need is one custom extension and portlet class that will be added to the layout portlet – and, of course, some knowledge of ext-js 6. Please note that if dynamic data is required you should have some knowledge about php too.

How to add portlet to dashboard

This is very simple to do. First, you should open any dashboard panel by selecting File->Dashboards->DashboardName on the left menu, and then on the top right side of panel you can find “Add Portlet” button (you can see that on the image below).

add-portlet

How to remove portlet from dashboard

You can simply remove portlet by clicking on the “X” button on portlet box, but remember this will remove portlet for current user.

Want custom portlet? Sure, let’s create one!

For demonstration purposes we will create one custom portlet. Let’s create portlet that will display users last 20 records in recycle bin. We will create custom extension, set all configuration, create portlet class and custom controller that will return data for our portlet. We have all planned out, now we should start with creating custom extension for Pimcore. In Pimcore, you can do that automatically by opening “Manage extensions” panel (select Tools->Extensionson on the left menu) and clicking on “Create new plugin skeleton”button. For now let’s call extension Inchooportlet.

pimcore-manage-extensions

You can see in plugins folder a new plugin with main folder named Inchooportlet. In plugin skeleton most important files are; plugin.xml, which contains all important settings for extension to work, and Plugin.php (located in lib/Inchooportlet) that is entry class loaded by pimcore autoloader and contains all important code for extension (like hooks, install/uninstall, etc). Now, we will create inchoo-portlet.js script which will contain all js logic for our portlet. Here is complete code for portlet class:

pimcore.registerNS("pimcore.layout.portlets.inchooexample");
pimcore.layout.portlets.inchooexample = Class.create(pimcore.layout.portlets.abstract, {
 
    getType: function () {
        return "pimcore.layout.portlets.inchooexample";
    },
 
    getName: function () {
        return 'Example portlet';
    },
 
    getIcon: function () {
        return "pimcore_icon_recyclebin";
    },
 
    getLayout: function (portletId) {
 
        var store = new Ext.data.Store({
            autoDestroy: true,
            proxy: {
                type: 'ajax',
                url: '/plugin/Inchooportlet/portlet/data',
                reader: {
                    type: 'json',
                    rootProperty: 'data'
                }
            },
            fields: ['desc','info']
        });
 
        store.load();
 
        var grid = Ext.create('Ext.grid.Panel', {
            store: store,
            columns: [
                {header: 'Id', sortable: false, dataIndex: 'id', flex: 1},
                {header: 'Path', sortable: false, dataIndex: 'path', flex: 1},
            ],
            stripeRows: true,
        });
 
        this.layout = Ext.create('Portal.view.Portlet', Object.extend(this.getDefaultConfig(), {
            title: this.getName(),
            iconCls: this.getIcon(),
            height: 275,
            layout: "fit",
            items: [grid]
        }));
 
        this.layout.portletId = portletId;
        return this.layout;
    }
});

Now we will analyze code and explain every part. First, we need to register new namespace (pimcore.layout.portlets.inchooexample), after that we will extend pimcore.layout.portlets with our unique identifier and assing our class pimcore.layout.portlets.abstract. Our class needs to contain next methods: getType (returns class type), getName (returns portlet title), getIcon (returns icon class for portlet icons displayed on add button and portlet box) and getLayout (contains all logic to render portlet content). As you can see, our most important method is getLayout so let’s explain that in detail.

As we have planned, we will have data returned from custom controller. For that we need to create store which will get response from controller in json format, and we will use that data for portlet content grid. After store load, we need to create grid panel which is standard format in ext js – it should contain our store to have data, and columns configuration so it can name table columns and display data by dataIndex name. Now we have all prepared to create portlet layout which has to contain title, icon class, height and items (our grid). We only need to set portlet id and to return all layout data.

Next step is to create simple controllers and for that we need to create PortletController.php script in controllers folder. Let’s create Inchooportlet_PortletController class which extends \Pimcore\Controller\Action\Admin class. In class we will create our logic in method dataAction(). Let’s prepare data that will be returned and encode that in json format with helper that returns json string. Here you can see our controller code:

<?php
/**
 *  Example Portlet Controller
 */
use \Pimcore\Controller\Action;
use Pimcore\Db;
use Pimcore\Model\Element\Recyclebin;
use Pimcore\Model\Element;
 
class Inchooportlet_PortletController extends \Pimcore\Controller\Action\Admin {
 
    /**
     * Pimcore\Db
     *
     * @var
     */
    protected $db;
 
    /**
     * Set db connection
     *
     * @throws Exception
     */
    public function init() {
        $this->db = Db::getConnection();
        parent::init();
    }
 
    /**
     * Get data for test portlet
     */
    public function dataAction() {
 
        $list = new Recyclebin\Item\Listing();
        $list->setLimit(20);
        $list->setOffset(0);
 
        $list->setOrderKey("date");
        $list->setOrder("DESC");
 
        $items = $list->load();
 
        $this->_helper->json(array(
            'data' => $items,
            "success" => true
        ));
    }
}

And here you can see how new portlet look’s like:

example-portlet-screenshot

More Pimcore?

I hope this will help you to create custom portlets and give you the motivation for deeper exploration on this great platform for Pim, CMS and Commerce. If you are interested in more Pimcore articles let us know. All suggestions and comments are welcome.

The post Pimcore Portlets appeared first on Inchoo.

The Struggle For Ideal Design

$
0
0

Many already attempted to define ideal design – and many have already confused design with aestheticism. That’s why we’re bringing you an overview of what design stands for and its primary role, problem solving. We also went over the fact that design is supposed to please the customer visually and trigger an emotion in him, so here’s how you combine all of that.

The design and the way problems are solved

Every one of us is a designer in a way. We are all trying to find the quickest and easiest way to solve problems that we encounter, whether it be a trivial thing like opening a yoghurt (as successfully as possible) or something much more demanding, like building life-sustaining structures on Mars. Realizing that something is not working like it should be and as well as it should is, in fact, in human nature. We observe and analyze, and upon identifying the problem, we iterate the product for as long as it takes for us to bypass the said problem. Some will probably find a completely different use for the same product than the other, or perhaps a different method of solving the problem. That is the essence of design: enabling anyone and everyone to use the product or service, any time, any place, without delays and disruptions, without the need to wonder about the inner workings.

Everyone designs who devises courses of action aimed at changing existing situations into preferred ones
– Herbert Simon

Design, contrary to popular belief, is not an art. Design is not a matter of style or taste. When talking about design, we talk about the decision-making process around the functions of a product or a service. What product or service would that be? The one that brings a definite solution to a particular problem. We talk about enhancing the quality of life and shortening the time it takes to carry out a certain task. We talk about breaking down the problem into its smallest segments so as to understand what causes it and how to avoid it. Design that does not work the problem out, therefore, is not design. If we think about design as only something aesthetically pleasing to a certain group of individuals, then we are not, in fact, talking about design. We are talking about taste and [i]n matters of taste, there can be no disputes“.

unusable
“The Uncomfortable” — Katerina Kamprani

Design fulfills the function. It solves the problem. Still, is finding the solution to a problem sufficient enough to create an emotional connection?

The taste & trends and why you should not go gentle into that good night

It is a well-known fact that everyone is entitled to their own opinion, and everyone can state if and what they like about something. Likewise, everyone can follow trends to “stay up to date”, to earn bragging rights and become popular on social networks, among friends and acquaintances. But the question remains: Are trends really for everyone? Do all trends agree with everyone? Are the current, contemporary trends applicable to every kind of business, to every product?

Subjective opinions of stakeholders’ random family members on the color, positioning or shape of an element that they may or may not like do not matter. Someone’s personal taste does not matter. What matters is the kind of visual presentation that will arouse emotions.

Trends come and go. They depend on a multitude of factors. Some trends evolve and adapt, but most are replaced with new ones, which are at that moment presented as the way things should be done, as an example to be followed. Some trends are utilized to such extent that they become a standard, which is not necessarily a bad thing.

Through standardisation of user interface elements we help create the platform that provides a consistent and cohesive experience, which then enables users to find their way around more effectively. This, in turn, saves time and allows the development of a visual language. Android Material Design and Apple Human Interface Guidelines offer exactly that: standardisation for their platforms in order to habituate their users with them. They offer designers a visual solution with which it is easier to shape the information architecture and tailor the user experience. However, is letting something that has become a standard only for certain platforms turn into a widespread trend a good thing? Especially if we consider the fact that the elements of that ‘standard’ are being implemented without careful thought and consideration of their peculiarities and effects?

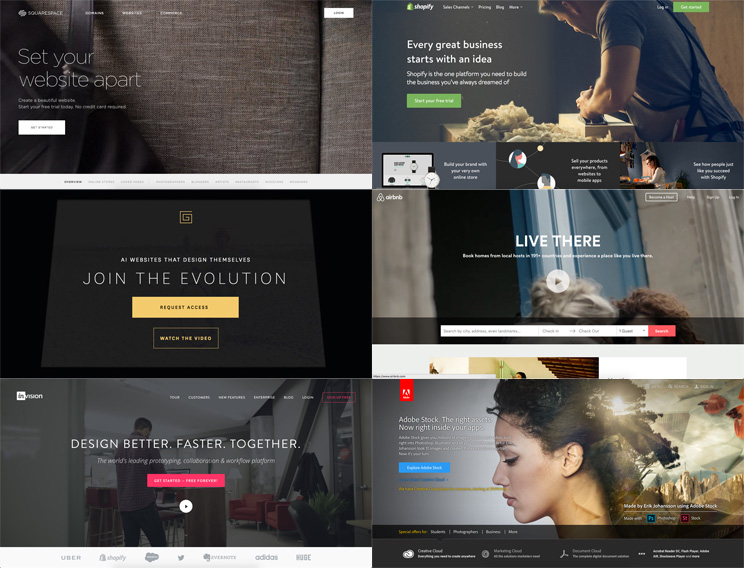
The perfect example can be found on the web, where standardisation of elements may have quite the opposite result. If we consider online stores designed through the use of  templates, we can notice the pattern; they all look the same. Remove the logo and one cannot be sure what web-page one is on. Remove the cover image and all the emotion is gone. Again, the user has no idea what he or she may find there. Trends come in handy with systems that enable quicker and simpler creation and presentation of products and services, but not with the users themselves. Those kinds of systems use the information only to analyze and possibly alter the behaviour of users. They observe only one side of the users and miss the bigger picture. Those kind of systems lose the connection with their users and do not offer the emotional experience of product use. Establishing that kind of bond is very important, and it cannot be done via the interface built on the current trends.

uniformity_inchooUniformity of todays interfaces
Templates of that sort may be attractive, but they fail to realize the emotional connection. If the template is created to solve all the potential problems, to be of broad functionality, it is most likely to fail. The presentation might seem satisfactory, but the connections between the product and the customer will not be realized.

Trends are not here so they can be blindly followed and exercised. Trends are, especially nowadays, a result of the lack of time, and the means for the quickest launch of MVPs onto the market possible. Unfortunately, many remain on that level, never growing, never evolving.

“The Competition Does It This Way” Problem

One of the more frequent issues is also one of “borrowing” from the competition. If the competition follows the latest trends when presenting its products and is doing well, some may start believing that the same mechanisms might also be adequate for them. That is, most often than not, a mistake.

Although the decisions made during the process of problem-solving (e.g. on a user-interface of an online store) are the result of an extensive research and thorough methodology (customer journey maps, user stories, personas, analytics/data, brainstorm sessions, user flows, storyboards, use cases and scenarios, usability testing, card sorting, a/b testing, sketches, etc), many still rely solely on the visual aspect that they find appealing.

That brings us back to personal taste, which again brings us back to trends, to imitation. Imitation, uniformity, lack of personality, lack of emotions and finally, an assembly line type of approach.

All that is a part of a problem that could easily be solved by people who are ready to invest time and effort into a process of both problem-solving and creating a user-product relationship.

The emotional connection between data and aesthetics

30% of all human decisions are rational and 70% are emotionally driven.

With that in mind, two Japanese researchers, Masaaki Kurosu and Kaori Kashimura conducted an experiment which confirmed the people’s preference for products that are more visually appealing than those that are simply functional. They modified ATM’s interface that was now more pleasant to use than the one before. All ATM’s were identical in function, number of buttons and the way they worked; the only difference was how their interfaces looked. And people loved it.

When talking about aesthetics, many still think about trends and styles, without examining how those trends would affect the presentation of their products to the targeted group of users.

When designing interfaces, we get to know where our users come from, we get to know their demographic, their interests, when and where they are using the service or product, and what they are using it for. We get to know their internet connection speed, screen resolution and how they use the product. We get to see firsthand what users perceive more and we get to learn how we can improve it.

In order to design an ideal experience we use our findings to help create emotional responses from the ones using the product or service. Through the use of Gestalt principles combined with color theory, shapes, typography, photography, iconography, we are given the tools to create experiences that will keep users happy, engaged and allow them to finish their tasks in no time. When designing products with such care not only will emotional connection be established, but users might also become so engaged as to start promoting the product for you. Apple achieved just that. Their products are aesthetically pleasing and easy to use, which, together with carefully devised marketing strategy, created a strong emotional relationship between the users and their, no longer products, but companions.

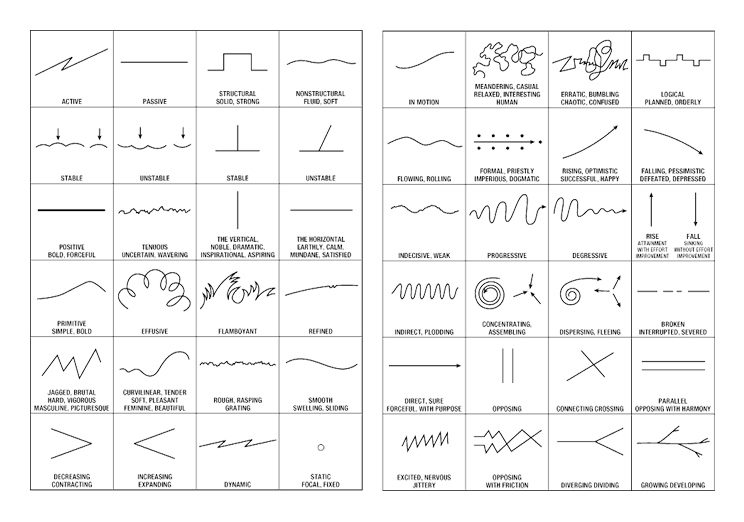
moods
Mood Lines

The researches have shown that the aesthetic quality is necessary during the user experience design because of the way people think, perceive the world around them and the way they interact with it. Aesthetics is deeply ingrained in human emotions and feelings, and therefore affects the way people receive information.

The common belief is that emotions are animalistic, irrational, while the cognition is cold, logical… human. (Emotional Design, Donald A. Norman). However, emotions are an indispensable part of people’s lives (however animalistic they might be). Everything we think about and everything we do is connected to our emotions and our subconscious. Emotions alter the way we think and often serve as guides to proper behavior. Product design needs to incite emotions because those are more memorable than anything experienced through the senses (sight, hearing, etc.). Most will not remember how something looked like, but how it made them feel.

Designing products that solve problems in an instant and connecting that product with the users on an emotional level lifts the experience users have. Experience that provides engagement and creates relationship stands out in the sea of monotonous products that looks like they were crafted just to be sold.

Because of that it is imperative to connect visually appealing with practical, to unite form and function.

How To Make It All Work?

Visuals and graphics do not make the design, but they do play a significant role in the design process. Design solves the problem, aesthetic quality shapes and connects the cold function with the user. The emotional reaction that stems from that could be further nurtured into a relationship.

Designing interfaces by function which does not follow the form will yield undependable results. Only by investing in quality research and time needed to create a deeper bond between the user and the interface will a business build a recognisable brand and create a relationship. In consequence, the user might spread the word about how he felt while using the product, reaching a greater number of people who might become interested to try it out for themselves.

After all, if something is visually appealing and impractical or dysfunctional, but still makes people smile and makes them happy, is it by definition still functional? Product itself may not meet the purpose it was created for, but it definitely meets another purpose – the emotional one, which is the hardest to come by.

Good design is making something intelligible and memorable. Great design is making something memorable and meaningful. – Dieter Rams

The post The Struggle For Ideal Design appeared first on Inchoo.

Enabling Multi-part MIME Emails in Magento

$
0
0

This article will explain steps needed for altering Magento transactional emails in order to support Multi-part mime emails. Which means that those emails will support both Text and HTMl versions of email. Core for handling multipart data is already implemented in Zend_Mime module, so there is no need for writing code that will handle necessary headers and boundary for multipart implementation.

So let’s get to it!

Main part that is needed for setting up of multipart emails is located in Mage_Core_Model_Email_Queue->send() function in line 225:

if ($parameters->getIsPlain()) {
                    $mailer->setBodyText($message->getMessageBody());
                } else {
                    $mailer->setBodyHTML($message->getMessageBody());
                }

If we add body text along with body html, Zend_Mime will handle the rest and add needed headers and boundary for multipart support. So the rewrite would go like this:

public function send()
    {
        /** @var $collection Mage_Core_Model_Resource_Email_Queue_Collection */
        $collection = Mage::getModel('core/email_queue')->getCollection()
            ->addOnlyForSendingFilter()
            ->setPageSize(self::MESSAGES_LIMIT_PER_CRON_RUN)
            ->setCurPage(1)
            ->load();
 
        ini_set('SMTP', Mage::getStoreConfig('system/smtp/host'));
        ini_set('smtp_port', Mage::getStoreConfig('system/smtp/port'));
 
        /** @var $message Mage_Core_Model_Email_Queue */
        foreach ($collection as $message) {
            if ($message->getId()) {
                $parameters = new Varien_Object($message->getMessageParameters());
                if ($parameters->getReturnPathEmail() !== null) {
                    $mailTransport = new Zend_Mail_Transport_Sendmail("-f" . $parameters->getReturnPathEmail());
                    Zend_Mail::setDefaultTransport($mailTransport);
                }
 
                $mailer = new Zend_Mail('utf-8');
                foreach ($message->getRecipients() as $recipient) {
                    list($email, $name, $type) = $recipient;
                    switch ($type) {
                        case self::EMAIL_TYPE_BCC:
                            $mailer->addBcc($email, '=?utf-8?B?' . base64_encode($name) . '?=');
                            break;
                        case self::EMAIL_TYPE_TO:
                        case self::EMAIL_TYPE_CC:
                        default:
                            $mailer->addTo($email, '=?utf-8?B?' . base64_encode($name) . '?=');
                            break;
                    }
                }
 
                if ($parameters->getIsPlain()) {
                    $mailer->setBodyText($message->getMessageBody());
                } else {
                    /** INCHOO EDIT START */
                    $mailer->setBodyText($message->getMessageBodyPlain());
                    /** INCHOO EDIT END */
                    $mailer->setBodyHTML($message->getMessageBody());
                }
 
                $mailer->setSubject('=?utf-8?B?' . base64_encode($parameters->getSubject()) . '?=');
                $mailer->setFrom($parameters->getFromEmail(), $parameters->getFromName());
                if ($parameters->getReplyTo() !== null) {
                    $mailer->setReplyTo($parameters->getReplyTo());
                }
                if ($parameters->getReturnTo() !== null) {
                    $mailer->setReturnPath($parameters->getReturnTo());
                }
 
                try {
                    $mailer->send();
                } catch (Exception $e) {
                    Mage::logException($e);
                }
 
                unset($mailer);
                $message->setProcessedAt(Varien_Date::formatDate(true));
                $message->save();
            }
        }
 
        return $this;
    }

Since we don’t have support for message_body_plain attribute added here, we will need to add it to tables and implement the logic for handling this new attribute.

First, lets extend needed classes to add text area for our new attribute when viewing transactional email:
Extend Mage_Adminhtml_Block_System_Email_Template_Edit_Form by overwriting _prepareForm() function to look like this:

protected function _prepareForm()
    {
 
        parent::_prepareForm();
 
        $form = $this->getForm();
 
        $fieldset = $form->getElement('base_fieldset');
 
        $templateId = $this->getEmailTemplate()->getId();
 
        $fieldset->addField('template_text_plain', 'textarea', array(
            'name'=>'template_text_plain',
            'label' => Mage::helper('adminhtml')->__('Template Content - Plain'),
            'title' => Mage::helper('adminhtml')->__('Template Content - Plain'),
            'required' => false,
            'style' => 'height:24em;',
        ));
 
        if ($templateId) {
            $form->addValues($this->getEmailTemplate()->getData());
        }
 
        if ($values = Mage::getSingleton('adminhtml/session')->getData('email_template_form_data', true)) {
            $form->setValues($values);
        }
 
        $this->setForm($form);
 
        return $this;
    }

Now we have added the new field for our plaintext version of email. Next we will add controller support for saving new attribute in database, by extending
Mage_Adminhtml_System_Email_TemplateController class and rewriting saveAction():

public function saveAction()
    {
        $request = $this->getRequest();
        $id = $this->getRequest()->getParam('id');
 
        $template = $this->_initTemplate('id');
        if (!$template->getId() && $id) {
            Mage::getSingleton('adminhtml/session')->addError(
                Mage::helper('adminhtml')->__('This Email template no longer exists.')
            );
            $this->_redirect('*/*/');
            return;
        }
 
        try {
            /** INCHOO EDIT */
            $template->setTemplateSubject($request->getParam('template_subject'))
                ->setTemplateCode($request->getParam('template_code'))
                ->setTemplateText($request->getParam('template_text'))
                ->setTemplateTextPlain($request->getParam('template_text_plain'))
                ->setTemplateStyles($request->getParam('template_styles'))
                ->setModifiedAt(Mage::getSingleton('core/date')->gmtDate())
                ->setOrigTemplateCode($request->getParam('orig_template_code'))
                ->setOrigTemplateVariables($request->getParam('orig_template_variables'));
            /** INCHOO EDIT */
 
            if (!$template->getId()) {
                $template->setAddedAt(Mage::getSingleton('core/date')->gmtDate());
                $template->setTemplateType(Mage_Core_Model_Email_Template::TYPE_HTML);
            }
 
            if ($request->getParam('_change_type_flag')) {
                $template->setTemplateType(Mage_Core_Model_Email_Template::TYPE_TEXT);
                $template->setTemplateStyles('');
            }
 
            $template->save();
            Mage::getSingleton('adminhtml/session')->setFormData(false);
            Mage::getSingleton('adminhtml/session')->addSuccess(
                Mage::helper('adminhtml')->__('The email template has been saved.')
            );
            $this->_redirect('*/*');
        }
        catch (Exception $e) {
            Mage::getSingleton('adminhtml/session')->setData(
                'email_template_form_data',
                $this->getRequest()->getParams()
            );
            Mage::getSingleton('adminhtml/session')->addError($e->getMessage());
            $this->_forward('new');
        }
    }

 After adding controller support for saving the attribute, we need to add additional database columns that will contain plaintext email version along with original HTML/plaintext version of email. We will add template_text_plain column to core_email_template table to contain plaintext skeleton for generating customer templates, and message_body_plain column to core_email_queue table to contain plaintext generated emails. To add necessary columns we can use this script:

/** @var $installer Mage_Core_Model_Resource_Setup*/
$installer = $this;
 
$installer->startSetup();
 
$connection = $installer->getConnection();
 
$emailTemplateTable = Mage::getSingleton('core/resource')->getTableName('core/email_template');
$emailQueueTable = Mage::getSingleton('core/resource')->getTableName('core/email_queue');
 
$connection->addColumn($emailTemplateTable, 'template_text_plain', array(
    'type' => Varien_Db_Ddl_Table::TYPE_TEXT,
    'nullable' => false,
    'comment' => 'Template Text Plain'
));
 
$connection->addColumn($emailQueueTable, 'message_body_plain', array(
    'type' => Varien_Db_Ddl_Table::TYPE_TEXT,
    'nullable' => false,
    'comment' => 'Message Body Plain'
));
 
$installer->endSetup();

Now that we have added our attribute, we need to implement the logic for generating customer emails after placing the order. To do that we will need to extend class Mage_Core_Model_Email_Template and rewrite send() and getProcessedTemplate() functions. In send function we will add call for processing template in plaintext along with normal processing:

public function send($email, $name = null, array $variables = array())
    {
        if (!$this->isValidForSend()) {
            Mage::logException(new Exception('This letter cannot be sent.')); // translation is intentionally omitted
            return false;
        }
 
        $emails = array_values((array)$email);
        $names = is_array($name) ? $name : (array)$name;
        $names = array_values($names);
        foreach ($emails as $key => $email) {
            if (!isset($names[$key])) {
                $names[$key] = substr($email, 0, strpos($email, '@'));
            }
        }
 
        $variables['email'] = reset($emails);
        $variables['name'] = reset($names);
 
        $this->setUseAbsoluteLinks(true);
        /** INCHOO EDIT START */
        $text = $this->getProcessedTemplate($variables);
        $textPlain = $this->getProcessedTemplate($variables, true);
        /** INCHOO EDIT END */
        $subject = $this->getProcessedTemplateSubject($variables);
 
        $setReturnPath = Mage::getStoreConfig(self::XML_PATH_SENDING_SET_RETURN_PATH);
        switch ($setReturnPath) {
            case 1:
                $returnPathEmail = $this->getSenderEmail();
                break;
            case 2:
                $returnPathEmail = Mage::getStoreConfig(self::XML_PATH_SENDING_RETURN_PATH_EMAIL);
                break;
            default:
                $returnPathEmail = null;
                break;
        }
 
        if ($this->hasQueue() && $this->getQueue() instanceof Mage_Core_Model_Email_Queue) {
            /** @var $emailQueue Mage_Core_Model_Email_Queue */
            $emailQueue = $this->getQueue();
            $emailQueue->setMessageBody($text);
            /** INCHOO EDIT START */
            $emailQueue->setMessageBodyPlain($textPlain);
            /** INCHOO EDIT END */
            $emailQueue->setMessageParameters(array(
                'subject'           => $subject,
                'return_path_email' => $returnPathEmail,
                'is_plain'          => $this->isPlain(),
                'from_email'        => $this->getSenderEmail(),
                'from_name'         => $this->getSenderName(),
                'reply_to'          => $this->getMail()->getReplyTo(),
                'return_to'         => $this->getMail()->getReturnPath(),
            ))
                ->addRecipients($emails, $names, Mage_Core_Model_Email_Queue::EMAIL_TYPE_TO)
                ->addRecipients($this->_bccEmails, array(), Mage_Core_Model_Email_Queue::EMAIL_TYPE_BCC);
            $emailQueue->addMessageToQueue();
 
            return true;
        }
 
        ini_set('SMTP', Mage::getStoreConfig('system/smtp/host'));
        ini_set('smtp_port', Mage::getStoreConfig('system/smtp/port'));
 
        $mail = $this->getMail();
 
        if ($returnPathEmail !== null) {
            $mailTransport = new Zend_Mail_Transport_Sendmail("-f".$returnPathEmail);
            Zend_Mail::setDefaultTransport($mailTransport);
        }
 
        foreach ($emails as $key => $email) {
            $mail->addTo($email, '=?utf-8?B?' . base64_encode($names[$key]) . '?=');
        }
 
        if ($this->isPlain()) {
            $mail->setBodyText($text);
        } else {
            $mail->setBodyHTML($text);
        }
 
        $mail->setSubject('=?utf-8?B?' . base64_encode($subject) . '?=');
        $mail->setFrom($this->getSenderEmail(), $this->getSenderName());
 
        try {
            $mail->send();
            $this->_mail = null;
        }
        catch (Exception $e) {
            $this->_mail = null;
            Mage::logException($e);
            return false;
        }
 
        return true;
    }

In getProcessedTemplate function we will alter the way plain and html templates are processed so that when we use html mode, both html and plaintext processing in enabled. Notice we added new $forcePlain argument for controlling how templates are processed:

public function getProcessedTemplate(array $variables = array(), $forcePlain = false)
    {
        $processor = $this->getTemplateFilter();
        /** INCHOO EDIT START */
        if($forcePlain) {
            $processor->setUseSessionInUrl(false)
                ->setPlainTemplateMode(true);
        } else {
            $processor->setUseSessionInUrl(false)
                ->setPlainTemplateMode($this->isPlain());
        }
        /** INCHOO EDIT END */
 
        if (!$this->_preprocessFlag) {
            $variables['this'] = $this;
        }
 
        if (isset($variables['subscriber']) && ($variables['subscriber'] instanceof Mage_Newsletter_Model_Subscriber)) {
            $processor->setStoreId($variables['subscriber']->getStoreId());
        }
 
        // Apply design config so that all subsequent code will run within the context of the correct store
        $this->_applyDesignConfig();
 
        // Populate the variables array with store, store info, logo, etc. variables
        $variables = $this->_addEmailVariables($variables, $processor->getStoreId());
 
        $processor
            ->setTemplateProcessor(array($this, 'getTemplateByConfigPath'))
            ->setIncludeProcessor(array($this, 'getInclude'))
            ->setVariables($variables);
 
        try {
            // Filter the template text so that all HTML content will be present
            /** INCHOO EDIT START */
            if($forcePlain) {
                $result = $processor->filter($this->getTemplateTextPlain());
            } else {
                $result = $processor->filter($this->getTemplateText());
            }
            /** INCHOO EDIT END */
            // If the {{inlinecss file=""}} directive was included in the template, grab filename to use for inlining
            $this->setInlineCssFile($processor->getInlineCssFile());
            // Now that all HTML has been assembled, run email through CSS inlining process
            $processedResult = $this->getPreparedTemplateText($result);
        }
        catch (Exception $e)   {
            $this->_cancelDesignConfig();
            throw $e;
        }
        $this->_cancelDesignConfig();
        return $processedResult;
    }

Lastly we need to add small adjustment to Mage_Adminhtml_Block_System_Email_Template_Preview class in _toHtml() function, which is adjustment for previewing template in admin, and it is needed because of getProcessedTemplate rewrite we did earlier. It is possible to rewrite getProcessedTemplate differently in order to bypass this last rewrite, but I chose this because of easier read:

protected function _toHtml()
    {
        // Start store emulation process
        // Since the Transactional Email preview process has no mechanism for selecting a store view to use for
        // previewing, use the default store view
        $defaultStoreId = Mage::app()->getDefaultStoreView()->getId();
        $appEmulation = Mage::getSingleton('core/app_emulation');
        $initialEnvironmentInfo = $appEmulation->startEnvironmentEmulation($defaultStoreId);
 
        /** @var $template Mage_Core_Model_Email_Template */
        $template = Mage::getModel('core/email_template');
        $id = (int)$this->getRequest()->getParam('id');
        if ($id) {
            $template->load($id);
        } else {
            $template->setTemplateType($this->getRequest()->getParam('type'));
            $template->setTemplateText($this->getRequest()->getParam('text'));
            $template->setTemplateStyles($this->getRequest()->getParam('styles'));
        }
 
        /* @var $filter Mage_Core_Model_Input_Filter_MaliciousCode */
        $filter = Mage::getSingleton('core/input_filter_maliciousCode');
 
        $template->setTemplateText(
            $filter->filter($template->getTemplateText())
        );
 
        Varien_Profiler::start("email_template_proccessing");
        $vars = array();
 
        /** INCHOO EDIT START */
        $templateProcessed = $template->getProcessedTemplate($vars);
        /** INCHOO EDIT END */
 
        if ($template->isPlain()) {
            $templateProcessed = "<pre>" . htmlspecialchars($templateProcessed) . "</pre>";
        }
 
        Varien_Profiler::stop("email_template_proccessing");
 
        // Stop store emulation process
        $appEmulation->stopEnvironmentEmulation($initialEnvironmentInfo);
 
        return $templateProcessed;
    }

That’s it! 😉

The post Enabling Multi-part MIME Emails in Magento appeared first on Inchoo.

A simple frontend workflow for Gulp

$
0
0

What is Gulp?

Gulp is a task/build runner which uses Node.js for web development. In this tutorial, I will not explain how to create your Gulp plugin but I will show you how you can create a simple, basic, customized build process for your frontend workflow to ease your job.

Gulp is often used for automated front end tasks like:

  • Compiling preprocessors like Sass or Less
  • Optimizing assets like images, CSS and Javascripts
  • Including browsers prefixes with Autoprefixer
  • Injecting CSS in browser without reloading page whenever file is saved
  • Spinning up a web server

This is not, of course, a comprehensive list of things Gulp can do. There are thousands of plugins which you can use or you can build your own.

Step 1: Install Node.js

Because Gulp is built on Node.js (Javascript runtime built on Chrome’s V8 Javascript engine), first we need to install Node.js.

Node.js can be downloaded for Windows, Mac and Linux at nodejs.org/download/. You can also install it from the command line using the package manager.

Once installed, open a command prompt and enter:

$ node-v

This will show a Node.js version number if it is a correctly installed.

Step 2: Install Gulp

Now we can install Gulp using by using the following command in command line:

$ sudo npm install gulp -g

Note: Mac users need the sudo keyword. “$” in the code above just symbolize the command prompt. You don’t need to enter it.

The “-g” option in the command line tells to install Gulp globally, not just for the specific project. It allows you to use Gulp command anywhere on your system.

Now, we can make a project that uses Gulp.

Step 3: Set Up a Gulp Project

Go to

root/skin/frontend/design_package/default/

In this folder, we will create a Gulp config file and install all Gulps dependencies. Enter the command below in command line:

$ npm init

The “npm init” command creates a package.json file in which are stored information like dependencies, project name etc.

Once the package.json file is created, we can install Gulp and other plugins used in this tutorial.

Step 4: Installing Gulp

Install Gulp locally in the same folder. This will create “node_modules” folder where are all our dependencies files located. Enter the command in command line:

$ npm install gulp --save-dev

Great, now we can move on to install Gulp-Sass plugin.

Step 5: Installing Gulp-sass

Gulp Sass is a libsass version of Gulp. Libsass is a much faster in compiling sass files than Ruby.

Enter the command in command line:

$ npm install gulp-sass --save-dev

Great, move on to the next dependency, Gulp Source Maps.

Step 6: Install Gulp Source Maps

Gulp Source Maps is useful for debugging. You can see in which sass file are styles located for the inspected element in the browsers Inspector tool.

Enter the command in command line:

$ npm install gulp-sourcemaps --save-dev

Step 7: Install Autoprefixer

Autoprefixer for Gulp helps us to write CSS without vendor prefixes. It will automatically search if there is a need to add vendor prefix for some newly CSS properties. Autoprefixer is pulling data from caniuse.com site and adds prefixes if there is a need for it.

In the command line tool, enter command:

$ npm install gulp-autoprefixer --save-dev

Step 8: Install Browser Sync

BrowserSync is one of my favorites. It can reload a browser page after file saving, inject CSS without reloading page, sync browser page screen and your browsing actions through devices. Very handy.

Write in the command line:

$ npm install gulp-autoprefixer --save-dev

Step 9: Create a Gulp config file

Create a new file gulpfile.js in the same folder. This will be the main configuration file for the Gulp where we write our tasks.

Open up gulpfile.js and write:

var gulp = require('gulp');
var sass = require('gulp-sass');
var sourcemaps = require('gulp-sourcemaps');
var autoprefixer = require('gulp-autoprefixer');
var browserSync = require('browser-sync').create();

We need to require all dependencies we have installed. The requirement statement tells Node to look into the node_modules folder for a package. Once the package is found, we assign its contents to the variable.

Next step is to create two variables used by GulpSass plugin for compiling sass files and we will assign to them a path for our Sass files and path for our compiled CSS file.

Write:

var input = './scss/**/*.scss';
var output = './css';

We can now begin to write a Gulp sass task. Add a code below:

gulp.task('sass', function () {
	return gulp.src(input)
	.pipe(sourcemaps.init())
	.pipe(sass(errLogToConsole: true,outputStyle: 'compressed'))
	.pipe(autoprefixer(browsers: ['last 2 versions', '> 5%', 'Firefox ESR']))
	.pipe(sourcemaps.write())
	.pipe(gulp.dest(output))
	.pipe(browserSync.stream());
});

Add a watcher task for watching Scss file changes and BrowserSync settings. Add a code below:

// Watch files for change and set Browser Sync
gulp.task('watch', function() {
	// BrowserSync settings
	browserSync.init({
	proxy: "mydomain.loc",
	files: "./css/styles.css"
});
 
// Scss file watcher
gulp.watch(input, ['sass'])
	.on('change', function(event){
		console.log('File' + event.path + ' was ' + event.type + ', running tasks...')
	});
});

Finally we create our default/main task which will run all above task. Add a code below:

// Default task
gulp.task('default', ['sass', 'watch']);

Our final gulpfile.js should look like this:

var gulp = require('gulp');
var sass = require('gulp-sass');
var sourcemaps = require('gulp-sourcemaps');
var autoprefixer = require('gulp-autoprefixer');
var browserSync = require('browser-sync').create();
 
var input = './scss/**/*.scss';
var output = './css';
 
gulp.task('sass', function () {
	return gulp.src(input)
	.pipe(sourcemaps.init())
	.pipe(sass(errLogToConsole: true,outputStyle: 'compressed'))
	.pipe(autoprefixer(browsers: ['last 2 versions', '> 5%', 'Firefox ESR']))
	.pipe(sourcemaps.write())
	.pipe(gulp.dest(output))
	.pipe(browserSync.stream());
});
 
// Watch files for change and set Browser Sync
gulp.task('watch', function() {
	// BrowserSync settings
	browserSync.init({
	proxy: "mydomain.loc",
	files: "./css/styles.css"
});
 
// Scss file watcher
gulp.watch(input, ['sass'])
	.on('change', function(event){
		console.log('File' + event.path + ' was ' + event.type + ', running tasks...')
	});
});
 
// Default task
gulp.task('default', ['sass', 'watch']);

To run above tasks, enter

$ gulp default

command in the command line.

Hope this will help someone to automate frontend workflow with Gulp. Thanks for reading!

The post A simple frontend workflow for Gulp appeared first on Inchoo.

Optimize Elasticsearch autocomplete URL for Google Analytics

$
0
0

In this article, we’re talking about Extension for Elasticsearch® by BubbleShop and optimizing URL for tracking autocomplete search through Google Analytics.

The Elasticsearch extension for Magento allows you to enhance drastically the default Magento search results which are not very relevant, and much more.

Where is the problem with Elasticsearch?
Magento default search has parameter in URL “?q=keyword“, but if you click on Elasticsearch suggested autocomplete item, you will get clear url without parameters.

This feature for Elasticsearch is adding query string to all URLs in quick search dropdown. That string allows you tracking “quick search autocomplete” through Google Analytics.

Autocomplete Elasticsearch

Default URL (before editing):
https://www.EXAMPLE.com/product.html

New URL (optimized):
https://www.EXAMPLE.com/product.html?q=keyword

Example from image:
https://www.EXAMPLE.com/product.html?q=Madison


Step 1 – Copy files in your theme:

/app/design/frontend/base/default/template/bubble/elasticsearch/autocomplete/category.phtml
/app/design/frontend/base/default/template/bubble/elasticsearch/autocomplete/cms.phtml
/app/design/frontend/base/default/template/bubble/elasticsearch/autocomplete/product.phtml

Step 2 – Implement query string in URL:

› category.phtml – Line 15.

<a href="<?php echo $this->escapeUrl($this->getCategoryUrl($_category)) ?>"

change to:

<a href="<?php echo $this->escapeUrl($this->getCategoryUrl($_category)) ?>?q=<?php echo Mage::helper('catalogsearch')->getQueryText(); ?>"

› cms.phtml – Line 15.

<a href="<?php echo $this->escapeUrl($this->getBaseUrl() . $_page->getIdentifier()) ?>"

change to:

<a href="<?php echo $this->escapeUrl($this->getBaseUrl() . $_page->getIdentifier()) ?>?q=<?php echo Mage::helper('catalogsearch')->getQueryText(); ?>"

› product.phtml – Line 16.

<a href="<?php echo $this->escapeUrl($this->getProductUrl($_product)) ?>"

change to:

<a href="<?php echo $this->escapeUrl($this->getProductUrl($_product)) ?>?q=<?php echo Mage::helper('catalogsearch')->getQueryText(); ?>"

Step 3 – Initialization Magento

/autocomplete.php – add this code on top files:

require_once "app/Mage.php";
Mage::app();

Step 4 – Don’t forgot to clear the cache!


Hope this will help you improve your tracking through Google Analytics.

The post Optimize Elasticsearch autocomplete URL for Google Analytics appeared first on Inchoo.

The practical value of Design Thinking

$
0
0

Recently, we got inspired by the Magento team’s Design Thinking presentation held at the Magento Imagine 2016 conference. Unfortunately, we weren’t there but it feels like we might as well have been. Seeing how the Magento team worked on improving the Magento 2.0. interface in the presentation slides struck a chord with us. It affirmed a lot of the methods we were already using and got us thinking even more.

I think, therefore I empathize, define, ideate, prototype and test

There are many different definitions of Design Thinking but generally speaking it’s defined as a repeatable process for solving problems and discovering new opportunities with the customer at the center. Understanding the end user is what this thinking perspective is all about. A far cry from mere visual creation of various design elements.

design_thinking__

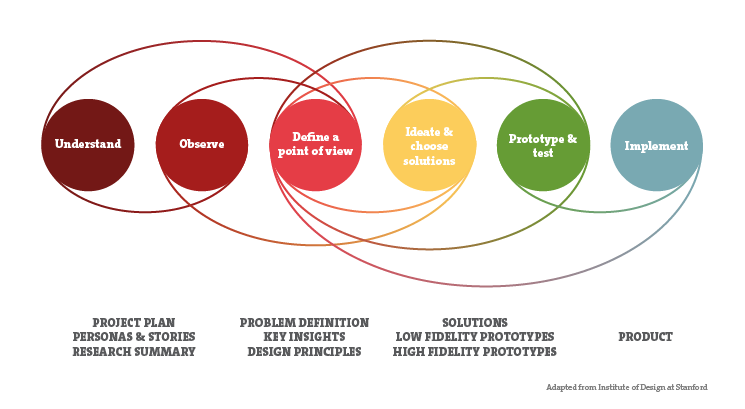
So, what’s the difference between this method and some more conventional problem-solving techniques? The Design Thinking process is best thought of as an agile system of overlapping spaces rather than a sequence of orderly steps. The five phases of Design Thinking are empathizing, defining, ideating, prototyping and testing. With empathizing, the goal isn’t to emotionally invest but to objectively uncover and understand as many viewpoints as you can. Finding target audiences is key because research conducted on people who aren’t your end users might not be relevant to your project. The defining phase is all about identifying user needs and business requirements. Knowing that you’re tackling the right problems while involving your customer early in the process is what’s most valued here. Usually created are customer journey maps, concept models and user scenarios – basically answering what the problems are and how the users are solving them or might be able to solve them.

design-thinking-2

Getting your foundations right allows you to ideate and think lateral while trying to find as many ideas as possible. At Inchoo, we’re big on rapid sketching and brainstorming sessions just to name a few methods that get our creative juices going. Prototyping and testing have to be one of the most valuable and powerful parts of the Design Thinking method. Whether they’re paper, lo-fi or hi-fi prototypes, create them, put them into your user’s hands, adapt and iterate. As is often mentioned in lean methodology – Think big, act small, fail fast. Learn from end users and refine. We’ll let one of the slides from Magento’s presentation do all the talking.

magento-imagine-design-thinking

These research methods produce quantitative and qualitative data: through heuristic and expert reviews, cognitive walkthroughs, user interviews, usability testing, surveys, focus groups and even more tools that enable them, but we’ll save that topic for another article. One of the main benefits of the Design Thinking perspective is avoiding expensive mistakes while easing use of product and allowing new ideas within the process itself. Apart from Magento, similar methods are taught at Stanford, IDEO, Google, IBM and eBay.

It wows but does it work?

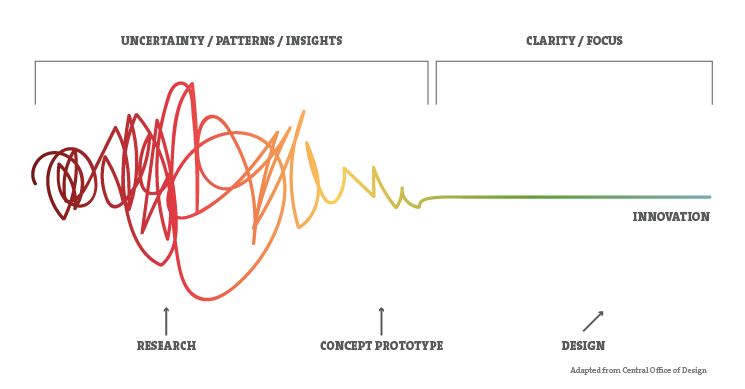
A lot of the time it is recognized what should be done in theory, but in everyday work, when push comes to shove, it is often safer to turn to more conventional problem-solving practices. That’s where abilities like intuition, pattern recognition, constructing ideas that are both emotional and functional and design beyond current trends, get overlooked. Designing with emphasis on emotion and inspiration can be equally failing as heavy reliance on analysis and reason – that’s where Design Thinking comes in. Because every project is different and carries their own end users and specific questions, we as designers have to answer and understand them if we want to create something that not only wows but works. In reality, trying to create something innovative is far more difficult and complex than just striving to be more creative.

design-thinking-3

It involves previously mentioned methods (prototyping, data visualization, innovation strategy, organizational design, qualitative and quantitative research, and IP (intellectual property) liberation) that create solutions which can’t derive only from our minds and experiences as individuals and designers.

Design Thinking isn’t really here to tell you how your workflow should look like or what tools you should be using. As we’ve seen on Magento’s improvements on Magento 2.0. it’s here to show you there’s a way to optimize the user experience if you’re willing to recognize and understand the needs of your customer. Learning the tools and testing new software that enables this is easy. Taking ownership of that process is a little bit harder but if you have a strategy to your design you’re halfway there. The takeaway here is to analyse, understand, ideate, prototype, test and test often to minimize the uncertainty and risk of innovation. Design thinkers rely on customer insights gained from real-world experiments, not just historical data or market research.

“The myth of innovation is that brilliant ideas leap fully formed from the minds of geniuses. The reality is that most innovations come from a process of rigorous examination through which great ideas are identified and developed before being realized as new offerings and capabilities.”

—Tim Brown, CEO IDEO

Design Team Thinking

Designers shouldn’t be perceived as professionals who make visual magic happen where meaningful user experience is expected. No amount of beautiful design can fix poor functionality and usability. As designers we create the one thing that is blatantly obvious – the hard shell, which is a lot of the times is all that users see. We have this power to influence them in such a short period of time – whether it’s presenting our own abilities, or our clients business. Yet, design teams are often not expected work on the analytical, logistical and planning aspects of searching out meaning and reason behind all that will inevitably end up in need of design. With wider understanding of the design process and greater ownership in the decision making process, Design Thinking utilises the designer’s toolkit to put the customer first, which in turn saves time and money on a larger scale.

Reducing risks in any way, shape or form is a real value of design teams that not many recognise. That’s why we often switch gears and flex our creative muscles to use our right-brain imagination, artistry and intuition the same way we do our left-brain logic, analysis and planning – to try and create the best user experiences we can.

The post The practical value of Design Thinking appeared first on Inchoo.

Improve default Magento reviews

$
0
0

If you’ve ever worked on Magento framework you’re familiar with the fact that Magento provides bunch of useful features. In this article we will cover one of them – Customer Product Reviews. Maybe some will say that we don’t need to change anything regarding this feature, but when we are in custom development a lot of things can’t just work “out of box”. Especially if you willing to provide fully polished retina responsive theme, default isn’t the way we roll.

So let us improve the default Magento product reviews feature.

Default product review

Like in many other cases Magento 1x uses some outdated approaches for displaying Magento product reviews on the store’s frontend. Our changes will be focused only on frontend, we won’t go into backend or admin part of Product reviews. If you are not satisfied with this parts, we can talk about in some other time.

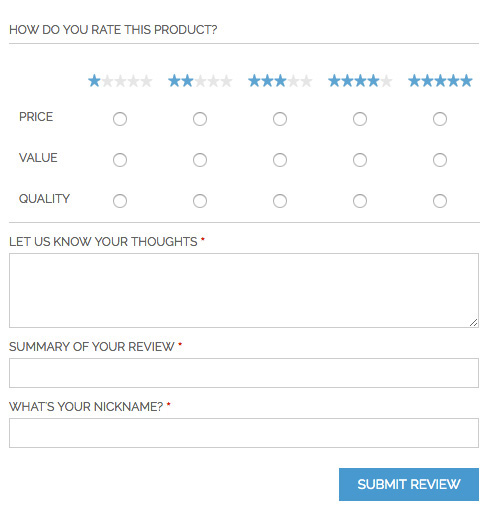
Basically if we don’t change something our customers have to deal with this form in order to create product review:

Improve default Magento reviews - default product review form

Sorry Magento but I’ll probably skip leaving my feedback when I see this interface. And I believe that lot of customers will behave the same.

Many studies have shown us that product reviews are a useful thing for your potential customers. Because a lot of customers check product reviews before purchasing somthing. From that our primary goal is to collect as many customer reviews as possible. In order to do that we need to improve the review in this interface to something better that has an user-friendly feel.

After we adjust submit form we will also improve customer product review sections on frontend (rating stars on product page, category page etc.). Magento handles this section by using inline style and image sprite in order to dynamically show product ratio. We will replace this outdated approach by pure CSS.

I’ll assume that we are all working on custom themes and that Magento base styles are already removed from theme. Because I don’t plan on going thought each step and finding out how and where to transfer files from base theme. Also, I’ll assume that you know what to do in order to enable Magento Reviews if they are disabled.

Adjust product rating form

Our main goal is to remove (hide) ratio inputs from frontend and instead of them we wish to have something like this:

Improve default Magento reviews - our product review form

Basically radio buttons will be replaced with vector rating stars.

To create custom interface we need to modify base review template file (../template/review/form.phtml). Copy base file to your theme and remove all unnecessary table markup. Together with default foreach inside table markup. We’ll replace that markup with this slightly modified foreach:

<?php foreach ($this->getRatings() as $_rating): ?>
   <dl>
       <dt class="label"><?php echo $this->escapeHtml($_rating->getRatingCode()) ?></dt>
       <dd class="rating-input value">
           <?php foreach ($_rating->getOptions() as $_option): ?>
               <label class="icon-star-empty" for="<?php echo $this->escapeHtml($_rating->getRatingCode()) ?>_<?php echo $_option->getValue() ?>">
                   <input class="no-display radio" type="radio" name="ratings[<?php echo $_rating->getId() ?>]" id="<?php echo $this->escapeHtml($_rating->getRatingCode()) ?>_<?php echo $_option->getValue() ?>" value="<?php echo $_option->getId() ?>" class="radio" />
               </label>
           <?php endforeach; ?>
       </dd>
   </dl>
<?php endforeach; ?>

As you can see, we have adjusted markup by adding label elements which will be used like “mask” for hidden radio inputs. And they will be also used for displaying stars in form of vector (retina) icons.

Now that we have a new markup we also need CSS, which will provide fully functional rating functionality. Before going on CSS code please set up web fonts or some kind of SVG graphics that can be use for rating stars. In this article we are using empty star, half star and full star icons from Font Awesome collection but feel free to use what ever you wish.

In order to better understand what we have done please check provided CSS code:

// Rating star input
.rating-input {
 white-space: nowrap;
 padding: 5px 0;
}
 .rating-input > label {
   display: inline-block;
   position: relative;
   width: 1.1em;
   height: 17px;
   color: #d0a658;
   font-size: 20px;
   font-size: 2rem;
}
 .rating-input:hover > label:before {
   content: "\e80a";
   position: absolute;
   left: 0;
   color: #d0a658;
}
 .rating-input:hover > label:hover ~ label:before {
   content: '\e800';
}
 .rating-input .full-star:before {
   content: "\e80a";
}

Note: This approach will not work on older web browsers (lt IE8). If support for older browsers is required then we need to think about some type of fallback. One of suggestion will be to use Javascript, but I’ll not cover that in this article.

Adjust product rating view

Next thing to do is to improve rating view on category page, product page etc.

First of all go to Magento base theme and find where and how Magento displays product reviews. For example go to base review view phtml template file. Find the "rating-box" markup and spot inline style="width:...%;" inside it. We don’t need it any more if we planing to use rating stars in vector shape. Instead of inline style we will use html5 data- attribute. We will call that attribute data-rating.

In order to show different reviews (number of stars) for different product we need range of numbers which can be declared differently in our CSS code. The easiest option is to go straightforward and adjust current Magneto percent range in PHTML to range of numbers that we need. Especially if we don’t really need a super precise range of ratings.

This option doesn’t require any type of extending Magento default Review block or some other wizardry. In this case you just need to have a range of numbers from 0 to 10 so we can hook our CSS on that numbers. By using native php round function and simple mathematical division by 10 we can get that range of numbers from the getPercent() Magento function.

In short, this is code which we need to use for showing rating stars:


Note: If that’s not good enough for you, then you need to consider extend of default Magento Review block and play it with range of numbers which Magento provide in order to get right data range for data-rating attribute that you can use.

And at last we need CSS code which will be responsible for dynamically displayed stars for each review ratio. By using data-range attribute and CSS content property we can show correct number of stars for each case. If the received range on data-range attribute is between 0 and 10 we can use that numbers in the way that value of 0 representing products without reviews (all empty stars), value of 1 will show half rating star on product. Value 2 will be one full star, value 3 will be one and half star etc. To cut to the chase, please check CSS code:

.rating {
   width: 100%;
   text-align: left;
}
.rating .rating-count {
   padding-left: 1em;
}
.rating .icon-fallback {
   display: none;
}
.rating i {
   font-size: 2em;
}
.rating i:before {
   margin-left: 0;
   min-width: 130px;
   text-align: left;
}
// half star rating
.rating i[data-rating="1"]:before {
   content: "\e822 \ \e800 \ \e800 \ \e800 \ \e800";
}
// one star rating
.rating i[data-rating="2"]:before {
   content: "\e80a \ \e800 \ \e800 \ \e800 \ \e800";
}
// one and half star rating
.rating i[data-rating="3"]:before {
   content: "\e80a \ \e822 \ \e800 \ \e800 \ \e800";
}
// two star rating
.rating i[data-rating="4"]:before {
   content: "\e80a \ \e80a \ \ee800 \ \e800 \ \e800";
}
// two and half star rating
.rating i[data-rating="5"]:before {
   content: "\e80a \ \e80a \ \e822 \ \e800 \ \e800";
}
// three star rating
.rating i[data-rating="6"]:before {
   content: "\e80a \ \e80a \ \e80a \ \e800 \ \e800";
}
// three and half star rating
.rating i[data-rating="7"]:before {
   content: "\e80a \ \e80a \ \e80a \ \e822 \ \e800";
}
// four star rating
.rating i[data-rating="8"]:before {
   content: "\e80a \ \e80a \ \e80a \ \e80a \ \e800";
}
// four and half star rating
.rating i[data-rating="9"]:before {
   content: "\e80a \ \e80a \ \e80a \ \e80a \ \e822";
}
// five star rating
.rating i[data-rating="10"]:before {
   content: "\e80a \ \e80a \ \e80a \ \e80a \ \e80a";
}

That is all guys.

As I’ve already mention if this isn’t good enough for your case, then consider to use Magento default 0 to 100 range and create your CSS on that concept. Or, extend Magento Review block in order to create array of numbers for further manipulation of data-range attributes.

Cheers.

The post Improve default Magento reviews appeared first on Inchoo.


Evaluating and improving accessibility of eCommerce websites

$
0
0

Sir Tim Berners-Lee once said that “Access (to the Web) by everyone regardless of disability is an essential aspect”. We, as developers, always strive to create a website which looks and feels good on a wide range of devices, resolutions, operating systems, network speeds, etc., but how often do we consider designing or creating a website for a wide range of people? In this article, we’re going to cover some basic frontend principles of improving accessibility and what that means in context of a Magento website.

Testing Accessibility

Understanding how people with disabilities browse the web is an important part of testing the accessibility of the site and, ultimately, improving it. For example, people with physical disabilities may only use the keyboard when browsing the website. Another example would be people with low vision who use browser accessibility options and narration software to improve readability of the website. We can also use various OS-default accessibility tools, browser accessibility options and basic keyboard navigation with TAB button to assess the website’s accessibility on a basic level.

I would personally recommend two very basic and simple ways of testing the accessibility your Magento store. Try to do the following in your store by navigating the store using your keyboard and, after that, navigating the store using your keyboard and OS-default narration software while having your eyes closed:

  1. Log into your store account. Navigate through the Homepage and select a category from navigation (or Sitemap, if navigation is not accessible).
  2. Navigate through the category page (select at least 2 filters from the layered navigation, if possible), sort the results by Price from low to high (if possible) and change the view from grid to list or vice versa (if possible).
  3. On a product page, configure the product (if configurable) and change the quantity, add the product to cart. Try to find more info on the product and cycle through the images before adding a product to a cart.
  4. Add several products to your cart
  5. On a cart page, remove one of the products on a cart page, change quantity of another product, apply a promo code and calculate shipping (if available).
  6. Proceed to checkout, enter your test data and try to successfully check out.
  7. Check your order status in your Account page and try to change your account settings (newsletter subscription, addresses, password, etc.).
  8. Test any features and pages which are unique for your store if you are using a custom theme or any of the extensions which affect the frontend.

W3C specifies three level accessibility checklist for developers. Priority 1 covers important basic accessibility requirements, while Priority 2 and Priority 3 cover UX improvements for people with disabilities. You can refer to this checklist while you’re developing a website from the scratch or when you are testing and improving the accessibility of an existing website.

For more information on types of disabilities and how they impact web browsing experience, you can also read W3C’s Web Accessibility Initiative guidelines on disabilities and diversity of Web users.

Skip to content

People with certain disabilities primarily use keyboard to navigate a website and providing them with “Skip to content” link makes accessing your main content easier for them. This way, user can access the main content quickly and skip the navigation links which are, usually, located between the link and the main content. In the context of navigation on Magento websites, this also means that the user can easily navigate the products on a category page without having to skip numerous links in the left sidebar (layered navigation and filters) to reach the product list.

Adding “Skip to content” link

Adding and testing a “Skip to content” link that turns visible only for people who navigate the site using a keyboard consists of the following steps:

1. Add a following link somewhere in your header. The “tabindex = 1” attribute allows this link to be first one selected (in focus) when user presses TAB key.

<a class="skip-to-content" tabindex="1" href="#content">Skip to content</a>

2. Add the id=”content” to the element with which contains main content (class=”col-main“ by default) in your layout files

3. Add the following CSS code

.skip-to-content {
    box-sizing: border-box; // remove this if you added border-box globally
    position: absolute;
    overflow: hidden;
    width: 0;
    height: 0;
    padding: 0;
    border: 0;
    margin: 0;
}
 
.skip-to-content:focus {
    z-index: 5; // change to z-index that fits your theme
    color: #000000; // change to the color which fits your theme
    background: #efefef; // change to the color which fits your theme
    text-align: center;
    width: 100%;
    min-height: 2em;
    padding: 0.5em 1em;
    left: 0;
    top: 0;
}

4. You can test if the link is added properly by pressing TAB key once. If added correctly, the link should turn visible and by pressing ENTER key, the focus should now be on the main content of your website. And, if the link has been configured correctly, on the next TAB key press, the first link from the main content section should be highlighted.

Testing default Magento 1 and Magento 2 keyboard navigation

Magento 1 RWD theme doesn’t have the “Skip to content” link out of the box, while Magento 2 Luma theme has. Magento 2 Luma theme has the “Skip to content” button implemented in a similar way as shown in this section of the article. Even though Magento 1 RWD theme doesn’t have lot of links in the main navigation that separates users from the main content, we can run into 20 and more links in a category page due to the layered navigation in the sidebar which is also comes before the main content.

Main Navigation

Websites with a complex structure, like Magento websites which have lots of stores, categories and subcategories, require a complex navigation with lots of links, dropdown menus and/or mega menus. For example, if we rely too much on mouse hover interaction with our complex menu we have created for our Magento store, we risk severely limiting the navigation for the users who use keyboard for website navigation. Cheapest and fastest way to address this issue is to have an easily accessible sitemap link (usually in the website’s footer).

Another solution would be to create a navigation that is also keyboard accessible in a similar way how the dropdown menus in desktop applications expand on pressing tab key. If you are using Javascript (or any Javascipt libraries like JQuery), it is recommended to expand your functions which trigger on hover to trigger on focus as well to make the navigation element accessible via keyboard. If you prefer using Bootstrap framework for your project, the framework contains bootstrap-dropdown.js which has the dropdown menu accessibility already implemented.

Testing default Magento 1 and Magento 2 main navigation accessibility

Magento 1 does not support keyboard animation for dropdown menus in the main navigation, but Magento 1’s RWD theme provides a sitemap link in footer. Magento 2 Luma Theme default navigation supports keyboard navigation in dropdown, although it is a bit complicated. User is required to select the whole menu bar with keyboard and then use arrow keys and Enter key to navigate the menu. Focused elements aren’t shown too clearly which can cause confusion while navigating the main categories. Keyboard navigation uses Javascript and injecting inline styles into the HTML markup which can be improved by using class overrides, but that’s the matter of personal preference.

Magento 2 accessible navigation

Basic accessibility improvements

Here are some basic accessibility features and improvements to consider while designing and working on your project. Accessibility improvements vary on type of content and you can check out W3C documentation for more detailed info and reference. I have included only the basic improvements which I found to be most common and easy for the developers and designers to keep in mind while working on a project.

Provide text equivalent for non-text content

It is very important to provide a text equivalent for non-text content (images, videos, audio content, iframes, etc.) for users with certain disabilities (poor vision, poor hearing, etc.). For more details on how to improve accessibility for a certain type of content, you can check out the W3C accessibility guidelines.

Use plain language

Using plain language in your text content improves clarity of your content, improves readability of your website and helps users easily understand the content on your website. This is an extensive improvement that affects UX of all users. Using plain language, you can significantly decrease user’s uncertainty about your content (global messages, tooltips, error messages, validation error messages, alert message when navigating away from checkout etc.). From accessibility and inclusivity perspective, it is recommended to also use inclusive language when referring to people with disabilities and/or disabilities. In context of a complex site like Magento store, it is vital for users to understand the shopping process on your site, get all necessary information about the products and generally required information (payment options, shipping options, returns, warranties, etc.). General rules to keep in mind for using plain language:

  • Use active voice rather than a passive voice
  • Use shorter words and sentences
  • Explain all uncommon words and acronyms
  • Do not make assumptions about the knowledge level of your users
  • Use language that respects disabled people (Inclusive language)
Provide keyboard equivalent for mouse functionality

For example, if you have a complex and multi-leveled mega menu in your Magento store (store menu ribbon – category menu ribbon – mega menu containing subcategories), you probably rely on mouse hover event in your Javascript or “:hover” selector in your CSS (if it’s a pure-CSS implementation). In this case you also need to consider implementing keyboard accessibility and narration software support in order to provide good accessibility for your complex navigation. This also applies for all mouse hover-triggered events on your website (popups, tooltips, etc.).

Avoid keyboard focus trap

It is important to make sure that all crucial intractable content (links, buttons, inputs, controls etc.) are accessible via keyboard navigation and that keyboard focus doesn’t get trapped inside an element. Focus trapping is a worst case scenario for keyboard users due to an impossibility of navigating away from the element without closing a browser or a browser tab and, ultimately, leaving your website.

Provide magnifying support

Users with low vision use magnifying tools and in-browser zoom option. It is important to ensure that the website looks good and it is accessible up to 200% zoom. Try zooming into your website 150% and 200% and see if you can still effectively navigate it and go through the checkout.

Be aware of animation style and duration

While animations do look impressive and we can create a wide variety of different graphical effects using the CSS animations and transitions, we have to keep in mind how excessive use of animation, flickering and blinking can affect accessibility. Animations can be very distracting for some users and some blinking (or flashing) animations can trigger an epileptic seizure. It is recommended to limit the animation duration (personally, I would use 5 seconds as a maximum value), add control to the animations (pause, stop, skip) and provide alternative to animated content for accessibility. When evaluating animations on Magento website, make sure loading animations, popup animations, mini-cart animations, global messages animations, etc. aren’t distracting (too complicated or too flashy) and that their duration is within a reasonable limit.

Keep an eye on contrast

At the time of writing this article, W3C specifies the minimum contrast ratio between the text color and solid color background of 4.5:1 for normal-sized text and 3:1 for larger-sized text, and a 7:1 contrast between text color and image background. For reference, the contrast between black and white color is 21:1 which is also maximum possible contrast. You can use any of the many online tools to calculate the contrast ratio or you can find the formula for calculating the ratio manually in the previously linked W3C specification. Ensuring that your website supports these contrast ratios results in better text readability for people with low vision.

Providing extra content for screen readers

Users with poor sight or other visual disabilities use screen readers for navigation websites and they might require additional context for the content on your website. For example, you might want to give extra context or info about your links or give those users special information when filling out a form. Or if your store relies on symbols (product quality, warning labels, award ribbons, etc.) or abbreviations and visual representation to convey some information that your users find useful or critical when deciding on making a purchase.

It is very much recommended to have a CSS class which would hide extra context from sighted users, but it would still be accessible to screen readers. This way, we can provide extra context or extra information for people with visual disabilities. We avoid using “display: none;” CSS property while hiding the content from sighted users because some screen readers might ignore the content with that CSS property.

.screen-reader-text {
    position: absolute;
    overflow: hidden;
    clip: rect(1px, 1px, 1px, 1px);
    padding: 0;
    height: 1px;
    width: 1px;
}

In the following example, we will provide extra context for screen readers which is not needed for sighted users for whom we provide visual context using CSS.

<table class="data-table table-schedule">
	<thead>
		<tr class=”row-months”>
			<th>Jan<span class=”screen-reader-text”>uary</span></th>
			<th>Feb<span class=”screen-reader-text”>ruary</span></th>
			<th>Mar<span class=”screen-reader-text”>ch</span></th>
		</tr>
	</thead>
<!-- ... -->
</table>

ARIA in Magento 1 and in Magento 2

Accessible Rich Internet Applications (or ARIA, for short) defines ways to make Web content more accessible to people with disabilities. ARIA is a set of special accessibility attributes which can be added to HTML markup. Magento 2 recommends usage of ARIA in the official documentation and considers it a best practice while developing Magento 2 store. As of date of writing this article, Magento 1 wasn’t updated with ARIA markup, meaning that Magento 1 has poor accessibility from the start and requires additional development for adding ARIA support.

Conclusion

This article covers only the very basic accessibility improvements which is, in itself, an extensive and intricate field. W3C specifications cover accessibility improvements in detail for various types of content for users with various disabilities and I recommend the use of W3C specification if you need more details or for another type of content (video, audio, etc.). As for Magento 1 and Magento 2 default themes, Magento 2 default Luma theme is definitely a step up from the Magento 1 RWD theme in terms of accessibility and recommended best practices which cover accessibility, but there is still room for minor improvements.

Feel free to share your thoughts, ideas and experience while working on projects regarding accessibility and projects with accessibility requirements, and feel free to share some more tips for improving accessibility of eCommerce websites by leaving a comment below this article.

The post Evaluating and improving accessibility of eCommerce websites appeared first on Inchoo.

Use browsersync in Magento frontend development workflow

$
0
0

As a frontend developer today you have tons of tools at your disposal. In everyday use you will need at least one tool which will be assigned to watch, process, generate, clean, minimize code. I will try to convince you to start using one which can be great assistant in modern frontend workflow. I will talk about Browsersync.io.

So, what is borwsersync!?

BrowserSync makes your tweaking and testing faster by synchronising file changes and interactions across multiple devices.

Started first as live reloader, you know, open your site in browser then write a few lines of code, hit refresh, go back to code, edit the code, back to browser refresh, open second browser, resize it, refresh, then repeat… You remember :-). By using Browsersync you can avoid all that “unneeded” repeated tasks and save time and money.

So, browsersync is node.js module which started and behaves as a standalone server and you can use it with other local servers, apache for example, as proxy server. It injects small script into every page which communicates with the server via WebSockets. When an event occurs — such as a file modification or scroll action — the server sends an update notification to all connected devices.

Some of the key features that comes with browsersync:

  • Scroll on one browser; other browsers follow the scroll to the same point
  • Click links; other browsers load the clicked URL
  • Fill out & submit forms; other browsers submit
  • Test responsive designs; see your site rendered on different devices at one time
  • Change HTML, CSS & JS; automatically inject those new files without a page refresh

And also have great looking UI where you can have overview of all available tools and important info. You can find UI in browser typing http://localhost:3001, URL address will be shown in terminal/console window.

Browsersync UI

Browsersync UI

Browsersync can be used in various ways, it depends on your personal preference and also on your current frontend workflow. You can use it under gulp.js or grunt.js task or my personal choice – as a standalone console tool.

Let’s start with the installation.

We believe you already have installed node.js so we will skip installation of node. There are two options: global and local installation. Global means that you can start browsersync in any directory, and local for each project separate, you decide.

Global:

npm install -g browser-sync

Local:

npm install browser-sync --save-dev

If you are running Mac OSX, please don’t use “sudo” if you encounter error in installation, please check NPM permissions.

After installation let’s start with some basic things

browser-sync --version


browser-sync start --help

Great things about browsersync is that you can write down recipes and reuse it on different project. Or maybe to run different task on one project.

Recipes are stand-alone examples of how to use Browsersync alongside many other popular tools. Each example can be run separately and is a great way for newcomers and pros alike to get their heads around the different use-cases that are possible.

Checkout github for full list of recipes.

# List all available recipes
$ browser-sync recipe ls
 
# Copy files for gulp.sass recipe
$ browser-sync recipe 'gulp.sass'
 
# Copy files for gulp.sass recipe into custom output directory
$ browser-sync recipe 'gulp.sass' -o 'my-project'

Please note you need to install globally browsersync to get recipes command!

Please refer to documentation where you can find more examples and guides.

Using in Magento 2 development

So, what about Magneto? In Magento 2 version they introduce new frontend workflow using grunt as a task runner and livereload.js as a “watcher” for changes inside .less/.css files.

For livereload you need to have installed browser extension. It is not my thing to go with inside browser development so I choose browsersync over livereload. This is my personal choice, it’s up to you to find comfortable environment for development.

If you have already created custom theme in Magneto2 and at least played with .less files you are familiar with the frontend workflow. I have already created custom theme “inchoo” and am using grunt as a task runner:

grunt clean:inchoo
grunt exec:inchoo
grunt less:inchoo
grunt watch

To start using browsersync go to pub static folder where are static files generated and simply watch changes.

cd magento-dir/pub/static/frontend/Inchoo/green/en_US/css

Start watching with this command

browser-sync start --proxy 'magento.local.address' --files="*.css"


Stanislavs-MacBook-Pro:css stamba$ browser-sync start --proxy 'magento.202' --files="*.css"
[BS] Proxying: http://magento.202
[BS] Access URLs:
 -------------------------------------
       Local: http://localhost:3000
 
 -------------------------------------
          UI: http://localhost:3001
 -------------------------------------
[BS] Watching files...

After I have made changes in custom .less file, grunt picks up on this, calls PHP, generates new css inside pub/static folder after which browsersync “listens” and serves inside browser changes.

[BS] Proxying: http://magento.202
[BS] Access URLs:
 -------------------------------------
       Local: http://localhost:3000
 
 -------------------------------------
          UI: http://localhost:3001
 
 -------------------------------------
[BS] Watching files...
[BS] File changed: styles-m.css
[BS] File changed: styles-l.css

So, here you go, if you think that this will be of use and addition to your current workflow please write it down in comments and especially if you have something to add or change on this topic.

Thanks.

The post Use browsersync in Magento frontend development workflow appeared first on Inchoo.

Tuning Redis for extra Magento performance

$
0
0

Using Redis is a quick & easy way to improve Magento performance. Setting it up is easy, performance benefits are great, and we never had problems with it – it’s fire and forget. Inchoo already covered that in detail: http://inchoo.net/magento/using-redis-cache-backend-and-session-storage-in-magento/.

But, come on! Are we really going to races with the stock engine? Are we tuning Magento performance or what? Redis is fast by default, but it can get a lot faster. Read on to see how.

Crunching numbers

Redis, by default, listens to TCP connections only. And Magento, by default, connects that way to Redis. But, if PHP and Redis are on the same machine, you can easily use Unix sockets instead for an impressive performance gain. Here are the numbers:

Remote TCP Local TCP Local socket
PING_INLINE 290,697.66 1,020,408.19 1,162,790.62
PING_BULK 364,963.53 1,408,450.62 1,785,714.25
SET 5,531.28 591,716.00 724,637.69
GET 5,852.06 485,436.91 833,333.38
INCR 246,913.58 763,358.81 1,315,789.50
LPUSH 5,572.58 320,512.81 487,804.88
LPOP 5,852.74 495,049.50 564,971.75
SADD 203,252.03 1,063,829.88 1,234,567.88
SPOP 362,318.84 1,219,512.12 1,538,461.62
LPUSH 5,572.27 454,545.47 500,000.00
LRANGE_100 58.56 5,753.74 7,227.00
LRANGE_300 1,535.20 1,690.93
LRANGE_500 853.21 1,031.46
LRANGE_600 619.66 749.81
MSET 65,402.22 90,090.09

Remote TCP is another server. Local TCP is same server over TCP connection, and Local socket is same server over unix socket connection. Numbers are requests per second.

The numbers speak for themselves, but let’s emphasize benchmarks for two most commonly used Redis commands in Magento: SADD, where local socket serves 607.41% more requests per second than remote TCP and 116.05% more than local TCP, and GET, where local socket serves incredible 14240.00% more than remote TCP and 171.67% more requests per second than local TCP. (In fact, Magento uses HGET, but redis-benchmark does not benchmark that command, so we consider GET as a proxy here.)

If you want to reproduce the benchmark on your machines, here is the command to use:

redis-benchmark -s /var/run/redis/redis.sock -c 10 -P 10 -d 2000

(Using socket, 10 parallel clients, 10 requests pipelined, 2000 bytes data size, default 100000 requests). Settings for data should be reasonably close to how actually Magento uses Redis. And if you want to do benchmarks of your own: http://redis.io/topics/benchmarks.

The takeaway here is that Redis itself is crazy fast. Basically, it’s only limited by RAM speed. And that means that even TCP overhead reduces its performance a lot. If you add physical network overhead, you get a few orders of magnitude worse performance than you could have.

Unix sockets FTW

Setting up Redis & Magento to communicate over unix sockets is actually very easy (assuming you’ve already got Redis working over default TCP, these are the only changes needed):

1. Edit redis.conf. (On Ubuntu 16.04, Redis configuration is located in /etc/redis/redis.conf)

Under “# Specify the path for the Unix socket…” add:

unixsocket /var/run/redis/redis.sock
unixsocketperm 777

(Just remember, this is for Ubuntu, and may be different on other Linuxes, like, for example, CentOS.) Restart Redis server.

2. Edit Magentos local.xml:

<redis_session>
  <host>/var/run/redis/redis.sock</host>
  <port>0</port>
<cache>
  <backend>Cm_Cache_Backend_Redis</backend>
<backend_options>
  <server>/var/run/redis/redis.sock</server>
  <port>0</port>

(Everything else staying the same as when using Redis over TCP.) Clear Magento caches. Voila!

Conclusion

So, let’s face it: you are not eBay or Alibaba (yet). Before you get there, you can still run your Magento shop fine off of one server. Use that to your advantage.

Today, one server can (and should) mean plenty of CPU cores and heaps of RAM. And, we can take that big, bad engine and turbocharge it. Use unix sockets to get the maximum power out of Redis.

The post Tuning Redis for extra Magento performance appeared first on Inchoo.

The latest Magento and eCommerce news

$
0
0

What’s new in the Magento world and the world of eCommerce? Well we’re bringing you the latest scoop.

Magento 2.1

This month, Magento came out with Enterprise Edition 2.1 which offers new features that simplify the use of eCommerce sites for both retailers and customers. The first feature is staging and preview which allows you to schedule and preview updates to products, categories, descriptions and promotions. Another part of this feature is the new timeline dashboard that enables you to clearly see what is scheduled to happen on the site so you can track the sales process and later analyze the impact you had on it.

The second feature is Elasticsearch which ensures high quality search results and is easier to set up, scale and manage. This search engine supports 33 languages out-of-the-box, and allows you to set your own stop words, synonyms and attribute weighting to deliver better search results.

Another feature are PayPal enhancements for the streamlined checkout. That includes the implementation of PayPal In-context checkout, so cutomers can use PayPal without leaving your site. With this feature, the storing of credit card information can be done in a safe way.

The last key feature are the bussines management tools. They are made intuitive and easy to use in order to simplify the process for the retailers. With the drag-and-drop tools, retailers can customize and save admin views for a quick access to products, customers and other information.

eCommerce

Pinterest is launching a way to search for products with your smartphone camera. In the next few months, Pinterest is going to be rolling out an improved visual search button feature – that will allow you to automatically perform a visual search for all the items in the frame of your camera. This feature could be used to find the furniture you see on a TV show or in a restaurant, the clothes you see on a celebrity, or a person on the street (but in that case, don’t forget to turn the flash of) it can even work on car parts, the possibilities are endless.

When launched, this feature could drive Pinterest closer to its competitors. This visual tool eliminates a lot of steps a potential customer would usually go through. It coincides with the shift to micro moments instead of a long research process, and marketers turning to map making instead of storytelling. Pinterest is monetising on the fact that people live on-the-go and don’t necessarily research every item they buy. A new “shopping cart” feature, accessible across all platforms where the users have active accounts, will also play its part in enhancing the overall commerce experience.

In other news, Amazon just announced they are expanding the Dash button program. If you’re not familiar with them, Dash buttons are small devices that allow customers to place orders on specific products. Every button is specific to a different company. Now you’ll be able to get up to 150 different buttons from the likes of Lavazza, Play-Doh, Red Bull, Schwarzkopf and many more, meaning you’ll never have to leave your house to go shopping again.

Finally, at the end of this news cycle, we leave you with a question. Which of these features are you most excited for?

The post The latest Magento and eCommerce news appeared first on Inchoo.

Meet Magento Association introduces exciting changes – Meet Magento 2.0

$
0
0

Have you heard of Meet Magento Association – an amazing group of individuals who have done incredible things for the community around Magento, being an integral part of making it into what it’s become?

They recently made some significant changes to the organization. Here’s the latest scoop on what’s new and how it affects the ecosystem!

Who/what is Meet Magento Association?

Now, you can’t tell me you haven’t visited any of the Meet Magento conferences that are happening around the world. If you have, like myself, had the privilege of attending, organizing or even speaking at some of those, you’re probably hooked and can’t wait to get the opportunity to visit new countries while meeting a lot of old friends.

I’ve been to two Imagine conferences in Vegas (and those were a blast) but Meet Magentos certainly have that special feeling – they’re usually smaller, cosier and you don’t have to spend days and weeks before the conference carefully planning your own schedule (and still, inevitably, missing on some good stuff).

Meet Magento events have been organized in more than 20 countries so far (there are quite a few coming up in the second half of 2016 so better start preparing). And while there are local event partners who actually put everything together, it all started with a small group of enthusiasts from Netresearch company based in Leipzig (perhaps you’ve heard the tale of two Thomases – Fleck and Goletz) who organized the first Meet Magento Germany.

They were soon joined by Guido Jansen and Dutchento who pulled off Meet Magento Netherlands – and these two are now the longest-running events of the Magento ecosystem. So, they are the ones behind all of the Meet Magento events, and let’s not forget Developers Paradise, the event that has been talked about a lot this year :)

So, what’s new? Global organization

Officially announced at Meet Magento Germany in Leipzig this week – they’ve changed some of the roles and responsibilities, now have Magento as the official partner (details are yet to be revealed) and introduced a global organization with 3 regional VPs and an Innovation Officer.

Ok, why is that important?

This move should allow other members of the ecosystem to have more direct access to “their” VPs who can provide more immediate assistance, advice and guidance around the plans to organize new events or improve on the existing ones.

Here we have a lineup of Meet Magento veterans – Kuba and Guido have organized a lot of MM events in Poland and Netherlands and SmartOSC is a stronghold in South East Asia.

Historically, Meet Magento hasn’t done many events in USA (Interactiv4 organized several MMNY events there) so with this way of expanding we may soon see some new MM events popping up from the East coast to the West.

What’s that about Magento and official support again?

So far, Magento has kept somewhat of a distance from official organization of these types of events and everyone organizing needed to make a distinction that those were “community-driven” events.

However, at this year’s Magento Live UK something new was announced:

Apparently, there was more news about it at this year’s Meet Magento Germany and I’m looking forward to next week’s meeting with all Meet Magento event organizers when I’m guessing we’ll be officially introduced to a lot of these changes.

Meet Magento World – coming to your home!

There is one addition to the family of Meet Magento events – Meet Magento World – an online Magento conference scheduled for December 6-8 this year. This event plays perfectly into the new concept behind the association – it’s global, interconnected, and we’re all contributing to one common goal.

meet-magento-world-speakers

And the speaker avatars look great – not just because our Katarina prepared them :).

Of course, this event will be joined (my expectations) by mostly developers and other community members (I don’t see this as something that has the potential of drawing in many merchants, at least not in its inaugural year), but even so, it will serve its purpose. Have you signed up already?

What’s next?

Magento is proving to be much more community-orientated since the eBay breakup, and there is still some way to go with improving Magento 2 so it can truly be the safest bet for many merchants and agencies alike.

Having Meet Magento Association grow stronger and be recognized by Magento as a true helping hand should help us all write new, successful stories for developers, agencies and, most importantly, those who put bread on our table – the merchants.

So, where can we see you in person to share some stories? What’s the next Meet Magento event you are attending?


The post Meet Magento Association introduces exciting changes – Meet Magento 2.0 appeared first on Inchoo.

Can Sketch help us improve our design workflow?

$
0
0

Designers are constantly trying to develop a healthy design process by experimenting with tools in an attempt to find the one that works best.

I’ve been using Photoshop as my primary design tool for almost 10 years, and the fact that Photoshop wasn’t created for UI design was never a real problem. Why? Because Adobe was always throwing new features to support UI design. The main problem is that Photoshop’s engine was never optimized for UI design, it is huge, memory-consuming, and many designers weren’t pleased with it’s performance.

The more large files you work on, the more you can get stuck and that was the main reason to look out for new and better alternatives to an existing design workflow.

Arrival of Sketch

A few years ago Sketch has become one of the favorite topics for discussion in UI design community. Sketch is 100% vector, lightweight, fast, focused solely on working on UI design and built exclusively for Mac by Bohemian Coding.

Almost two years ago I decided to give Sketch a try, but after a few days, initial enthusiasm began to wear off. It was buggy, messy and very frustrating. I still remember very weird bug when text disappeared suddenly or become uneditable. The only way to fix that was to close and reopen the file.

I’ve lost too much time on a project with Sketch and decided to move back to Photoshop in the middle of design process.

It was obvious it has many potential, but it wasn’t 100% ready to use for production. I decided to wait some time because it was getting better and better with every update. Finally, this year, after Sketch 3.7 was released, I decided to give it another try.

How creating a website in Sketch improves the design process?

This is not going to be another “Sketch vs Photoshop” article with features cited against each other. In this post, I’ll briefly explain our thoughts and insights into Sketch, and we’ll take a dive into key features in future posts.

Interface and Artboards

Sketch’s interface is clean and simple, it offers only what can be recreated with HTML and CSS3 so everything is perfectly suited for interface design.
interface

First thing you’ll notice is Sketch’s infinite canvas. You can scroll as far as you want, so if you’re creating a responsive web design you may want to set up your working area by adding artboards first. Simply type the letter ‘A’ and the Inspector will show up with some common templates.

artboards

Creating separate working frames, with customisable built-in grids, in a single canvas makes Sketch perfect for designing responsive sites and apps.

Scalability and Pixel Precision

Sketch works in vectors so it is easy to rescale the objects on canvas without losing quality and you’ll also get precise pixel control making it perfect for design in a world of different screen sizes and pixel densities. If you want to see the non-vector degradation, just switch to View > Canvas > Show pixels and you’ll see equivalent to exporting the image to PNG and then zooming in.

Shared Styles and Symbols

Symbols allow you to save time and make designs way easier to maintain by reusing elements across Artboards and Pages. To create a symbol, simply select a group, artboard, or a selection of layers and click the Create Symbol icon in the toolbar.
Although they are still not powerful like Smart Objects in Photoshop (resizing is not available), they still allow you to improve your workflow. If you use Atomic Design approach by Brad Frost the symbols page will give you an overview of all building blocks.

symbols

Plugins

Let’s face it, Sketch still lacks many features we are used to, but there is amazing community of designers and developers who have created impressive range of Sketch plugins and I’ll go through some of the ones I find most useful.

The first plugin you need to download and install is Sketch Toolbox. It is a simple 3rd-party plugin manager which allows you to easily browse and install plugins without much hassle. With a single click it will download and install new plugins while also keeping up to date the previously downloaded ones.

toolbox

Dynamic Buttons
Let’s say we have a few buttons with the different labeling text and the same style. Dynamic button plug-in allows us to create buttons with fixed paddings so they automatically expand based on the text they contain.
Just create a text layer and use shortcut Cmd + J to create a dynamic button. After Dynamic Group is created, use CSS shorthands to define padding (e.g. 10:30:10:30) and use Cmd+J to update button. Now you can duplicate button and change text, to update just press Cmd + J and button will change automatically.

dynamic-button

Craft
Craft is a plugin suite created by InVision Labs which comes with three plugins: Data, Duplicate, and Library. It allows you to quickly pull in contextually relevant content in your designs, duplicate design elements quickly with pixel perfect accuracy, and keep your design library cloud-connected.

Data

craft-generating-content

Duplicate

craft-duplicate

States
If you’ll ask UI designers what feature they would like to see in the next upgrade I’m sure many would say they want an equivalent to Layer Comps. Unfortunately there isn’t that feature in Sketch at the moment, but Eden Vidal created great plugin called States and it works similar to Layer Comps (you can change positions and toggle visibility of layers).

states

Sketch Palettes
Color management system in Sketch is really simple, there’s just global colors and document colors. If you want to create a different palette for each project, you’ll have to use a plugin. One of the best is Sketch Palettes by Andrew Fiorillo.

You can save color palette from either the Global or Document Colors.

save-palette

Once you’ve saved some palettes, you can load them as needed by opening a .sketchpalette file containing the colors you want to load. This will replace current colors in the selected section. Saving palettes in the cloud is also a great way to share them between the team.

Exporting screens and integration with other tools

Many developers don’t have experience with Sketch yet, and since it is Mac only tool many of them won’t be able to open Sketch file if they are on other OS. For that reason, very often designers will have to slice up all of the assets for them. Fortunately, exporting the assets in Sketch is super-easy and it allows exporting multiple sizes and multiple formats.

export

You will also have to spend some time creating a style guide in order to prepare styles developers will need to get started. Again, this won’t take you more than one click in Sketch using Craft Library plugin. It’s going to look an entire document and create a style guide in the new page named Styles.

styles

Another option is to use collaboration tool like Zeplin. Sketch Zeplin plugin will send your artboards to project in Zeplin where you have up-to-date repository for collaboration with developers. Developers can click on a layer and see all the information.

Prototyping tools like InVision, Marvel, Framer and Principle have also their own Sketch integration, so you can turn your designs into interactive prototypes automatically without extracting your screens and assets.

Price

Comparing Sketch’s price to Adobe’s subscriptions revealed it’s cheaper in the long term. At this moment (v3.7.2) fixed price is $99 versus $19.99 a month for Photoshop CC. But it is important to mention that Sketch announced new Versioning and Licensing model. A license of Sketch will still cost $99 USD, but for one year of free updates.

The Future of Sketch

Sketch is not perfect yet, it does have a few downsides and lacks some useful features, but it is already a tool that makes design workflow much faster so we can focus on other aspects of design process. Also we shouldn’t forget it’s only a few years old and the team behind it releases new updates constantly. No one can reliably predict the future, but Sketch is definitely moving at a good pace. It will be interesting to see their reaction to Adobe’s XD, long-awaited design/prototyping tool which looks very promising too. One thing is for sure, the only one who will see a benefit from this war will be designers.

The post Can Sketch help us improve our design workflow? appeared first on Inchoo.

Product links on Magento CSV import

$
0
0

When I started working at Inchoo, one of our clients requested a functionality to be added to Magento CSV product import. Client wanted to know if an attribute value of one of the products that they were importing already had a matching value in the database and they also wanted to be able to jump to that product via link. Find out more about handling this specific situation.

The attribute in question was a custom SKU that they used internally within the company, and as they were importing large number of products they didn’t want to have two products with the same custom SKU.

The biggest problem about this task was the issue of available memory as the number of the products in the database and the size of CSV files were large. In the code below I’ll focus only on the logic that was needed to make this work. For purpose of demonstrating this I’ll be using try() section of the validateAction() in Mage_ImportExport_Adminhtml_ImportController. 

First, we have to make the source file (CSV) available to us by adding another step to the source validation process:

$source = $import->setData($data)->uploadSource();
$validationResult = $import->validateSource($source);

Now there is a check whether the file is valid or not, but in our case the information about the duplicate attribute values should be displayed regardless of the validation result, so we will have to have the same logic in two places.

Second, we have to get the product data we need from Magento database. For this example we will be using ‘name’ attribute as the search value.

//-- set search value flag
$search_value_exists = 0;
 
//-- search_values array for storing search values from all products
$search_values = array();
 
$products_data = Mage::getResourceModel('catalog/product_collection')
		 ->addAttributeToSelect('name')
		 ->addAttributeToFilter('visibility', array('neq' => 1));

We will have to limit number of products that we will be loading while collecting the data from the database to avoid the memory issues. For this example a limit of 100 products per page is used.

//-- set page limit to 100
$products_data->setPageSize(100);
 
//-- get the number of pages
$pages = $products_data->getLastPageNumber();
$currentPage = 1;

And now we will get all the necessary data. The reason for taking SKU values is for uniqueness (other unique values can also be used), as the search values themselves may not be unique (e.g. two products may have the same name). After each page of 100 products is done, we clear the collection and load the next one.

do{
	$products_data->setCurPage($currentPage);
	$products_data->load();
 
	foreach($products_data as $product_data){
		$search_values[$product_data->getId()] = array('sku' => $product_data->getSku(),
							       'name' => $product_data->getName());
	}
 
	$currentPage++;
	$products_data->clear();
} while ($currentPage <= $pages);

For our example we will be displaying the product links with SKUs, so a link between search value and SKU will have to be stored in an array.

//-- array for storing skus belonging to duplicate search values
$sku_search_value = array();

Next, we open the CSV file and get column keys for SKU and search value.

//-- open csv file
$fh = fopen($source, 'r');
 
//-- get key for the search value and sku from the first row of csv
$rowData = fgetcsv($fh, 0, ',', '"');
$search_value_key = array_search('name', $rowData);
$sku_key = array_search('sku', $rowData);

Now comes the part where we will read CSV file row by row and compare the search value with the data that we got from the database (row by row reading of CSV file is used to avoid memory issues). Again, SKU here is used as a unique field to differentiate between those products that have the same search value (e.g. two different products have the same name). If the duplicate is found, then the link is created and stored within an array that will be used later to generate links to products.

//-- for each csv search value (excluding the first row - the column names)
//-- check if that search value exists within the search_values array
while ($rowData = fgetcsv($fh, 0, ',', '"')){
	$rowArray = array('sku' => $rowData[$sku_key],
		          'name' => $rowData[$search_value_key]);
 
	if(in_array($rowArray, $search_values)){
		$link = Mage::helper('adminhtml')
			->getUrl('adminhtml/catalog_product/edit',array('id' => array_search($rowArray, $search_values)));
 
		//-- if there is need for link to open a specific tab then the line below can be uncommented and modified
		//-- the group number can be found in eav_attribute_group table and other tabs will have their specific names
		//-- (like inventory) that can be found by looking in respective layout xml files and searching for <action method="addTab">
		//$link = substr($link, 0, strpos($link, '/key/')).'/tab/product_info_tabs_group_8/'.substr($link, strpos($link, '/key/')+5, strlen($link));
 		//$link = substr($link, 0, strpos($link, '/key/')).'/tab/product_info_tabs_inventory/'.substr($link, strpos($link, '/key/')+5, strlen($link));
 
		$sku_search_value[] = $rowData[$sku_key].' ('.'<a target="_blank" rel="external" href="'.$link.'">'.$rowData[$search_value_key].'</a>'.')';
		$search_value_exists = 1;
	}
}

After that, we close the CSV file and add the links to products with duplicate search values. The import button is disabled by setting the second parameter to false.

//-- close csv file
fclose($fh);  
 
//-- if the search value exists do not show the import button and notify the user
if($search_value_exists){
	$resultBlock->addSuccess(
		$this->__('File is valid, but there are names that already exist in magento products for following SKUs (in CSV): '.'<br>'.implode(', ', $sku_search_value).'<br>'),
		false
	);
} else {
	$resultBlock->addSuccess($this->__('File is valid! To start import process press "Import" button'), true);
}

In the end the whole try() section of the validateAction() should look like this (modified parts are marked by START and END comments):

try {
	/** @var $import Mage_ImportExport_Model_Import */
        $import = Mage::getModel('importexport/import');
	//-- 1st modification START
        //$validationResult = $import->validateSource($import->setData($data)->uploadSource());
	$source = $import->setData($data)->uploadSource();
	$validationResult = $import->validateSource($source);
	//-- 1st modification END
 
	if (!$import->getProcessedRowsCount()) {
		$resultBlock->addError($this->__('File does not contain data. Please upload another one'));
	} else {
        	if (!$validationResult) {
			if ($import->getProcessedRowsCount() == $import->getInvalidRowsCount()) {
				$resultBlock->addNotice(
                                	$this->__('File is totally invalid. Please fix errors and re-upload file')
                            	);
                        } elseif ($import->getErrorsCount() >= $import->getErrorsLimit()) {
                        	$resultBlock->addNotice(
                                	$this->__('Errors limit (%d) reached. Please fix errors and re-upload file', $import->getErrorsLimit())
                            	);
                        } else {
                        	if ($import->isImportAllowed()) {
 
                                //-- 2nd modification START
                                //-- set search value flag
                                $search_value_exists = 0;
 
                                //-- search_values array for storing search values from all products
                                $search_values = array();
 
                                $products_data = Mage::getResourceModel('catalog/product_collection')
                                                ->addAttributeToSelect('name')
                                                ->addAttributeToFilter('visibility', array('neq' => 1));
 
                                //-- set page limit to 100
                                $products_data->setPageSize(100);
 
                                //-- get the number of pages
                                $pages = $products_data->getLastPageNumber();
                                $currentPage = 1;
 
                                do{
                                    $products_data->setCurPage($currentPage);
                                    $products_data->load();
 
                                    foreach($products_data as $product_data){
                                        $search_values[$product_data->getId()] = array('sku' => $product_data->getSku(), 'name' => $product_data->getName());
                                    }
 
                                    $currentPage++;
                                    $products_data->clear();
                                } while ($currentPage <= $pages);
 
                                //-- array for storing skus belonging to duplicate search values
                                $sku_search_value = array();
 
                                //-- open csv file
                                $fh = fopen($source, 'r');
 
                                //-- get key for the barcode and sku from the first row of csv
                                $rowData = fgetcsv($fh, 0, ',', '"');
                                $search_value_key = array_search('name', $rowData);
                                $sku_key = array_search('sku', $rowData);
 
                                //-- for each csv search value (excluding the first row - the column names)
                                //-- check if that search value exists within the search_values array
                                while ($rowData = fgetcsv($fh, 0, ',', '"')){
                                    $rowArray = array('sku' => $rowData[$sku_key],
                                                      'name' => $rowData[$search_value_key]);
 
                                    if(in_array($rowArray, $search_values)){
                                        $link = Mage::helper('adminhtml')
                                                ->getUrl('adminhtml/catalog_product/edit',array('id' => array_search($rowArray, $search_values)));
 
                                        //-- if there is need for link to open a specific tab then the line below can be uncommented and modified
                                        //-- the group number can be found in eav_attribute_group table and other tabs will have their specific names
                                        //-- (like inventory) that can be found by looking in respective layout xml files and searching for <action method="addTab">
                                        //$link = substr($link, 0, strpos($link, '/key/')).'/tab/product_info_tabs_group_8/'.substr($link, strpos($link, '/key/')+5, strlen($link));
                                        //$link = substr($link, 0, strpos($link, '/key/')).'/tab/product_info_tabs_inventory/'.substr($link, strpos($link, '/key/')+5, strlen($link));
 
                                        $sku_search_value[] = $rowData[$sku_key].' ('.'<a target="_blank" rel="external" href="'.$link.'">'.$rowData[$search_value_key].'</a>'.')';
                                        $search_value_exists = 1;
                                    }
                                }
 
                                //-- close csv file
                                fclose($fh);  
 
                                //-- if the search value exists do not show the import button and notify the user
                                if($search_value_exists){
                                    $resultBlock->addNotice(
                                        $this->__('Please fix errors and re-upload file. File also contains names that already exist in magento products for following SKUs (in CSV): '.'<br>'.implode(', ', $sku_search_value).'<br>'),
                                        false
                                    );
                                } else {
                                    $resultBlock->addNotice(
                                        $this->__('Please fix errors and re-upload file or simply press "Import" button to skip rows with errors'),
                                        true
                                    );
                                }
                                //-- 2nd modification END
                            } else {
                                $resultBlock->addNotice(
                                    $this->__('File is partially valid, but import is not possible'), false
                                );
                            }
                        }
                        // errors info
                        foreach ($import->getErrors() as $errorCode => $rows) {
                            $error = $errorCode . ' ' . $this->__('in rows:') . ' ' . implode(', ', $rows);
                            $resultBlock->addError($error);
                        }
                    } else {
                        if ($import->isImportAllowed()) {
                                //-- 3rd modification START
                                //-- set search value flag
                                $search_value_exists = 0;
 
                                //-- search_values array for storing search values from all products
                                $search_values = array();
 
                                $products_data = Mage::getResourceModel('catalog/product_collection')
                                                ->addAttributeToSelect('name')
                                                ->addAttributeToFilter('visibility', array('neq' => 1));
 
                                //-- set page limit to 100
                                $products_data->setPageSize(100);
 
                                //-- get the number of pages
                                $pages = $products_data->getLastPageNumber();
                                $currentPage = 1;
 
                                do{
                                    $products_data->setCurPage($currentPage);
                                    $products_data->load();
 
                                    foreach($products_data as $product_data){
                                        $search_values[$product_data->getId()] = array('sku' => $product_data->getSku(),
                                                                                       'name' => $product_data->getName());
                                    }
 
                                    $currentPage++;
                                    $products_data->clear();
                                } while ($currentPage <= $pages);
 
                                //-- array for storing skus belonging to duplicate search values
                                $sku_search_value = array();
 
                                //-- open csv file
                                $fh = fopen($source, 'r');
 
                                //-- get key for the barcode and sku from the first row of csv
                                $rowData = fgetcsv($fh, 0, ',', '"');
                                $search_value_key = array_search('name', $rowData);
                                $sku_key = array_search('sku', $rowData);
 
                                //-- for each csv barcode (excluding the first row - the column names)
                                //-- check if that barcode exists within the barcodes[] array
                                while ($rowData = fgetcsv($fh, 0, ',', '"')){
                                    $rowArray = array('sku' => $rowData[$sku_key],
                                                      'name' => $rowData[$search_value_key]);
 
                                    if(in_array($rowArray, $search_values)){
                                        $link = Mage::helper('adminhtml')
                                                ->getUrl('adminhtml/catalog_product/edit',array('id' => array_search($rowArray, $search_values)));
 
                                        //-- if there is need for link to open a specific tab then the line below can be uncommented and modified
                                        //-- the group number can be found in eav_attribute_group table and other tabs will have their specific names
                                        //-- (like inventory) that can be found by looking in respective layout xml files and searching for <action method="addTab">
                                        //$link = substr($link, 0, strpos($link, '/key/')).'/tab/product_info_tabs_group_8/'.substr($link, strpos($link, '/key/')+5, strlen($link));
                                        //$link = substr($link, 0, strpos($link, '/key/')).'/tab/product_info_tabs_inventory/'.substr($link, strpos($link, '/key/')+5, strlen($link));
 
                                        $sku_search_value[] = $rowData[$sku_key].' ('.'<a target="_blank" rel="external" href="'.$link.'">'.$rowData[$search_value_key].'</a>'.')';
                                        $search_value_exists = 1;
                                    }
                                }
 
                                //-- close csv file
                                fclose($fh);  
 
                                //-- if the search value exists do not show the import button and notify the user
                                if($search_value_exists){
                                    $resultBlock->addSuccess(
                                        $this->__('File is valid, but there are names that already exist in magento products for following SKUs (in CSV): '.'<br>'.implode(', ', $sku_search_value).'<br>'),
                                        false
                                    );
                                } else {
                                    $resultBlock->addSuccess(
                                        $this->__('File is valid! To start import process press "Import" button'), true
                                    );
                                }
                                //-- 3rd modification END
                        } else {
                            $resultBlock->addError(
                                $this->__('File is valid, but import is not possible'), false
                            );
                        }
                    }
                    $resultBlock->addNotice($import->getNotices());
                    $resultBlock->addNotice($this->__('Checked rows: %d, checked entities: %d, invalid rows: %d, total errors: %d', $import->getProcessedRowsCount(), $import->getProcessedEntitiesCount(), $import->getInvalidRowsCount(), $import->getErrorsCount()));
                }

 The end result for a valid CSV file would look something like this:

import_product_links

Have you ever met with a situation like this? What’s your take on it?

The post Product links on Magento CSV import appeared first on Inchoo.


Extending javascript methods Magento way

$
0
0

Hello, in this article I am going to show you how to properly extend javascript files in Magento 1. We’ve already covered the topic of extending Magento 2 default JS components in this article, but it’s time to revise how it’s done in Magento 1. So, let’s get to it! 

For examples we are going to use prototype’s validation script located under js/prototype/validation.js and prototype javascript file located under js/prototype/prototype.js.

Extending javascript in Magento is resolved by loading the javascript files with rewritten classes and methods after the original ones. Common improper way of extending javascript is copying whole files that contain methods or classes we want to extend and making changes where we need them. This causes code pool to increase and it is completely unnecessary.

There are two ways we can extend Magento build in javascript, depending on whether the class we are extending is already extended in original files, and on what way.

Lets get it started!

If the class has not been extended using prototype’s Object.extend() method, we can use Class.create() method which allows us to call parent method when extending by using $super variable as an first and extra argument. For example we can use Ajax.Request class located in js/prototype/prototype.js.

First create a new file under js/inchoo/prototype.js in project root:

/*
 * INCHOO extend of prototype.js
 */
 
var InchooAjaxRequest = Class.create(Ajax.Request, {
    request: function($super, url){
        // your changes before
        $super(url); // call method from parent class
        // your changes after
    }
});
 
// replace parent class with extended class where needed and call the extended method
var ajaxBase = new InchooAjaxRequest();
ajaxBase.request('http://yourtesturl.com');

Next include it in your layout where it is needed, for example in local.xml. Also make sure it is included after the original (js/prototype/prototype.js in our case):

<default>
	<!-- rest of the layout -->
        <reference name="head">
            <action method="addJs"><script>inchoo/prototype.js</script></action>
	</reference>
        <!-- rest of the layout -->
</default>

 Second way is used if the class we are extending has already been extended using the prototype’s Object.extend() method, then we can extend it again using the same method.

First create a new file under js/inchoo/validation.js in project root:

/*
 * INCHOO extend of validation.js
 */
 
// check if Validation class exists and is property of current window object
// (we use this to double check we're not extending object that doesn't exist)
if('Validation' in window) {
    Object.extend(Validation, {
        test : function(name, elm, useTitle) {
            // your changes START
            Validation.whatDoesThisButtonDo();
            // your changes END
        },
        isVisible : function() {
            // you can extend multiple methods!
        },
        whatDoesThisButtonDo : function() {
            // or add new methods!
 
            // what does this button do?
            console.log('bam!');
        }
    });
}

Next, include it in your layout where it is needed, for example in local.xml. Also make sure it is included after the original (js/prototype/validation.js in our case):

<default>
	<!-- rest of the layout -->
        <reference name="head">
            <action method="addJs"><script>inchoo/validation.js</script></action>
	</reference>
        <!-- rest of the layout -->
</default>

Important part being the:

<action method="addJs"><script>inchoo/validation.js</script></action>

This way you only extend methods you need, and not the whole class as you would by just copying original file and then editing it. And what is great, you can extend multiple methods + add new ones you need. And that’s it!

First way is better because you can use $super variable to use parent class methods, but you can’t use it always as the second way.

If you have issues with it, first make alert or console.log on top of extended javascript file just to be sure you’re including the file correctly.

Good luck!

The post Extending javascript methods Magento way appeared first on Inchoo.

Getting started with CSS Flexbox

$
0
0

The CSS3 Flexible Box Layout, or as a shorter and more widely recognised term – Flexbox, is a CSS box model optimised for designing user interface layout.

It is the addition to the four basic layout modes, previously defined in CSS: block layout, inline layout, table layout, and positioned layout. But, in contrast to these earlier ones, this is the first CSS module designed for laying out complex pages.

Flexbox brings a lot of new stuff to the table and solves some of the existing problems in rather simple manner, especially in regards to:

  • Building a responsive/fluid layouts (while containing elements, such as images, maintain their position and size relative to each other)
  • Vertical and horizontal centering/aligning of elements
  • Changing direction and reordering elements on the screen in a different order from how they are specified by the DOM (i.e., without altering the HTML)

In the rest of this article, I’m going to cover some of the flexbox’s defining aspects and also go through a couple of quick examples and practical ideas.

Flexbox basics

Two fundamental concepts essential for understanding flexbox are flex container & flex items.

flex-container1

To enable flexbox, first we need to specify the value on a display property for the container element.

.container {
    display: flex;
}

By doing so, we are changing container element to use flexbox layout, rather then default block layout. This also means that all container’s immediate child elements are automatically laid out by using flex layout model – they are now set to flex items.

Flexbox has a direction-agnostic layout algorithm and that is in contrast to the block layout – which has vertical direction, or inline layout – which lays out it’s elements horizontally.

Considering this, we can use flex-direction property to easily modify direction of elements:

.container {
    display: flex;
    flex-direction: row;
}

flex-row-1

As we can see on the previous image, it’s value is set to row  (which is a default value), but we can also change it to column:

.container {
    display: flex;
    flex-direction: column;
}

flex-column-1

By looking at most useful flexbox properties, we can also point out to justify-content; a property, which aligns flex items inside of the container on the main axis (horizontally):

.container {
    display: flex;
    justify-content: flex-start;
}

flex-start-1

On the contrast, for aligning flex items on the cross axis (vertically), we can use align-items property:

.container {
    display: flex;
    align-items: flex-end;
}

flex-end-1

As you may have noticed, we are modifying the layout by changing only one property, particularly the one which belongs to flex container.

Further modifications with flexbox can also be achieved by using properties for flex items.

For example, one of them is with flex-grow property, which defines what amount of the available space (inside the flex container) should the flex item occupy. All flex items have a default value of 0 and when we put value of 1 to each one of them, they will occupy the same amount of space in the container. If we put value of 2 to our 2nd item (leaving the other items with value of 1), it would take twice as much space as the others (if there is available space)

.container {
    display: flex;
}
 
.item1,
.item3 {
    flex-grow: 1;
}
 
.item2 {
    flex-grow: 2;
}

flex-grow-1

To put all together, based on the previous examples, we can conclude that flexbox properties are divided in the two main groups:

  1. Properties for the parent (flex container):
    • display
    • flex-direction
    • flex-wrap
    • flex-flow
    • justify-content
    • align-items
    • align-content
  2. Properties for the children (flex items):
    • order
    • flex-grow
    • flex-shrink
    • flex-basis
    • flex
    • align-self

It’s also useful to add that, since we are switching to using new flexbox layout, some properties that were created with the regular block layout in mind, won’t be applying here anymore (in this new context of flex layout). This means that:

  • float and clear do not create floating or clearance of flex item, and do not take it out-of-flow
  • vertical-align has no effect on a flex item
  • the ::first-line and ::first-letter pseudo-elements do not apply to flex containers, and flex containers do not contribute a first formatted line or first letter to their ancestors

Browser support

When getting started with new features in CSS, one of the first questions which comes to our mind is the one that concerns browser support. How do we stand here?

At the moment of writing this article, we can say that flexbox has reached a level in which all major browsers, in their latest versions, are supporting this functionality. Of course, as always, here we have a league of it’s own – the legacy browsers – or particularly, Internet Explorer. Although there are some known issues in the latest versions (which can be passed with certain workarounds), it’s pretty safe to say that if you’re lucky with having to maintain IE 10+, you’re good to go.

For supporting as much browsers as possible, like with most new CSS additions, flexbox requires us to add certain vendor prefixes. Fortunately, with modern frontend tools such as Autoprefixer – which automatically adds vendor prefixes to CSS rules that requires them (by using up-to-date values from caniuse.com), this is not a problem at all and you can easily forget about any cross-browser syntax differences.

So, how can we apply this set of tools on our websites? Let’s take a quick look at couple of short examples.

Reordering elements

The first is one of the most straight-forward examples of flexbox in action. Here we’re using the order property, which gives us the possibility to efficiently rearrange the whole layout, without the need for changing the HTML markup.

On the following image (screenshots are taken from Magento’s demo site), we are looking at small ‘promos’ list consisting of 3 items. On the smaller screens the list items are stacked in column, on top of each other, and on the larger screens, they are layed out in a row.

flex-order-marked-1

In some situations (e.g., when developing responsive websites) we might want to change the order of their appearance and we can easily do this just by setting the order property on the container’s child elements (flex-items).

Let’s say that we want to keep the default order of items on desktop, but on mobile screens we want to put the 1st item on bottom of the container. A default value for order property of all flex items is 0, so we’ll just need to give a value of 1 to the 1st item and, since it will now have a highest value, it will go down to the bottom.

ul.promos {
    display: flex;
}
 
ul.promos > li:first-child {
    order: 1;
}
 
@media (min-width: 768px) {
    ul.promos > li:first-child {
        order: 0;
    }
}

flex-order-marked-2

Sticky footer

The common problems when building a layout is a situation in which the page’s content is shorter than the height of the browser so we end up with the footer that sits up in the middle of the page (instead of at the bottom, where we want it to be).

Since this is a very old issue in front end development, there are lot of different existing solutions for this problem. Flexbox solves it in a simplest possible way.

We have made a search on Magento demo site with intention to get a ‘no-result’ search page in return. In the screenshot below, you can see that the main content area (main-container) has very small amount of content, and therefore the footer is pulled up.

sticky-footer-marked-1

To set things up, we need to take two steps.

First, as always when initializing flexbox, we’ll set up flex container (in this case on our page container) with flex-direction set to column and also declare min-height of 100vh, which will set our page container’s height to be the same as the height of the window.

For the second, and last step, we’ll put to our main-container value of flex property to 1. This will tell browser to expand our content area as needed (not depending on our lack of content).

.page {
    display: flex;
    flex-direction: column;
    min-height: 100vh;
}
 
.main-container {
    flex: 1;
}

So, when we apply our code, we’ll see that footer gets sticked to the bottom of the page regardless of the amount of content on the page.

sticky-footer-marked-2

Equal height columns

Third example gives us an insight in a way that flexbox handles the column/box height.

We’re going to take a look at Magento product listing page, where each listed product has different content, with different height.

flex-equal-height-marked-1

Here we want to make each product box in one row the same height (each box will have the height of the highest box) and also get price box stacked to the bottom of the box.

To achieve this with the help of flexbox, this is what we need to do:

ul.products-grid {
    display: flex;
    flex-wrap: wrap;
}
 
ul.products-grid > li.item {
    display: flex;
    flex-direction: column;
}
 
.price-box {
    margin-top: auto;
}

With flexbox, equal height columns come out-of-the-box. To make it work, all it takes is to put display: flex on the container and all of its children (flex-items) will automatically stretch to the height of the parent element. We’ve also added flex-wrap: wrap onto the container to enable the list items to wrap into the multiple rows.

To fully stretch the content inside of the box (flex-item), we’ll also have to turn them into a flex container (with display: flex) and lay its content into the column (flex-direction: column).

For the last part, since we wanted the price box to be at the bottom of the box, we’ve added margin-top: auto to this element;

In the end, it gave a more organized look to our product list.

flex-equal-height-marked-2

Conclusion

This was just a basic overview and there is a lot more to cover. But, I hope it will be a good jump-start into the more advanced use of flexbox’s set of tools. Like with learning each new skill, it takes some time and practice to become a master, but eventually, you’ll get comfortable with it. There is a broad range of possibilities and I’m sure that you’ll also find some other flexbox use cases applicable for your website.


The post Getting started with CSS Flexbox appeared first on Inchoo.

Free your cart, and the speed will follow

$
0
0

What if I told you that you can significantly improve the most important performance metric on your Magento site with a few clicks in the admin interface?

This sounds like a bad commercial…” you would surely mumble under your breath (but you would keep reading, because, that’s why bad commercials still exist). And, you would be (partly) correct. Just like in a bad commercial, the initial claim suffers from some ifs and buts. However, there actually is such low hanging fruit in the gardens of Magento performance. Let me take you there.

The ifs and the buts

What is “the most important performance metric on a website”? TTFB (Time To First Byte).
Why? In short, because before the first byte of the requested page arrives, nothing at all happens in the browser. It’s just idle wait time, and users hate that. For the site to (at least) feel fast, it is very important to get that first byte from server to browser as quickly as possible.
What exactly is so slow and can be easily turned off? MAP (Minimum Advertised Price) [http://docs.magento.com/m1/ce/user_guide/catalog/product-price-minimum-advertised.html].
But? It shouldn’t be turned off if you are actually using it.
And, it only matters if the user has something in cart.

Still…

Most sites aren’t using MAP, so chances are you can turn it off. Users often do have something in cart, and you don’t want to irritate them with slowness at that moment. Minicart is usually shown on every page of a Magento site. So, if you can use this optimization, it will really give you the promised significant performance improvements on every page load.

So, what happens that slows the website down?

This little bugger is difficult to cache:

minicart

Magento needs to render it for every user, and when rendering, it needs to call a method named canApplyMsrp for every product in it. And that method is quite slow. However, if you turn off MAP, it is short-circuited, and has no effect on performance, as is shown in the following table:

MAP (0 items in cart) MAP (2 items in cart) MAP (5 items in cart) MAP turned off
Real Project ~350 ~550 ~850 ~350
Vanilla RWD ~150 ~400 ~700 ~150

Numbers are milliseconds to first byte on homepage. As can be seen, MAP has no effect when nothing is in cart, but, progressively slows down page rendering when items are added to cart. And, if you turn off MAP, the rendering time, no matter how many items in cart, is the same as if there is nothing in it.

How to turn it off?

Make sure you don’t need MAP feature first!

 System / Config / Sales / Minimum Advertised Price / Enable MAP -> No.
 Save Config.

There. Enjoy!

The post Free your cart, and the speed will follow appeared first on Inchoo.

Development and design under the same roof

$
0
0

Building a web shop on Magento is challenging. When you see a feature that looks “so simple that you could do it”, it was usually not as simple to build it as you think. To create that “simple” thing designer had to spend a great amount of time finding the right solution. After all, creating a feature which draws on that kind of comment means translating something very unorganized and complex to something simple and understandable. On the other hand, developer had to spend a lot of hours translating that solution into code. Designer and developer can find that beautiful solution by communicating, which is crucial in this case. And that kind of communication, the one which yields incredible and neat results, would be much harder if a designer and developer are not placed in the same location.

It is all about communication..

When designing a web shop, designers always want to create the best user experience that will be followed by a beautiful user interface. The idea sounds so simple but the whole beauty of it is that it is not. It takes a lot of research, planning, sketching, trying multiple solutions and in the end – checking if that desired layout and functionality is possible within Magento.

In most cases, it is possible. But, think about the following things as well: is it worth the time, the money, possible performance issues, messy code…? If we give up on that functionality, what is the adequate replacement that will leave both sides satisfied?

That is the moment when “face to face” working meetings make the process easier for both designers and developers and where magic of direct communication comes in handy.

By brainstorming we can find the best solution which will give great user experience without leaving out the great performance.

The importance of that regular communication is the most visible in the wireframe phase when most of the features, website’s structure and informational architecture are being arranged. Since I already wrote about process of designing a Magento web store, I will now explain how important it is to work together, both designer and developer, and why one of the key factors is working on the same location.

Wireframe and design phase

It is crucial for a designer to translate to a developer what is the main idea and a desired outcome. Designer will brief him on the conclusion of the conducted research, importance of the planned features and explain, “face to face“, with help of wireframes and animation, what should the final version look like.

In the first phase of the project, when wireframes are given to developers, dialog about features and transitions (and many other tiny details) happens. On the other hand, if they are designed in an independent design company and simply given to frontend developers, they can have trouble understanding the designer’s idea and why is something designed as it is.

Designer and developer go through every feature on every page for desktop, tablet and mobile resolutions and search for any possible issues that could happen while translating design into code. It is not enough just to email the prototype approved by a client and say “Here you go!” because it is never possible to translate everything in the prototypes. Few emails with notes can’t replace real conversation. In some cases, explanations and conversation in person are necessary to give developers the right course and keep them on track. Walking them through the design in person and explaining how it should work makes the process easier, neater and faster.

That is the moment when developer would ask questions that designer maybe oversaw and write down notes that could be useful while working. Because, in the end, we all have to be sure that something that is suggested to the client is doable.

Because of all that, first people that see wireframes are always front end and back end developers – even before the clients. Wireframes must be first approved by a front end developer who checks the “We can translate that into code!” box, then by the client, and after that it is time for the design phase.

While slicing the design some problems can occur. Something after all creates a problem and we have to create different approach and redesign it. No problem – designer immediately jumps on that and together with the front end developer finds the solution.

Final phase

Importance of being on the same location doesn’t reduce even after handing the final designs to developers. After developers are done with their work it is time for designer to take a look to make sure that everything is in place.

That is the part where all smallest details are arranged, the smallest issues were found and working side by side is crucial. Conversations about tiniest details and sometimes showing physically what should be moved where is something that couldn’t be arranged if the designer and developer are not on the same location.

That collaboration makes building a web shop as efficient as possible and being able to consult with other team members in person can save thousands of dollars and hours of redundant back and forth messaging.


The post Development and design under the same roof appeared first on Inchoo.

Is your website being hammered by Facebook and what liger has to do with it?

$
0
0

Do you or your client have a popular Facebook fanpage?! If so – this article might be interesting to you, but first – let’s start with definition of “hammering”, although the term is not unknown to webmasters…

define: hammering:

  • gerund or present participle: hammering
    hit or beat (something) repeatedly with a hammer or similar object.
  • strike or knock at or on something violently with one’s hand or with a hammer or other object.
  • work hard and persistently
    “they must hammer away at these twin themes day after day”
  • inculcate something forcefully or repeatedly.

Hard and persistently.

What’s website hammering and how to spot it?

Website hammering, originally derived from (“hard and persistent”) process of trying to connect to FTP servers in short period of time, nowadays includes all sorts of services, and can cause all sorts of availability and performance issues. In this particular case, it would be getting “hard and persistent” page requests.

Do you check your web logs from time to time?! I know, none us do as often as we should, as browsing through them can be a mix of painful experience and eye-bleeding match-a-pattern game.

In one of those “games” I noticed something interesting – web server was receiving loads and loads [at least a half a dozen per second] of page hits for a recently shared URL on a Facebook fanpage. “Oh, this traffic must be looking nice in Google Analytics real-time report” – I thought and logged into GA just to find out nothing but usual – regular traffic of a pageview each second or a few seconds…

After 24 hours of waiting on Google Analytics to consolidate data for previous day, few URLs shared previous on Facebook were examined and data in Apache website logs were compared to Google Analytics pageview reports. Discrepancy in pageviews for specific URLS between website Apache logs and GA was remarkable, to say the least:

For each shared URL data discrepancy was similar to this example:
~ 10K page GET requests for a page in Apache access logs
~ 3K pageviews in Google Analytics

At this point I thought that for some reason:

  • bots/crawlers have gone on a rampage
  • website might have been under some kind of [not so efficient] DDoS attack
  • Google Tag Manager (GTM) or GA codes were not fired properly

Testing hypotheses

Testing for “bots/crawlers” was fairly easy – a chunk of access log file [with request to a specific page] was submitted to an online log analyzer – LogCruncher. Crunched numbers disapproved hypothesis about bots/crawlers as 95% of all requests had different IP, and all those IPs were from ISP pools for standard users. So, the sources of traffic were regular users and their devices.

A deeper inspection of traffic was required. No patterns in missing traffic in Google Analytics could be found – all device categories, all manufacturers, all OSs, all browsers – they all had their share in Google Analytics, but still, a huge portion of traffic was missing. There must be a pattern, but it’s impossible to find it in Google Analytics.


Google Analytics Browser pivot by versions


For further Apache logs inspection and I used GoAccess – nice little Linux utility that does just what I needed – groups requests by various dimensions – this might help me in finding the pattern.

GoAccess OS overview

GoAccess: OS version distribution


And it did help… most of the requests were from Android, and since there were more requests from Android than there were missing pageviews – it was a strong indicator in which direction further analysis should go. From that point the rest was relatively easy – observed traffic was reduced to Android traffic only, and the next two hints were spotted right on.

These two hints also eliminated DDoS, since surge in page loads corresponded with link being shared on Facebook.

Facebook m.facebook.com as referal


One would say – that’s it
Facebook in-app browser blocks GTM or GA from firing.  A bold statement that needs strong arguments, which translates in more hypotheses to test. 🙂

A few quick tests were done – and  it proved that FB in-app requests were tracked as usual – GTM and GA fired as usual, _ga cookie was set and used. Could it be that GTM/GA in FB in-app are blocked just on some devices, while firing regularly on others?!

So I did two tests for this thesis using measurement protocol [did it by the book, using _ga cookie if available, etc.]:

  1. created measurement protocol [MP] hit [using image] and put it in NOSCRIPT on the page
    • this one would catch those that have JS disabled
    • MP was fired using specific data source parameter
  2. created measurement protocol [MP] hit [using image] and fired using JS if there were no GTM and GA objects on the page
    • this one would catch those that have JS enabled, but have GTM/GA blocked using adblocker/router etc.
    • MP was fired using specific data source parameter
  3. benchmark image: created measurement protocol [MP] hit on a different GA property, and fire it using plain image placed somewhere in BODY
    • this hit would be used as benchmark – since it would fire as image tag on every page view in client’s browser, it should collect regular + NOSCRIPT + GTM/GA blocking requests [except for those who block image loads]
  4. benchmark server-side call: created measurement protocol [MP] hit on a different GA property, and fire it during page generation on the server [complete server-side hit, does not depend on web client]
    • this hit would be used as absolute benchmark – if there’s a GET request – it would be executed (in case there are no issues with network traffic ;-))


Theoretically, this would would cover all possible cases, and after the test I would create custom reports based on
data source parameter and would look for patterns. The cases are:

  • GTM/GA are executed as usual
  • JS is blocked [GTM/GA are not executed], but MP is fired instead (via image)
  • GTM/GA are blocked, but since JS is enabled – it will create MP image if GTM/GA are not initialized
  • benchmark MP image is fired and should have ALL page views and match Apache logs 100% [since MP call is server side and does not depend on
  • server-side benchmark is fired on every GET request for a page

The Results

I thought that I will finally get ~100% match between Apache logs and GA. The result?!

Almost no increase! A slight, ~5% increase in number of pageviews in GA, so instead 10K vs. 3K, it was 10K vs. 3.5K – probably due to collecting those who block GTM/GA (well, I finally got GTM/GA blocking rate for the site ;-)).

Benchmark image MP hit should be 10K, right?! Well – benchmark image  GA property was showing 3.5K pageviews. That meant that FB in-app did not send request for a regular image on a page!

Benchmark server-side MP:  the only benchmark that was ~100% match with Apache logs was server-side MP call that was put in the main app code. No surprises here.

So, at this point I had these pieces of a puzzle::

  • HTTP referer: “http://m.facebook.com
  • User-Agent has: FB_IAB/FB4A;FBAV (Facebook in-app browser for Android)
  • GTM/GA are not loaded
  • regular images are not loaded – FB in-app requests only for HTML page

More questions, until…

So, a large portion of traffic was still missing, and I was stuck – there were no more information from the Apache log files that could be squeezed out, and I could not recreate situation where my traffic in Facebook in-app would be logged in Apache, but not in GA.

I did not know whether this traffic is valid or not, should I block it or not, and blocking by User-Agent  signature would have a large number of false-positives (this would block regular traffic as well).  

Test traffic on devices I made had the same HTTP referer and User-Agents had the same pattern [FB_IAB/FB4A;FBAV], but that traffic was tracked and visible in Google Analytics. I was not able to recreate something that was happening to ⅔ of visitors, no matter on how many devices I tested Facebook app.

There was just one more thing to inspect – HTTP request headers. Made a little HTTP header request logging routine, and started collecting HTTP headers. And … bingo!

[stripped out not so important parts of the HTTP request]
X-Purpose: preview
x-fb-sim-hni: xxyyy
x-fb-net-hni: xxyyy
Cache-Control: no-cache
referer: http://m.facebook.com/
cookie: _ga=GA1.2.xxxxxxxxx.yyyyyyyyy;
accept-encoding: gzip, deflate
x-fb-http-engine: Liger
Connection: keep-alive
  • x-fb-net-hni & x-fb-sim-hni – used for MCC+MNC (Mobile country code + Mobile network number – identifies country and provider)
  • x-fb-http-engine: Liger – this is the identifier of the engine, BUT, FB in-app does not send it every time! It is being sent only when X-Purpose is sent:
  • X-Purpose: preview – page prerender/prefetcher HTTP header

These are the pieces that were missing to properly identify missing requests in Google Analytics. Puzzle-pattern is now complete!

Conclusion

Facebook Android in-app sends SOME page requests with X-Purpose: preview header (and identifies as x-fb-http-engine: Liger), probably for prefetch/preview purposes [faster load for users]. Presumeably FB in-app has some internal algorithm (similar to Chrome’s prerender) that decides what will be preloaded and when. More on harnessing FB in-ap pressure and how browser’s prefetch/prerender can be used to speed up (Magento) sites will be covered in future articles – stay tuned! 

We all know that Magento CPU cycles come at a price, a hefty one. You should test on your own whether this FB in-app feature has implications on your web server performance and expenditure.

Are you affected?

How to test it on your site?! Here’s help for configuring Apache web server, something similar could be done with nginx as well.

  • edit main Apache config [search for LogFormat, and add new LogFormat]
    LogFormat "%h %l %u %t \"[%{x-fb-http-engine}i | %{X-Purpose}i]\" \"%r\" %>s %b \"%{Referer}i\" \"%{User-Agent}i\"" fbligerprev
  • edit virtual host config, search for CustomLog and just above that line add:
    SetEnvIf x-fb-http-engine "Liger" fbliger
    CustomLog /var/log/path-to-your-logs/access_log_fbliger fbligerprev env=fbliger

This will log all “Liger/preview” requests in a separate file which you can examine and make appropriate decisions on how you’ll be handling this type of traffic on your site.

Please, share your “liger rate” in the comments below. Thanks!

The log file /path/access_log_fbliger would look like:

image03

Interesting facts:

Fact #1: there was only one Google search result [googlewhack] for “x-fb-http-engine: Liger” at the time of writing this article + one AdWords ad 😉

Googlewhack

Fact #2: The liger is a hybrid cross between a male lion (Panthera leo) and a female tiger (Panthera tigris). The liger has parents in the same genus but of different species. [Wikipedia]

Is your site affected by this? Please, share your experience…


The post Is your website being hammered by Facebook and what liger has to do with it? appeared first on Inchoo.

Viewing all 263 articles
Browse latest View live